Contents
Install / Remove
Quick Start
Basic Operation
|
Cells, FX, Tools
|
Settings & Nav
More...
Help
|
Mixtikl from Intermorphic Ltd.
© 2008-2015 Intermorphic Ltd. All Rights Reserved. Rev: V6.3.1 A June 23 2015. E&OE.
iOS version: AudioCopy/AudioPaste by Retronyms
© 2008-2015 Intermorphic Ltd. All Rights Reserved. Rev: V6.3.1 A June 23 2015. E&OE.
iOS version: AudioCopy/AudioPaste by Retronyms
Mixtikl 6 - Generative Music & Loop Mixer
Mixtikl is quite possibly the most powerful generative music mixer there is.
It features an underlying 12 track mixer / cell sequencer / arranger / performer with 4 central content cells per track. It comes with over 380 generative music templates, and there are a number of downloadable free audio loop Tiklpaks. You can also use your own loops in it, and import generative music you have made with Noatikl.
Mixtikl's generative music content is composed by the integral Noatikl (MIDI) Music Engine (NME).
The sounds Mixtikl makes are generated either by the flexible and integral Partikl Sound Engine (PSE) and/or by audio & MIDI loops / recordings you put into it. You can also use Mixtikl Mobile to drive external MIDI software or hardware synths, FX units and samplers (iOS).
Don't forget to check out the 30 second videos!
Mixtikl is available for the following:
At the bottom right of most screens is a "?" for online help. Simply tap on it to go to the relevant page in this online Mixtikl User Guide or the PSE Guide. As Mixtikl is such a deep tool, this helps make it easier to find out about the operation of a particular screen or control.
Tip: If you just want to get started with the minimum of fuss & figure stuff out as you go, then check out the Quick Start tutorials.
Mixtikl for iOS / Android and Mixtikl Desktop Standalone for Mac OS X are installed via the respective app stores as part of the download process.
The 30 day trial full versions of Mixtikl for Windows can be downloaded here. They are installed and have Product Keys entered as below.
Installing Mixtikl Desktop Software Downloaded from IM Website:
- Tip: You cannot install a 32-bit version on a 64-bit OS or vice versa. Get the right version for your OS.
- The zip files you can download are called
mixtikl_win64_standalone_setup.zip / mixtikl_win32_standalone_setup.zip or mixtikl_win64_plugin_setup.zip / mixtikl_win32_plugin_setup.zip.
- Unzipping the relevant one for your OS will extract the file e.g.
mixtikl_win64_standalone_setup.exe or mixtikl_win64_plugin_setup.exe
- Run to install the relevant 64-bit or 32-bit versions of :
- If you want to use the Mixtikl VSTi, you might need to tell your Sequencer program to scan the appropriate folder for the Mixtikl VSTi, as above.
- Note: Earlier versions of the installer used to install on 64-bit Windows a 32-bit plugin to
c:\Program Files (x86)\VstPlugIns, but this is no longer supported.
Mixtikl Desktop Audio Plugins for Mac:
- The downloaded zip file is called
mixtikl_plugin_vst_mac_dmg.zip or mixtikl_plugin_au_mac_dmg.zip
- Unzipping it will extract the file
Intermorphic - Mixtikl Plugin VST.dmg or Intermorphic - Mixtikl Plugin AU.dmg
- Run this to extract the
Mixtikl_Plugin_VST.pkg or Mixtikl_Plugin_AU.pkg installer
- Run that to install the revelant 64-bit plugin:
mixtikl_VSTi_mac.vst (VSTi plugin) installed to
mixtikl_AU_mac.component (AU plugin) installed to
Mixtikl Desktop Standalone & Desktop Audio Plugins for Windows are made available via our website as 30 day trial versions. To continue to use them after the 30 day evaluation period requires that you purchase the revelant licence(s) from the Intermorphic webstore. Following your purchase you will be sent an Order Confirmation email that contains your Order ID, Customer ID (the email you used for purchase) and Product Key, or in some cases just a Product Key.
Note: The Product Key for the Mixtikl Desktop Audio Plugin is different to the one for the Mixtikl Desktop Standalone version, therefore you must enter your Product Key into the same product that you have licenced or it will not be accepted. For example, you must enter the Mixtikl Desktop Audio Plugin licence key into the Mixtikl Desktop Audio Plugin. To enter your Desktop Audio Plugin product key, launch the Plugin from your Windows Desktop Audio Workstation (DAW) or Sequencer that is a VST host (e.g. Sonar, Reaper, Ableton, Cubase etc) and then follow the instructions below.
As you are entering your Product Key into a plugin on a Windows PC, then you might need to ensure that you are running the host software (e.g. Reaper 3) "as Administrator" in order to get the product key to stick.
Entering the Product Key
- Open your Order Confirmation email
- Launch Mixtikl:
- Mixtikl Desktop Standalone is launched as you would launch any standalone software.
- Mixtikl Desktop Audio Plugin must be launched via the VST host you are using it in.
- Open the pop up Product Key dialog:
- Mixtikl Desktop Standalone: From the application title bar menu select Help > Mixtikl Product Key
- Mixtikl Desktop Plugins: from the app Main Menu select the "Store" button.
- Copy the relevant information from your Order Confirmation email (i.e. Customer ID, Order ID and Product Key or where only Product Key is provided, then just that) and paste into the relevant fields. All information must be the same as that in your Order Confirmation email. If you have problems, see this FAQ entry.
As of Mixtikl 6.3.1 the Audio Unit plugin no longer requires a Product Key, but instead a Mac App Store purchased and installed version of Mixtikl 6.3+.
IMPORTANT: If you purchased a Mixtikl Plugin Licence from the Intermorphic Store but have NOT ALSO purchased Mixtikl at the Mac App Store (and have a Mixtikl 6.3+ version installed), then in order to activate the Mixtikl Audio Unit Plugin you must FIRST ensure you have successfully enter your Product Key into a previous version of the Audio Unit Plugin. To check your license status for the Mixtikl Audio Unit Plugin: Press the Store button in the plugins' Menu.
Garage Band 10 users: See the following - How do I use Audio Unit plugins?
- The downloaded zip file is called
mixtikl_AU_mac.component.zip.
- Unzipping it will extract the file
mixtikl_AU_mac.component
- Copy or move this file to:
Configuring your Mac so that Mixtikl can route its MIDI data
View the Noatikl video tutorials and follow similar steps:
- Enable your IAC driver
- Click on the blue magnifying class (spotlight) icon on the top right of your Mac screen
- Type "audio midi setup"
- Click on the Audio MIDI Setup entry you will see listed under applications. This will run the audio midi setup application. Note: more advanced Mac users could use Finder to run this application directly, you will find it under Applications / Utilities Audio MIDI Setup
- Click on MIDI Devices tab
- Click on IAC Driver
- Click on Show Info icon
- Ensure that "Device is online" is ticked, and press Apply
- We strongly recommend that you download and use the excellent MidiPipe by SubtleSoft, which you can get from http://www.apple.com/downloads/macosx/audio/midipipe.html ... a very useful piece of software, which most of our Mac tutorials rely on! Please also refer to the Noatikl video tutorial - "creating your first piece on Mac" which will get you going with MidiPipe in 1 minute.
Sequencer-specific Plug-in notes
Launching Mixtikl
- iPhone / iPad / iPod touch:
- Tap the Mixtikl app icon in the App screen.
Once launched, the load screen will display for a few seconds as Mixtikl loads up and show status updates such as "Loading skin" "version number " and "Loading content". Once Mixtikl has loaded the load screen will disappear.
Backing up:
However you use our IM Apps, we strongly recommend you regularly and suitably back up your "Suitable Content" (see below) to somewhere safe: you don't want to lose it!
- IM Apps on Mobile Device: If you have a Mac/Windows PC we strongly recommend you use it to regularly and separately back up your Mobile Device "Suitable Content" (see below) to an "Intermorphic Folder" (see below) on that Mac/Windows PC. You should certainly do this BEFORE you remove an IM App from your device or you will lose your files!
- iOS specific note: Although making an iTunes backup of your device will back up all your installed apps AND their data (see: http://support.apple.com/kb/ht4946), if you remove and then reinstall an app, its DATA is not restored: the only way to get back that app's data is to do a device restore from a backup (See: http://support.apple.com/kb/HT1766) - but that also then OVERWRITES ALL device app data with whatever was in the backup. If you want or need to go that route, see this FAQ entry.
IM Apps
Details in this section apply to Noatikl or Mixtikl ("IM Apps"), as relevant.
Suitable Content:
Noatikl [NT2.5+]
- Tiklpak/Pak, .noatikl, .partikl, .fxm, .tg, .DLS, .SF2
Mixtikl [MT6+]
- Tiklpak/Pak, .WAV, .Ogg, .MIDI, .mixtikl, .noatikl, .partikl, .fxm, .tg, .DLS, .SF2
Mac / PC - Intermorphic Folder:
Noatikl 2.3+ and Mixtikl 6 (OS X/Windows)
Our Desktop IM Apps save to a specific folder and look for content in that folder. This is to allow Suitable Content (above) to be shared/used between both mobile and desktop versions of those apps. We call this folder the "Intermorphic Folder". It is a *flat folder* (where tilde [~] or %HOMEPATH% in the pathname is a shortcut for your user account name), and is found here:
~/Music/Intermorphic/ (Mac)%HOMEPATH%\Music\Intermorphic (Windows)-
- Tip: If you are not sure where to find the Intermorphic Folder, use a Desktop IM App and try saving a .mixtikl or .noatikl file and then take a look to see what folder it appears in - that is the folder you’re looking for!
- If you want to use your own content in IM Apps, or want to move Suitable Content from an earlier version of Mixtikl or Noatikl, simply move it to the above *flat* folder(s).
- IMPORTANT: A flat folder means that *all content* must be at the top level of that folder. It must not be in a subdirectory under it or it will not be found. So, for example, the free Tiklpak AL Collections 1-3 zip file would just go here, alongside any mix files you might have saved or indeed any other content e.g.:
~/Music/Intermorphic/IMTPALLoopEssentials1.zip
Copy: iOS <-> Mac / PC:
Noatikl 2.3+ and Mixtikl 6 (iOS)
Refer to Apple's docs on iTunes Apps File Sharing, as this is the latest information from them on how to do this.
- Tip: You may need to restart the IM App for it to be able to find any new content copied in.
- Tip: You can also email yourself mixes and recordings, and then import from those, but that is something that has to be done one file at a time.
- Note: All Suitable Content is shown in the root directory in the right hand side list. Ignore folders called "CompatibleAppsCache" and "intermorphic".
- Note: Click the following links for information related to Noatikl 2.3 (or earlier) Desktop (OS X/Windows) or Mixtikl 5 Desktop (OS X/Windows).
Copy: Android <-> Mac / PC:
Mixtikl 6 (Android)
- Connect your Android device to your PC or Mac. It will appear in Explorer or Finder as a USB device.
- With Explorer or Finder look for a top level folder on the device or SD card called "Intermorphic" (i.e. NOT /Music/Intermorphic/).
- Copy your Suitable Content (see above) to/from this folder. If you want to access the same mixes and recordings in Mixtikl for Desktop, put them in the Intermorphic Folder (see above) on your Mac/Windows PC.
- Tip: You may need to restart Mixtikl for it to be able to find any new content copied in.
- TipYou can delete files on your Android device using Menu > Tidy, or by deleting them via Explorer or Finder.
- Note: Click the following link for information related to Mixtikl 5 (Android).
Note: If you want to remove Noatikl so you can reinstall an older version, see the instructions here.
iPhone / iPad / iPod touch:
- In the App screen tap and hold the Mixtikl application icon, and then press the jiggling black cross in the left corner of it.
Android:
- In the App screen tap and hold the Mixtikl application icon, and then from the pop up menu select "Remove from Device".
PC:
Mac:
- With Finder, locate the following folders:
-
Hard Disk/Applications
- Drag
Mixtikl to the Trash
-
Hard Disk/Library/Audio/Plug-Ins/Components
- Drag
mixtikl_AU_mac.component to the Trash
-
Hard Disk/Library/Audio/Plug-Ins/VST
- Drag
mixtikl_VSTi_mac.vst to the Trash
These quick tutorials are to get you doing some very basic things with minimum fuss. Mixtikl is a very deep app and quick tutorials are no substitute for further investigation - they are just to get you started! To that end, in most steps we link to further information where you can go on to read and learn more about various screens and what they are for.
Tip: Have a quick look, also, at the 30 second intro videos at the top of this page!
- Launch Mixtikl
-
- From the list of mixes shown, select one of the demos, e.g. Example-GenMix1-A and it will load in the Mixer screen (the most important screen in Mixtikl as this is where you control your mix).
-
 Play/Stop
: Tap to play or stop the mix
-
 Content Cells (Cols 3-6)
: Tap any content cell to display the
Content Cell Menu (the second most important screen in Mixtikl as it is the starting point for adding or modifying content).
-
 Content
 : Tap the Content button to display the
Content List
- From the Content List, tap the right side "speaker" button to preview the content item or tap left side to select it, have it replace any content item already selected and return to the mix; or, tap the top left Cancel button just to return to the mix without any changes being made.
- That's it - easier than you might at first think!
- Launch Mixtikl
-
- Tap the right side of a Pak in the Tiklpak List to select which Pak (e.g. GenMix1) you want to be the basis of your random mix (you can still mix in content from other paks though).
-
 Settings
: Tap this if you wish to change any of the randomisation settings before you create your new Random Mix.
-
 Random
: Now tap this to create your random mix which you will then see in the
Mixer screen.
-
 FX Cells (Col 8)
: These are cells in the far right column (Track FX) or top of that column (Global FX)
- Tap an FX cell that is empty: You will see the FX Preset List (which you see if you tap the Preset button in the FX Menu). Tap the FX Preset you want to have it added and you are returned to the mix.
- Tap an FX cell with FX unit: You will see the FX Menu. Tap the Preset button to see the FX Presets. Tap the FX Preset you want to have it added and you are returned to the mix.
-
 Menu
Menu >
 Save
Save: Type in the name you want and tap return. Were you to now go Menu > Open you would see your saved mix at the top, in black (demo files show in blue).
- Launch Mixtikl
-
- Volume/Pan: In the Mixer screen tap one of the far left cells (Col 1) in a track and then move the bottom pop up knob. To toggle between changing volume (black bar) and pan (grey bar), tap the TOP cell in that column.
- Mute/Solo: Similar to Volume/Pan, tap the cell in column 2 of the Mixer screen to Mute or Solo a track. To toggle between Mute or Solo, tap the TOP cell in that column.
- Track Rules: You will notice that track 5 starts with a blank cell, and then has 3 populated cells. In column 7 there is a > symbol. This means the track is of type "Sequence". When it has that type, once a cell plays for as many times as you have set in the Content Cell (Gen Bars/Rng; Cell Repeat/Rng), play moves to the next cell. If you tap/hold one of the content cells it starts to play and the bar at the top turns orange to signify it is now looping. It will stay playing until you tap/hold it again to remove the looping behaviour. If you change the track type to Looping (tap the track type cell to toggle through all the types; Looping is just a loop symbol) it means cells in that track no longer sequence - they will only play if forced to play (loop). This is mainly for performance possibilities. See Track Rules for more information.
-
 Menu
Menu >
 Export
: Then choose how you want to export it. Select "mixtikl" via Mail attachment to mail it to yourself!
The Mixer Screen is where most of the action happens in Mixtikl. It is where you set up your mix so this is where you need to start.
Tracks: There are 12 tracks and each track contains 4 Content Cells. Tracks can be muted/soloed, have their volume and pan changed and have FX applied. A Track's Content Cells have one of 4 different track selectable behaviours: A) "Sequence" - each content cell plays its content through once and play moves to the next content cell in the track, B) "Looping": a content cell plays/loops forever, C) "Spot": a content cell plays once but only when "triggered" to play, and D) "Tap": when in the Visualizer and the screen is tapped notes are played using the sound generator in the selected Tap Cell.
Content Cells: A track can play only one Content Cell at at a time, whether it has content in it (a generative "part" or loop) or it is silent or empty. A part's sounds, FX, root, pitch offset and rules can be customised on a per cell basis.
Cell Highlight: An orange surround indicates the cell in any screen that has current focus. A red surround means the cell is sticky (see Tools). Tip: in the Desktop versions the cell position can be selected by keyboard arrows (see Navigation).
Top Display Area
-
 Menu
Menu
-
 Visualiser
-
 Time, Name, Tips
-
 Vis Settings
Top Toolbar
Contains the main button shortcuts, as follows:
-
 Track Vol/Pan Display Toggle
-
 Mute/Solo
-
 Play/Stop
-
 Mix Record
-
 Mix Tempo, Pitch & Rules Button
-
 Microphone Recording
-
 EQ
EQ
-
 Global FX
Tracks
There are 12 tracks each with 8 cells; the four central cells (in between the two dark vertical lines) are the "content cells" via which content is added to the mix.
-

 Vol / Pan (Col 1)
Depending on the track vol / pan toggle setting in the Top Toolbar, tap and then drag the cell or drag the bottom pop up slider, or select this cell and (on desktop) use the navkey left/right to decrease or increase the track volume (central indicator is black) or pan (central indicator is grey).
Release the slider or select another cell to lose the focus.
-


 Solo / Mute / None (Col 2)
-
 Content Cells (Cols 3-6)
This area contains the "Content Cells", which is where you add in your content of a supported content type.
To add content to a cell, select it and select the Content List Button from the pop up Content Cell Menu, which is also where you find the controls to be able to customise your content (e.g. if generative content, then its sounds, FX used, scale and harmony rules, and generator parameters).
When a cell has content in it, you see the name of the content in the cell (skip and silent cells have their own identifiers).
Cells that show red mean that the content in that cell cannot be found. When you see this it is most likely because you have got a tweeted mixtikl and you do not have that content pak (Tiklpak) installed, whether an add-on loop pak or a user saved loop or mix/mic recording.
Black text in a cell indicates Audio and MIDI loop content and blue text in the cell indicates generative content.
Play Indicator: The golden dot at the top of the active content cell in the track is the "play indicator" (there is only ever one play indicator shown for each track as there can only be one active content cell in a track); for a cell with multibar content this moves within the cell every bar that is played, up to 4 bars, before starting over again. The play indicator in an empty cell which is always 1 bar in length, so it does not move within the cell.
For a "sequenced" track, the play indicator will move to the next content cell when the content has played through once.
Other Indicators:
- An orange bar at the top indicates a cell that has either been forced to loop and the content in that cell will continue to play until the looping is turned off (generally by tapping/holding the cell or via the Loop On/Off button), or it has been triggered (see Track Rule - One Shot).
- A blue bar at the top indicates a cell that contains generative content that has (effectively) infinite length and so will play for ever. A blue dot top left indicates a non-default Gen Bars setting.
- A black dot top right indicates and non-default Cell Repeat setting.
- Track Rules (Col 7):
Selecting the Track Rules cell will toggle the Track Rules between the 4 available states, below.
Cell Looping / Triggering: To toggle the loop state of any cell or trigger it (if Track Rule is Trigger), either tap/hold the cell for a few seconds or tap on it to load the Content Cell Menu and then select the loop button or trigger button respectively. If a cell is "looping" or "triggered", it will display an orange "cell loop indicator" at the top of the cell.
-
 Sequence
-
 Loop
Loop
-
 One Shot
- In desktop version, you can also trigger a cell by selecting it and pressing key 3.
-
 Tap
Tap
- You can set any number of tracks to be of Tap Cell type and so you can layer up sounds in different tracks, and they all get played when the screen is tapped. Tap cells otherwise behave like sequence cells and so will sequence unless locked: this lets you have some very interesting results in mix visualisation!
- When you select Tap Play > Auto in the Message / Visualizer Display Settings screen, ONLY track 12 will revert to a standard sequenced voice type so that it can play (and if you uncheck the setting the track reverts to a Tap Cell type).
-
 Track FX (Col 8)
Selecting this cell will launch the Track FX Menu from which you can select an FX Preset via the Preset button or create/edit (Mixtikl Full only) a FX Network (via Edit Network button) that you wish to apply to this track (FX is processor intensive, so use Track FX sparingly in your mix, unless on a PC!).
Bottom Toolbar
Contains the main button shortcuts, as follows:
-
 Online Videos
-

 Store / Recall
Press this button to store the solo/mute settings for all the tracks, and then clear them from the mix. Press again to apply the stored values.
-

 Mix Sections 1-4
Affects ONLY *non-looping* Sequence cells: Press a section button to force any non-looping sequenced cell in that column to play. Press any locked section again to release the lock. If no section is locked, then when a cell has played its content (once), the next cell in the track with play until it reaches the end of the track, when play moves to the first cell in the track, and so on.
-
 Clear
ClearPress to see the Clear Mix Content options.
-
 Tools
ToolsPress to launch the Tools List, where you will see a list of macros and other tools to help with your mix making.
Red Cell Highlight: This means that the tool you selected will be applied to any (releveant) cell you tap UNTIL you turn off "sticky" behaviour by tapping the Tools button again.
 Visualiser
The visualiser can be driven by any music that Mixtikl creates or plays, e.g. generative music as well as audio or MIDI loop beats and samples! It can also driven by the notes generated by tap-play and a mix can have a number of these "tap parts" which can even be different sounds on different tracks to create a multi-layering effect. Tap parts can be customised in many ways in Mixtikl, such as by changing the sound, the FX, the generative rules, the pitch and pitch range, the harmonisation etc.
Included text can also be displayed onscreen in a number of ways including: as a message (with "karaoke" style highlighting), in random order, revealing words one at a time, as random words chosen from an included word bank, with floating words and even as a jumbled up message.
Note: If you don't hear any notes being played when you tap the screen it is either because no tap-part has been included, or the tap-part is not configured correctly.
Visualiser controls

- Tap: Menu
- Tap/hold: New random mix (if running Mixtikl on a mobile device, also shake the device for the same)

- Middle area
- Tap: play a note, where up/down is pitch axis; left/right is pan
- Tap/hold: Sometimes it can change the pitch of a note by a semitone or 2
This is where you open a previously saved mix. Mixes you have saved are coloured black, and mixes included with any Tiklpaks you may have installed are shown in blue and at the bottom of the list. Do check out the demo mixes, as they are a great place to start!
Note: You cannot rename Mix files, and if you want to change the name, simply save the mix again with the name you want and then delete the original.
Tip: You can delete Mix files you have save via the Tidy screen, or as below:
- +<OPTIONS>
- Select to show the options. When
<HIDE OPTIONS>
shown, select to hide the options.
-
-[DELETE MIX]
- Select this and then, from the list that displays, select the item you want to delete. Select Cancel to close the list.
- Note: You cannot delete the demo mix files.
- List of mix files, black ones are the ones you have saved
The New Mix screen is a very powerful screen in Mixtikl as it lets you create random new mixes in ways that can let you come up with new ideas fast. It comes with some default settings, but once you are familiar with Mixtikl you may way like to try customising the settings to suit your working preferences.
 Random
The Random Button lets you create a random mix for the Paks you have checked in the Pak list, according to the various randomisation settings and options (See Settings). Content cells, Track volume/pans, GenBars/Range, and CellRepeats/Range are all randomised within ranges you can set.
- From the Tiklpak list check all the Tiklpaks you want content to be selected from (tap on the checkbox to select/deselect).
- Tap right side of the Tiklpak list to select/highlight the Tiklpak you want to be the underlying base pak for your random mix, e.g. GenMix 1.
- If, before you create your random mix, you wish to change some of the randomisation settings, then select the Settings button and make your changes.
- Select the Random button and you will be presented with the Mixer Screen and a new randomised mix.
 Empty
Empty
The Empty Button is the simplest of all the options and selecting it allows you to create a new, empty mix based on the Tiklpak you choose.
- Tap right side of the Tiklpak list to select/highlight the Tiklpak you want to be the underlying base pak.
- Select the Empty button and you will be presented with the Mixer Screen and a new empty mix.
 From Mix
The From Mix Button lets you create a random mix based on a pre-existing mix.
- Select the From Mix button to display the Mix File List.
- Select the mix you want your new mix to be based on.
- You will be presented with the Mixer Screen and a new randomised mix based on the mix you selected.
Note: There are two alternatives, as follows:
- When the "Use Mix Cells Only" check box is checked (see Randomisation Settings) only content cells that already include content will be randomised according to the randomisation rules.
- When the "Use Mix Cells Only" check box is unchecked (Randomisation Settings) any content cell can be randomised according to the randomisation rules.
 Show Paks
The Show Paks checkboxes at the bottom of the New Mix screen will filter what Tiklpaks you will see in the Pak list. Using these filters makes it easy to only select from certain kinds of Paks (or by deselecting the checkbox to clear those selections). For example, if you do not want to see/use any content from Loops paks (e.g. Audio Loops Tiklpaks), then make sure the Loops box is unchecked (default setting).
- Gen: Shows/lists Tiklpaks that contain generative content (default on).
- Loops:
Shows/lists Tiklpaks that contain audio or MIDI loop content (default off).
- Default Pak Selection (small button with "flash" on it): Applies the Mixtikl default selection of paks which is most likely to give you the best random mixes.
- Use Content Filter: Filters out content from all the embedded Paks so that only the best is available for selection when you create random mixes (all content is still available from the Content button accessed via the Content Cell). If you deselect this checkbox then all content from all the paks you have selected can be chosen for random mixes (default on).
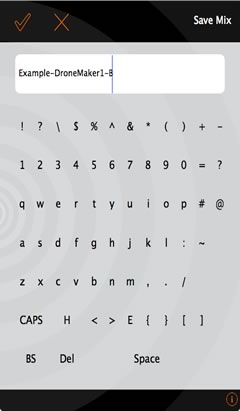
Save Mix Screen (Desktop)
The first thing you need to do is to save your new mix! When saving files, renaming mixes etc. in Mixtikl, you will be presented with the Text Entry screen.
- On iOS / Android devices we use the native text entry mechanism which is a pop up keyboard (not shown here). Once you have entered your mix name with the pop up keyboard, press the keyboard's "Return" button and your mix will be saved.
- On Mac/PC, where we are unable to provide access to the native text entry abilities of a mobile device, we display a different screen (shown above):
- Desktop: Select the text field and enter text with your keyboard.
- Select the top left OK (tick) button to accept your changes, otherwise select the Cancel button.
- The "H" on the one from bottom row is "Home"
- The "E" on the one from bottom row is "End"
- The "BS" on the bottom row is "Backspace"
- The "D" on the bottom row is "Delete"
Where Mixtikl 6 saves mixes:
All mix files in Mixtikl 6 are saved to the /Music/Intermorphic/ folder as below (see here for more info).
Tip: You can also get to the Mix recordings screen from the Preview button on the Main Menu.
 Mixdown Audio Recording
With non-real time recording (mixdown), it is easy to make the best possible quality audio or MIDI recording of your mix or arrangement (but you cannot interact with it at the same time), even if your device struggles to play it live at the quality you want.
 Live Audio Recording
It is easy to record your mix to an audio or MIDI file of specified bar length, and you can interact with it while the recording is being made, even when in the visualizer (iDevice has default
audio output set to 22KHz stereo for live play). If your mix struggles to play at that quality, either reduce it, or make a mixdown recording!
To make a mix recording:
-
 Record
- Live Audio Recording:
- Mixdown Audio Recording:
 Email mix recording
Note: On Mixtikl for Desktop, this will only work with the OS preferred Email client.
- Select the item in the recordings list that you want to email.
- Select the Email Button in the top toolbar.
- Fill in the details in the email, and send it!
 Audio / MIDI
You can select whether to record your mix to either an audio file, or a MIDI file (but not both at the same time).
Tip: Note events and music generated by tap events in the visuallizer also get recorded, too!
- Recording Type (checkbox)
 Play/Stop
- Select an item in the recordings list
- Press the Preview button to start playback
- Press the Preview button again to stop playback
 Copy to Clipboard
- Select an item in the recordings list
- Press the Clipboard button, and then either select the Pasteboard button or the Sonoma AudioCopy button. Follow the Copy instructions.
 Delete
- Select an item in the recordings list
- Press the Delete button to call up the text edit screen
- Press OK if you want to delete the recording
 Rename
- Select an item in the recordings list
- Press the Rename button to call up the text edit screen
- Rename the file and press return to accept the change
 Mix Recording Settings
Select the Settings button to show the Mix Recording Settings screen. Here you can define the settings for both Live recordings and Mixdown recordings, and (aside from the preface) they can be different for each.
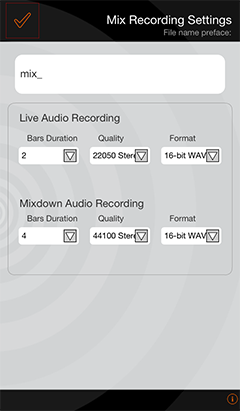
- File name preface
- Bars Duration (Live Recording / Mixdown)
- The bar length of mix recording, up to 99 bars.
- Tap the control to display the pop up bar list, and select the value you want
- Live recording: 2 bars (default); Mixdown recording: 4 bars (default)
- Format (Live Recording / Mixdown)
- The file format for the recording.
- Tap the control to display the pop up format list, and select the value you want
- 16-bit Wav (default), 8-bit Wav, 16-bit AU, 8-bit AU.
- Audio Quality (Live Recording / Mixdown)
- The different available output frequencies for recordings.
- Tap the control to display the pop up list of audio qualities available, and select the value you want
- Live recording: 22Khz stereo (default); Mixdown recording: 44Khz stereo (default)
- Live Recording: The range of options will be up to that of the quality set in Options for the Audio Output. If this is set, for example, to 22KHz stereo, then that is the maximum quality at which you can record.
Where Mixtikl 6 saves recordings:
All recordings in Mixtikl 6 are saved to the /Music/Intermorphic/ folder as below (see here for more info).
It is easy to make a mic recording of specified bar length, and attach it to a particular cell. You can do the same things with a mic recording as you can with any other loop (e.g. pitch shift/time stretch it if you change the mix tempo or root, or just stream it so that it never changes).
Large/long microphone recordings are best set to play as a "stream" meaning they can be played right off the storage media/hard drive and do not have to first be loaded into memory (which can take time which will also mean a mix can take a long time to load). Samples need to be first loaded into memory so it can be pitch shifted/time stretched as required).
Songwriter Note: The mic recording facility is designed for recording (and using in mixes) ambient sounds, speech etc. that do not require a precise "bar boundary" start. However, in the Content Cell Advanced Settings we do provide a "Stream Skip" setting that you can experiment with.
To make a mic recording:
-
- Start:
- Select the Mic Recording Button above from the Mixer Screen.
- You will see a pop up message asking you "Mic Record - Select the cell to which you wish to record".
- Press OK and you are taken back to the mixer screen where you will notice that the bottom right toolbar "Tools" button now has a red outline.
- Select the desired cell to then see the Mic Recording screen.
-
In the Mic Recording screen select the Live Rec recording button to start the recording.
- The mic recording will now being made according to the bar length defined in Mic Recording Settings, unless you otherwise stop it.
- Stop:
- In the mixer screen, press the stop button, or wait for it to reach the bar length specified in Settings.
 Play/Stop
- Select an item in the recordings list
- Press the Preview button to start playback
- Press the Preview button again to stop playback
 Copy to Clipboard
- Select an item in the recordings list
- Press the Clipboard button, and then either select the Pasteboard button or the Sonoma AudioCopy button. Follow the Copy instructions.
 Delete
- Select an item in the recordings list
- Press the Delete button to call up the text edit screen
- Press OK if you want to delete the recording
 Rename
- Select an item in the recordings list
- Press the Rename button to call up the text edit screen
- Rename the file and press return to accept the change
 Mic Recording Settings
Select the Settings button to show the Settings screen. Here you can define the settings for mic recording.
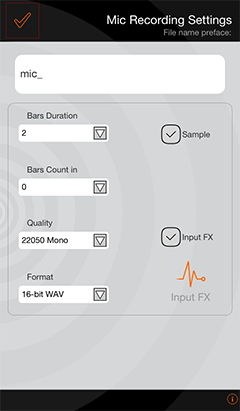
- File name preface
- Bars Duration
- The bar length of the mic recording, up to 99 bars.
- Tap the control to display the pop up bar list, and select the value you want
- Mic recording: 2 bars (default)
- Loop checkbox
- Bars Count in
- How many bars you want to count in before the recording starts, up to 3 bars.
- Tap the control to display the pop up bar list, and select the value you want
- Bars Count in: 0 bars (default)
- Quality
- The different available output frequencies for mic recordings.
- Tap the control to display the pop up list of audio qualities available, and select the value you want
- Quality: 22Khz mono (default)
- Format
- The file format for the mic recording.
- Tap the control to display the pop up format list, and select the value you want
- 16-bit Wav (default), 8-bit Wav, 16-bit AU, 8-bit AU.
- Input FX checkbox
- Check (default) if you want the mic recording to have input FX applied (currently a compressor unit), or uncheck if you don't want it applied.
- Input FX Button (Compressor)
- Press the button to launch the Compressor Unit so that you can customise the settings.
Where Mixtikl 6 saves recordings:
All recordings in Mixtikl 6 are saved to the Intermorphic/ folder (see here for more info).
Imports into Mixtikl a mix that has been pasted to the clipboard, perhaps copied from an email, tweet or forum posting. See also importing to a Content Cell and Importing mixes, Tiklpaks, audio loops .
Mixtikl for Mac/PC or Android: To get audio/MIDI or other content into Mixtikl to use with it, you can skip this section and instead see the instructions on how to transfer files to < > device/PC/Mac.
Mixtikl for iOS: Copy and Paste (via the Apple General Pasteboard) makes it a snap to get audio loops and recordings into and out of Mixtikl for iOS.
Mixtikl for iOS also supports Retronym's AudioCopy/AudioPaste which passes meta information about loops such as tempo and makes it easy to find compatible apps which you can copy to/paste from.
Tip: The Retronyms AudioCopy app is a useful addition to allow you quickly to upload your Mix recordings to Soundcloud (you have to paste them into the App first of course!).
Copy Audio/MIDI recording to Clipboard
-
 Record
- Select the item you want to copy from the list of recordings, then the "Clipboard" button.
- You will get a pop up message asking you "Choose Export Clipboard":
- Pasteboard
- Choose this for basic copy
- AudioCopy
Paste Audio from Clipboard into Content Cell
- Select a Content Cell to display the Content Cell Menu.
- Select the Import button and you will get a pop up message asking you "Choose Import Clipboard":
- AudioPaste
- General Pasteboard
- Choose this for basic paste (no tempo or other information is carried over). When the import is completed you will also then see the "Imported Meta File info" screen where you will need to set the Root and Time Sig settings if different from those shown. See also FAQ entry "Loop Import".
- Root:
- Set the root note (e.g. C#) for the imported loop
- Time Signature:
- Set the time signature (e.g 4/4) for the imported loop
- Tempo:
- Set the tempo (e.g 120bpm) for the imported loop
- Bars:
- Set the number of bars (e.g 4) for the imported loop
- Noatikl / Partikl
- Choose this to import a noatikl or partikl file
- Cancel
AudioCopy
- Follow steps 1-3 for Copy as above.
- Select the AudioCopy button above for Retronyms AudioCopy.
- In the popup AudioCopy control enter a name for the recording and select the "Copy Audio" button to copy the recording.
- Select the compatible App you want to paste into (e.g. the Retronyms AudioCopy app so as to use that app again later) and it should launch; or press the Done button to cancel out of this screen.
- From the App you have selected, use AudioPaste within that App to paste the recording into the app.
AudioPaste
- Follow steps 1-2 for Paste as above and select the AudioPaste button.
- In the popup AudioPaste control, select where you want to copy from and choose the Recording that you want to paste into Mixtikl.
- The Mixtikl "Import As" screen is then displayed, with a name already in the edit field (Appname_Date_Time) to make it quicker to get the recording in, and you do not have to change this if you do not want to. Tap or double tap the displayed file name to edit it and then the bottom Return button when done.
- You see a message telling you that the file has be copied.
- Press OK to see the Mixtikl "Imported File Meta Info" screen. We make a guess at the Tempo and Bars of the recording from information we can back from AudioPaste, but it depends on the App you are pasting from, so please double check! You will need to set the Root and Time Sig settings if different from those shown. See also FAQ entry "Loop Import".
- Root:
- Set the root note (e.g. C#) for the imported loop
- Time Signature:
- Set the time signature (e.g 4/4) for the imported loop
- Tempo:
- Set the tempo (e.g 120bpm) for the imported loop
- Bars:
- Set the number of bars (e.g 4) for the imported loop
- Once done, press the top left check (OK) button and you see a message saying "Clipboard import all done". Once you press OK to dismiss this message you will see the name of the recording appear in the Content Cell. It can take a little while for the name to appear, especially for big recordings, as Mixtikl is loading the recording into memory so that it is ready to play. To copy this recording to other cells, use the Copy command in the Tools menu.
Export your mixes and tweet your mixtikls. It is very easy to do.
- "mixtikl" as Tweet
- Your mix is then copied to the clipboard and you see a pop up message. You are advised there are 2 formats, one for pasting into a tweet where the tweet app will auto-shorten a link for you, and the other where you want to paste it into an email or shorten yourself by using one of the URL shortener services (this is in case the tweet app does not auto-shorten correctly). See the FAQ for further details.
- "mixtikl" to Clipboard
- Your mix is then copied to the clipboard for you to e.g. paste into an email.
- "mixtikl" via Mail (inline)
- Your mix is then copied to the clipboard and then inserted into a new email.
- "mixtikl" via Mail (attachment)
- Your mix is inserted into a new email as an attachment.
Content Cells are at the heart of Mixtikl, so this menu is one of the most important screens in Mixtikl. It lets you access the Content List to enter/change the content in a cell, loop/un-loop a cell, trigger a cell, import audio loops from another app (iOS only, via audio clipboard), get info on the content in the cell (if from a properly constructed Tiklpak) and to set the cell root, pitch offset and cell rules etc.
Tapping on any content cell in the Mixer screen will load this screen.
 Trigger
Choose this to force the content cell to play. What happens depends on what the Track Rules are set to:
-
 Sequence
- The content cell will play once then (at next bar boundary;
- the next cell played
-
 One Shot
- The content cell plays immediately (not synched to bar boundary) and once only;
-
 Loop
Loop
- The content cell starts looping immediately until cell looping is stopped or cell type changed
 Content
Displays the Content List, which provides you the means to preview and/or add content your to mix. This content can be from the included Tiklpaks or other content such as your own loops (see also Add-on Content).
- [Pak HOME]: Pakname
- This displays the name of the Pak on which this mix is based
- Select this item to get back to a list of content from that Pak
- (..)
- Selecting this allows you to browse for other content under the Mixtikl directory i.e. from other installed Paks (in which case it can be auto pitch shifted or time stretched) or recordings you might have made and saved.
- Desktop Tip: To browse outside of the application (and load Add-on Content "as is"), use the Advanced > BROWSE option below.
- Content Items
- Selecting one of these will add it to the Content Cell.
- Tip: To preview content in the Content List, tap the right side "speaker" icon (or use Left or Right keys on Desktop), and it should play for a few seconds.
- Content items are shown in different colours
- Generative - blue
- Audio and MIDI - black
 Loop
Loop
Tap this to force the cell to loop continously, or to un-loop it. What this button does, depends on what the Track Rules are set to:
-
 Sequence
- The content cell loops continuously (from next bar boundary) until cell is unlooped, then;
- The next cell is played
-
 One Shot
- The content cell loops immediately (not synched to bar boundary) until unlooped;
-
 Loop
Loop
- The content cell loops continuously (from next bar boundary) until stopped or cell type changed.
- Note that when the track rule is set to this, the only way to play the content cell is to loop it. This is useful when you do NOT want any of the cells in the track to play UNLESS they are looped.
 Gen Bars/Range
These two controls determine the bar lengths for generative content and help you to "arrange" a mix so as to allow it to breathe better. The settings have no effect for non-generative content (i.e. content that is not Noatikl based).
- Gen Bars:
- The left control defines how many bars a generative part will play for before the cell either e.g. loops or play moves to the next cell should it be a sequenced cell (see track rule).
- Value: Infinite
If the value shown above the control is "Infinite", this means the setting is as defined in the underlying part, which is generally something like 32,000 bars, and so effectively infinite in length.
- Value: Other
If this value is any other value a blue dot shows to the top left of the cell, indicating it plays only for a certain number of bars.
-
- Gen Bars Range:
The right control (Gen Bars Range) defines the range to be added to the Gen Bars value, allowing for a spread of possibilities.
 Info
Info
This will only display if there is content in the Content Cell, and tapping it will open a browser window. This will display a webpage with further information on the pak that this content items comes from (if known). Note that if the content cell is showing as red, then it means Mixtikl cannot find that content (it is not present / installed in your version of Mixtikl). This button can be useful to help find out more about that content and where to get it, should you want to hear the mix as intended.
 Cell Repeat/Range
These two controls determine how many times the content in the content cell repeats, helping you to "arrange" a mix so as to allow it to breathe better. This setting applies to both generative and non-generative content, and goes on the length of the underlying content in the cell, e.g. if the cell contains a 4 bar audio loop, this just sets how many times that loop will repeat.
- Cell Repeat:
- Defines how many times the content in a cell will repeat before play moves to the next cell, should the cell be a sequenced cell (see track rule).
- If this value is non-default, a black dot shows to the top right of the content cell.
- Cell Repeat Range:
- Defines the range over the above value, allowing for a spread of possibilities.
 Roots & Rules
This buttons will only display if the content in this content cell is generative (e.g. Noatikl-based). In which case, select it to launch the Cell Noatikl Rules screen.
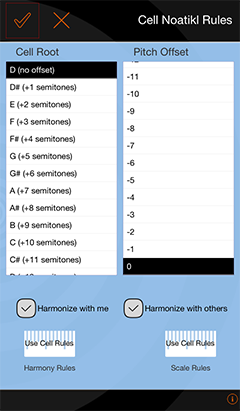
Content Cell Roots & Rules
- The left-hand list displays the Cell Root, and if you leave as the top value (i.e. no offset) then the cell plays with the Mix root.
- The right-hand list displays the Pitch Offset and this can be used to adjust the lowest note that can be composed/played by this part (whilst following harmony and scale rules).
- Harmonize with me (default setting - checked): This determines if Mixtikl needs to take the notes played by this part into account when composing/playing other parts.
- Harmonize with others (default setting - checked): This determines if Mixtikl needs to take the notes played by other parts into account when composing/playing notes for this part.
- Harmony Rule Button: Displays the name of the currently selected cell harmony rule (refer to the NME Guide for further information on Harmony Rules):
- Use Cell Rules (default setting): use the rules that are in the part.
- Custom: Override the rules in the part with your customised rules. Tap/drag the sliders at the bottom to change the various interval weightings for the rule. This affects composition in real time.
- Default: The NME default harmony rule values.
- Scale Rule Button: Displays the name of the currently selected cell scale rule (refer to the NME Guide for further information on Scales Rules):
- Use Cell Rules (default setting): use the rules that are in the part.
- Custom: Override the rules in the part with your customised rules. Tap/drag the sliders at the bottom to change the various interval weightings for the rule. This affects composition in real time.
- Default: The NME default scale rule values.
 Import (iOS only)
This displays the Choose Import Clipboard message where you can choose to import a recording via the Apple General Pasteboard, or via Retronyms AudioCopy.
Whatever method you choose, once the import has occured you will be presented with the "Imported File Meta info" screen where you will need to provide the following information (See also FAQ entry "Loop Import"):
Imported File Meta info screen
- Root:
- Set the root note (e.g. C#) for the imported loop
- Time Signature:
- Set the time signature (e.g 4/4) for the imported loop
- Tempo:
- Set the tempo (e.g 120bpm) for the imported loop
- Bars:
- Set the number of bars (e.g 4) for the imported loop
 Generators
Note: For full details what each of the parameters do, refer to the NME Guide.
The Generators button will only display if the content in this content cell is generative (e.g. NME-based content); it will not display if the cell contains and audio or MIDI loop.
You have access to all NME parameters except those for the Piece and File Objects, and noting also that Mixtikl Mobile does not support scripting or listening voices. Experimenting with NME parameters is a great way to learn about how the NME works!
The NME Editor in Mixtikl is different to the one in Noatikl, but it still allows powerful real-time & inline editing/customisation of the core NME parameters used in a generative part. This includes adding, deleting and renaming Voices as well as editing pattern strings. It is a drill down editor, and is meant for editing of generative content rather than creating new NME content from scratch, for which we direct you to Noatikl itself (but you can do that if you have the patience and then export it from the cell to import into Noatikl!).
There several buttons at the top of this dialog which allow you to create a new .noatikl file, import, export or save one (the folder button) or copy, cut, rename etc voices (the pencil button). The Left / Right arrow buttons allow you to undo or redo your last action.
- Object List:
- This shows the list of available NME Voice Objects (blue) and NME Rule Objects (black). Rules have their own editor, but to edit voices first select one (e.g. Voice) and then select a Parameter to edit via one of the lists below.
- Parameter Group (Voice Objects):
List
- This displays groupings of NME Voice Object parameters, some of which are relevant for the Voice Type of the Object selected above. To change the Voice Type of the selected object, select the Basics > Parameter Group and then the Parameter > Voice Type list item and select the type you want.
- Parameter List:
- This is the list of parameters available in the selected Parameter Group for the selected Voice Object e.g the Pattern Parameters.
- value:
- There are 3 kinds of control to set the value for the parameter you have selected:
- a slider with an edit box above it for data entry if required.
- the pattern editor which, when the folder button next to it is pressed calls up the pattern randomiser: select a pattern to create a random variant; beneath this is the sub-pattern list and you can order the sub-patterns with the up/down arrows.
- a rule editor similar to the one used in mix and cell scale/harmony rule editing.
 Sounds
Note: For full details on how the PSE works, refer to the PSE Guide.
Mixtikl allows powerful real-time & inline editing/customisation of PSE sounds and effects (i.e. synth sounds, fx and sound/fx networks).
Experimenting with PSE is a great way to learn about modular synth/sound design.
The Sounds button will only display if the content in this content cell is generative (e.g. NME-based content); it will not display if the cell contains and audio or MIDI loop.
Press the Sounds button to launch the PSE Synth Attacher screen. This shows which MIDI channels the part is generating sound on (the mix must be playing).
If you press the Edit (pencil) button for the channel you are interested in (the channel highlighted in black in the left hand list), you will see the Synth Network Editor screen from where you can import and modify the settings of the units in the network, and even the network itself, and save your modifications back to the mix.
 Cell FX
Note: For full details on how the PSE works, refer to the PSE Guide.
Mixtikl allows powerful real-time & inline editing/customisation of cell level (stereo / mono) sound FX played through PSE (i.e. fx and fx networks), which is in addition to Track and Global level FX.
The main reasons we allow cell level FX are A) so that you can edit/modify these settings for an imported Noatikl file or even create/export one; B) so that the parts in a track can simply have different levels, pan (amp) and FX (for variety); and C) to allow different FX to be applied to different channels on a part that uses multiple channels (e.g. GenDrum 1/2 OWt templates).
Experimenting with PSE is a great way to learn about FX design.
The Cell FX button will only display if the content in this content cell is generative (e.g. NME-based content); it will not display if the cell contains and audio or MIDI loop.
Press the Cell FX button to launch the PSE FX Attacher screen. This shows which MIDI channels the part is generating sound on (the mix must be playing), and channels which have FX applied (and a global level cell FX, too).
If you press the Edit (pencil) button for the channel you are interested in (the channel highlighted in black in the left hand list), you will see the Synth Network Editor screen from where you can import and modify the settings of the units in the network, and even the network itself, and save your modifications back to the mix.
 Clear
Clear
This clears the content from the current cell.
 Advanced
This displays a list containing advanced settings for the Content Cell. In all probability you will never want to or need need to check these out!
- -[BROWSE]
- Tip: In the Desktop version this control is how you find and import audio content into your mix where that content is not in a Tiklpak. It is always treated as streamed content.
- Lets you choose different top level folders in which to search for content.
- -[SKIP]
-
 Skip
Skip
- When no section lock is on, a skip cell is skipped and next cell in the track plays instead.
- -[SILENT]
-
 Silent
After selection the content cell will be designated a silent cell (shown left).
- When no section lock is on, a silent cell plays silence.
- <STREAM SKIP ms: 0>
- Note: In the Desktop version this setting applies only to audio content loaded via a correctly configured Tiklpak.
- This allows you to start playback of a mic recording at a set period of time into the recording.
- The recording must be set to Stream in the option below.
- <AUDIO: value>
- Note 1: In the Desktop version this setting applies only to audio content loaded via a correctly configured Tiklpak.
- Note 2: In Mixtikl Desktop audio content can be imported into a content cell via Content Cell > Advanced > Browse. This imported audio is ALWAYS treated as a stream meaning that if you change the mix tempo or root it does not get pitch shifted or time stretched.
- Determines whether the cell audio content (if any) is played back in a mix as a stream (e.g. for long recordings) or a sample (e.g. for short recordings, or those you want to be able to change pitch/tempo, as below):
- Sample [default value]:
- Recording gets loaded into memory when mix is playing
- Means it can be looped on a bar boundary
- Suitable only for shortish recordings, e.g. up to about 16 bars max in length
- Stream:
- Recording when played in content cell will play once, and will not loop
- Select this item if you're using sounds that
you simply don't ever want time-stretched and/or pitch shifted (e.g. ambient sounds like wind/rain etc.)
 Mixer > Global or Track FX cell
 Note: For full details on how the PSE works, refer to the PSE Guide.
Track FX cells and the Global FX cell are at the heart of Mixtikl as they determine what FX, if any, are applied to the content in each track, as well as to the whole mix (i.e. globally). They also let you access the FX Preset List to select a preset, disable or enable a FX, access the FX Network Editor or clear an FX etc.
Select either the Global FX cell or a Track FX Cell in the last column of the Mixer Screen.
- When selecting an FX cell with an FX in it, you will see the FX Cell Menu above.
- When selecting an empty FX cell you will be presented with a list of FX Presets to choose from.
- If you touch/hold an FX Cell with an FX already in it, then you display the relevent FX unit directly.
- Note: FX uses up processing cycles more than most things (and Reverb uses by far the most), so use carefully. Also, where possible, use a global FX instead of the same FX applied to multiple tracks. See also the FAQ.
Selecting this will display the PSE FX Network Editor for your selected FX so that you can change the values of any FX unit or controller and then save them back to the mix file.
 Disable/Enable
Select to enable or disable the FX. When the FX is enabled it shows in the mixer as a icon of the normal colour for that FX. When disabled, the colour is muted (duller).
 Edit FX
Select to customise the relevant Track or Global FX unit or network you have already applied.
 Preset
Select to display the FX Preset List. There are a wide range of FX Presets that come with Mixtikl, to get you started, but you can also customise and save them.
- +<OPTIONS>
- Select to show the options. When
<HIDE OPTIONS>
shown, select to hide the options.
- [RENAME]
- Select this entry to see the list of FX available for renaming
- You cannot rename presets that are included with Mixtikl or are in Pak zip files.
- [DELETE]
- Allows you to delete any FX presets you have saved.
- You cannot delete presets that are included with Mixtikl or are in Pak zip files (but you could delete those Pak zip files).
- FX Presets
- Selecting one of these will add it to the FX Cell.
- Tip: To scroll through the list to see all the Presets, tap and drag the list up/down or (on desktop) use the Up / Down or Page Up / Page Down keys or the mouse center wheel.
- Tip: Touch the top right of the display area to toggle to the top and bottom of the list.
- See also Navigation.
 Clear
Clear
Select to clear the Global FX or selected Track FX, as relevant.
You may never have the need to use this, but the EQ Screen is where you can set the global Mixtikl EQ setting, applied to all mixes. You can also select from a number of EQ Presets.
Select the EQ Preset List at the bottom to open the list of Presets, and choose the preset you want. Alternatively, drag the sliders to customise the mix EQ to suit!
There are a number of tools and macro functions available for the Mixtikl Mixer. When selected, the colour of the Tools cell highlight changes to red.
Tools are generally sticky (i.e. they operate until cancelled) and the method of operation is generally:
- Select the tool entry
- The list closes
- Select a content cell
- To turn off the mode, press the tools button again
[COPY CELL/FX]
- After selection (and until cancelled), select a content cell. Any other content cell you then select will then have this content pasted into it.
[TRIGGER CELL]
- After selection (and until cancelled), when selecting a content cell that cell will be forced to play. Normal operation for that cell resumes after it has been played once.
- If you trigger a One-shot Track Rules cell (see Mixer Screen), then the content will play immediately, and not wait until the next bar boundary. This is ideal for "spot fx" such as stings and other incidental sounds.
[CLEAR CELL]
- After selection (and until cancelled), any content cell you select will have its contents cleared.
[RANDOMISE COLUMN]
- After selection (and until cancelled), every content cell in the columm (section) you then select (by selecting a content cell in that column/section) will have its content chosen at random from whatever the underlying pak is.
- The intention is to allow quick random combinations to be generated.
[RANDOMISE TRACK]
- After selection (and until cancelled), every content cell in the track you then select (by selecting a content cell in that track) will have its content chosen at random from whatever the underlying pak is.
- The intention is to allow quick random combinations to be generated.
[SKIP CELL]
-
After selection (and until cancelled), any content cell you select will be designated a skip cell (shown left).
- When no section lock is on, a skip cell is skipped and next cell in the track plays instead.
[SILENT CELL]
-
After selection (and until cancelled), any content cell you select will be designated a silent cell (shown left).
- When no section lock is on, a silent cell plays silence.
[LOOP CELL]
-
After selection (and until cancelled), any content cell you select will be designated a looping cell which displays an orange bar at the top (shown left).
- Looping cells continue to loop, whether or not a section lock is on in another section, until the looping is removed (which you can do by selecting Content Cell > Looping again).
The Clear Mix Content screen gives you quick toolbar access to a number of ways to clear cells in your mix.
Tip: You can also clear a cell directly from the Content Cell, or with use of sticky Tools.
Clear Menu
- [CLEAR CELL]
- This is a sticky control (the Clear Menu button shows a red surround), so once selected (and until the Clear Menu button is selected again), it will clear out everything and all settings from any cell you select. Use CAREFULLY as there is no undo!
- Clear All Loops
- Once selected (and you are asked to confirm), it will clear out all the loops from the current mix.
- Clear All Track Settings
-
Once selected (and you are asked to confirm), it will clear out from the current mix all track settings (track FX/global FX, track mute/solo) and reset track volume and pan settings to default values. Note: This will not clear loops, turn off looping on any content cell or reset track rules.
- Clear EVERYTHING
- Once selected (and you are asked to confirm), it will clear out from the current mix ALL loops and ALL mix settings including turning off looping on any content cell. It does not reset track rules.
The Mixtikl Settings screen provides you with a number of ways to customise Mixtikl. The iOS version of the Settings screen is shown; the Android and Desktop versions look different but the differences are noted below.
Note: Audiobus / Inter-App Audio support is now enabled by default and can be used at no charge. See this FAQ entry for further links/info.
Audio Output...
System Audio Output options:
- All the audio output options that are detected to be system-available (e.g. 22050 kHz Stereo, the default setting).
- Select the option you prefer.
- If your mix stutters during playback, it means your device is having problems playing your mix: you should either try removing content from your mix, or try lowering the audio output quality. Even if you lower the output quality, you can still make a high quality mix recording with the Mixdown capability.
- We strongly recommending changing this setting with an empty mix as it can take some time to change the Audio Output if there are several audio loops in your mix, as each of these needs to be resampled.
Toggles/Checkboxes
-
AirPlay: Enabled/Disabled [iOS only]
Note: When this option is enabled, you are not able to make Microphone recordings in Mixtikl for iOS.
AirPlay : Disabled (unchecked - default)
- Mixtikl audio plays through the speaker or headphone socket, as normal, and you are able to make Microphone recordings in Mixtikl.
AirPlay : Enabled (checked)
- Should you have one set up, you can direct Mixtikl's audio output to an AirPlay enabled Apple TV, an AirPort Express or paired Bluetooth device so that you can listen to Mixtikl through e.g. a Home Cinema, Audio system, Car stereo etc.
- To select your preferred audio output:
- Swipe the iOS screen up to reveal your iOS control panel options and select the little Airplay arrow on the bottom right to get a pop up choice of Airplay outputs.
- Select e.g. Apple TV / AirPort Express / Bluetooth device.
-
MIDI Output [iOS only]
Core MIDI: Off by default. When enabled, tells Mixtikl to send-out MIDI events via Core MIDI. Apps that are Core MIDI enabled can take advantage of this.
Virtual MIDI: Off by default. When enabled, causes Mixtikl to present a number of Virtual MIDI ports - one Omni (all channels) and 16 per-channel virtual MIDI ports - and Mixtikl sends MIDI events as Virtual MIDI ports over Core MIDI.
Latency: 100ms by default. Sets Latency (milliseconds) to apply to MIDI events sent-out to Core MIDI / Virtual MIDI by Mixtikl. Use to help remove jitter if using e.g. Network MIDI.
-
Sample Frames [Android only - default 1024]
Akin to latency, allows you to adjust for device capability. The faster your device the lower the setting you can use.
-
Block Count [Android only - default 10]
Allows you to adjust for device capability. The faster your device the lower the setting you can use.
-
Check for update when Mixtikl Starts [Desktop Audio Plugins only]
Check this for Mixtikl to check for updates when it starts. Uncheck this if you do not want Mixtikl to check for updates.
-
Analytics
We use analytics to help us figure out how to improve Mixtikl. If you are OK to help us in that, then please leave it on! Please also refer to our Privacy Policy.
From the Mix Settings screen you can pitch shift & time stretch the entire mix (but it is not real time, and it can take some time). You can also change the generative harmony and scale rules that apply to all generative parts in the whole mix except where over-ruled on a per-cell basis.
Select the top OK button to apply any changes you make to the Tempo and Root settings (conversely, select the Cancel button to reverse all your changes and close the screen). Changes are made (non-destructively, i.e. in memory) to each content item in your mix.
Tip: Generative content should change as soon as you make a change to the pitch/tempo/rules values; audio loops will be changed as quickly as is possible to pitch shift/time stretch them. You can press the Cancel button at any time.
Tempo list
- Select the value you want.
- The time it takes for the mix to adopt the new tempo depends on how many loops there are in your mix, what quality you are mixing at (e.g. 22KHz).
Root list
- Select the value you want.
- The time it takes for the mix to adopt the new tempo depends on how many loops there are in your mix, what quality you are mixing at (e.g. 22KHz).
Global Harmony
- Ensures that the mix level harmony rule is applied to all content cells in a musically optimum fashion when composing, which may also mean some unexpected notes still occur. Can be over-ridden by rules at a cell level.
- Checked - Rule applied (Default setting)
- Unchecked - mix level harmony rule is not applied and parts do not attempt to harmonise with each other at all, but harmonise only withing themselves (cell level harmonisation).
Strict Harmony
- Ensures that the mix level harmony rule is absolutely obeyed by parts in all content cells when composing. You may wish to use this setting to ensure that ONLY certain harmonies occur. Can be over-ridden by rules at cell level.
- Checked - Rule applied (Default setting)
- Unchecked - the strict enforcement of a mix level harmony rule is not applied.
Harmony Rules
Note: For details of what the Rules do, refer to the NME Guide.
Scale Rules
Note: For details of what the Rules do, refer to the NME Guide.
There are a number of Mix Randomisation Settings that determine what content can be selected for randomisation, and how it is selected.
General Controls
- Tracks Control: Determines how many tracks (1-12) can have randomised content (the others are left empty).
- Cells Control: Determines how many cells (columns 1-4) can have randomised content (the others are left empty).
- Vol Min Control: The minimum volume a track can have.
- Vol Max Control: The maximum volume a track can have (where 86 represents 0db.
- Pan +/- Control: The maximum variation in the track pan from the center value of 64.
- Gen % Control: The percentage of cells that include generative content. If this setting is 100% then only generative content is used; if 0% then only non-generative content (e.g. audio loops) is used.
- BPM +/- Control: The maximum variation of the tempo from the tempo of the chosen Pak. If set to 0% then the tempo will not be randomised.
- Blank % Control: The percentage of cells that are empty; this can help thin out an otherwise dense mix.
Cell Controls
- GenBar Min (default value is 8): The minimum value for the GenBar content cell setting, where "Normal" (i.e. a value of 0) means the generative content will play for as long as it is set to play in the underlying Noatikl file. When the "Normal" value is used by a cell's content, a blue bar displays at the top of the content cell in the Mixer UI.
- GenBar Max (default value is 16): The maximum value for the GenBar content cell setting.
- GenBar Range (default value is 8): The maximum value for the GenBar content cell setting.
- CellRepeat Min (default value is 1): The minimum value for the CellRepeat content cell setting.
- CellRepeat Max (default value is 7): The maximum value for the CellRepeat content cell setting.
- CellRepeat Range (default value is 3): The maximum value for the CellRepeat content cell setting.
Checkboxes
- Cells Loop: If checked it means that all tracks will be of a looped type, and not a sequenced type - this is useful if you are using Mixtikl for performing live.
- Use Mix Cells Only : See "From Mix" button above.
- Mix Root: If checked it means that the root of the mix will be randomised (e.g. A or C or E etc); If unchecked, then the root will not be changed.
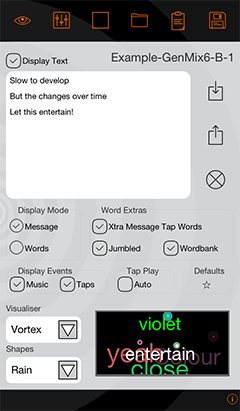
Visualiser Settings Screen
Buttons at the top are shortcuts to a number of key activities such as exporting mixtikls, getting more mixtikls, opening saved mixtikls, making recordings etc. Some buttons have a tap/hold shortcut, detailed below.
IMPORTANT: Mixtikl files ('mixtikls') are user self-published as URLs & Intermorphic has no control over any user-included text or tunes ('message'). On importing a mixtikl that contains a message you will be required to agree that you understand Intermorphic has no control over the content of that message.
Top Buttons & Shortcuts
-
 Vis
Vis
- Tap: Accept your changes, display Vis screen
- Tap/Hold: Accept your changes, display Menu
-
 Mixer
Mixer
- Tap: Accept your changes, display Mixer Screen
- Tap/Hold: Accept your changes, New random mix
- Play/Stop
-
 Open
Open
- Tap: Open list of previously saved mix files
- Tap/Hold: Search online for tweeted mixtikls
-
 Clipboard
- Tap: Copy mixtikl to clipboard for tweeting
- Tap/Hold: Paste mixtikl into a new email ready for sending
-
 Save
Save
Message and Visualizer Settings
- Mix name:
- To the right of the screen is displayed the mix name
- Tip: Before you email or tweet your mixtikl, save it with a catchy or relevant name, e.g. "Happy Birthday" or "Play this haiku" or "One for you Bill" etc, as you will see this in front of the mixtikl URL.
- Display Text Checkbox: If checked, display text in the visualiser
- Text Box:
- Tap in it to enter up to 140 characters of your own text
- Tip: If you put 2 carriage returns after a word the next word will appear in a text block that is displayed once the previous text block has displayed.
- Import Button: Import text from the clipboard
- Export Button: Export text to the clipboard
- Clear Button: Clear the text field
- Display Mode Radio Buttons:
- Message: Select to display words in a block as an on-screen message
- Words: Select to display words one at a time through display events (below)
- Word Xtras:
- Extra Message Tap Words: Check to display floating text in addition to your message
- Jumbled: Check to display the text box words in a random order / jumbled up
- Wordbank: Check to also include words from the Mixtikl word pool (which includes over 600 words)
- Display Events:
- Music: Check to allow music engine generated events to drive the visualiser, shapes or text highlighting
- Taps: Check to allow taps to drive the visualiser, shapes or text highlighting
- Tap Play:
- Auto: Check to have Mixtikl play the tap part for you!
- Defaults:
- Press button to save current settings as defaults for new mixes
- Visualiser List: Choose one from the list visualizers available
- Shapes List: Choose a note shape from one of those available
There are a number of sources of such content that you can use in Mixtikl Content Cells, noting that add on content needs to be of the types listed in Content Types.
See the information on Transferring files to < > from your device.
- iOS Clipboards: WAV or Ogg samples or loops you have made yourself on your iOS Device with another app, such as microphone recordings or modular synth recordings, and that you copy into Mixtikl Mobile from the audio clipboard using the Content Cell > Import button (this is by far the easiest way on mobile, i.e. using another app that supports copying to the audio clipboard see a list of these apps here) or the Content Cell > Content List button where you can copy into the cell recordings made in Mixtikl.
- The pre-installed Intermorphic Tiklpaks that come with Mixtikl.
- Add-on Intermorphic Tiklpaks or Paks that you have made yourself.
- Partikl, Noatikl or MIDI files you have created yourself.
- Your own or 3rd party WAV/Ogg files or SoundFont (SF2)/DLS files:
- You have purchased some loops
- You have purchased a Music Magazine with cover DVD
- You have a sequencer or other software tool that comes with some loops
- You have downloaded some free online loops
- Creative Commons licensed samples, e.g. One Laptop Per Child project.
- Mixtikl Desktop: WAV or Ogg samples or loops you have made yourself on your Desktop PC, such as microphone recordings or modular synth recordings, and that you copy into Mixtikl Desktop via the Content Cell > Content List button or Content Cell > Advanced > Browse button.
Displays a list of weblinks to sources of shared mixes, and communities.
- Tweeted "mixtikls"
- Shared Mixes Forum
- Mixtikl@Soundcloud
- Mixtikl Support Forum
- IM @ Facebook
- Goes to the IM Facebook page where we will be linking to mixtikls and releasing Mixtikl news. Please make sure you friend us!
- IM @ Twitter
- Goes to the IM Twitter page where we will be linking to mixtikls and releasing Mixtikl news. Please make sure you friend us!
- Other Communities
Mixtikl allows the use or mixing together of many different audio and music
files, namely "content". This content can be in a wide range of file formats, from
audio clips to MIDI files and beyond. To keep things simple, we refer to any item of
content in any format simply as "content" or "content item", but this section gives
some more information on the different formats.
Mixtikl’s content flexibility allows you to be creative in ways that both
suits the capabilities of your device and that match your personal preferences –
namely how much memory you have on your phone, and how much space you
want to set aside for storing content or recordings of mixes you might make.
Audio Content
Audio content is used where maximum sonic impact is required. The reason is that
an audio sample (a short clip) contains a great deal of high quality pre-processed
audio information (such as a real voice, electric guitar riff, orchestral theme etc).
However, the downside is that memory usage is higher than for other content types
(for both storage and operation). A typical 1 bar audio sample (in compressed Ogg
Vorbis format, 48Kbps) is around 15Kb, but in order to be mixed it must first be
expanded into your device RAM memory, where it might be >4 times larger!
Audio formats supported (file extensions capitalised for consistency):
- Ogg Vorbis (compressed audio format) – .OGG
- WAV (PCM and ADPCM) - .WAV (8 or 16 bit only at present)
Note: When using audio content, there are a number of factors that determine the
size of the content item. The key ones are the tempo of the mix and how many
"bars" there are in each item of content (a "bar" is a musical term which refers
most commonly to 4 beats, and is the normal minimum size for a content item),
and then for each item the sample rate, bit depth and whether the sample is stereo
or mono.
Tempo is to do with how many beats per minute (bpm) you have in your mix,
which is defined in each Pak. Tempo and the content size are closely
interrelated in that a 1 bar 60bpm audio clip is 4 seconds in length (each beat is 1
second in length and there are 4 of them in a bar), and a 1 bar 120bpm audio clip a
2 seconds in length (each beat is ½ second and there are 4 of them).
MIDI Content
MIDI content is an electronic version of sheet music
(in that it only contains note playback information), and it is played through the
Mixtikl integral MIDI synthesizer. MIDI content has the advantage of
small size, and so uses far less device memory, but it does not have the sonic
impact and richness of the much larger audio content. A typical 1 bar MIDI riff is
around 1Kb.
MIDI formats supported (file extensions capitalised for consistency):
- SMF (Standard MIDI file, type 0 or 1) - .MID/.MIDI/.KAR
Advanced Content
Various advanced content options are available within Mixtikl, and these
allow greater use of the device as a music "computer", creating rich sounds from
small components. This kind of content is typically in .partikl
format, and it allows the use of real software synthesisers, FX and music engines. A
1 bar .partikl file can be just a few Kb in size, but can be set up to allow the creation of
hundreds of minutes of varied and sonically rich content.
Partikl content can also include audio samples, for which the comments
above related to audio content apply. Partikl files may contain any combination of DLS file data, audio data (Ogg, Au and/or WAV), Noatikl files, MIDI files and PSE Modular Synth and FX network settings. Noatikl files are generative content, meaning that they are composed for you in real-time by the Noatikl trans-generative music engine.
Advanced formats supported (file extensions capitalised for consistency):
- Noatikl - .NOATIKL or .NOA
- Partikl - .PARTIKL or .PAR
SoundFont (SF2) / DLS 1 Wavetables
The PSE multi-synth, via the Wavetable Unit, can be used to hook up MIDI or advanced content to a SF2 or DLS 1 Wavetable. The SF2/DLS Wavetable can either be in one of the pre-installed Paks, or included in a Pak you might have made. Either way, it has to be installed to your device and PSE must know the path to it.
SF2 / DLS formats supported (file extensions capitalised for consistency):
- SF2 (SoundFont 2) - .SF2
- DLS (DLS format 1) - .DLS
Being able to target SF2 / DLS 1 Wavetables via PSE means that MIDI playback, via the MIDI synth in PSE, can use some cool sounds and with the smallest performance overhead - all you need is the Wavetable!
Multi-bar Content
This is content in any of the above forms that plays for more than 1 bar. It can be
even more effective than content of 1 bar length as it provides more continuity and
variation over a longer period of time. Mixtikl is very powerful in that
mixes can utilise not only 1 bar content, but also multi-bar content.
Mixtikl intelligently caters for content of non-full bar length (e.g. 2 ¼
bars). When the content is not in a Tiklpak it will not simply loop the content,
causing mix synching problems, but will instead pad it out with silence until it
reaches the next bar boundary. Content that *is* in a Tiklpak is time-
stretched/shrunk automatically to the nearest bar multiple.
The "mixtikl" file itself
When you add content into a mix, references to it are saved to the ".mixtikl" file. The mixtikl file stores all the information about what
content is used in the mix and where used, together with sound FX, generative rule customisations etc. However, all content referenced in the mixtikl must be installed in Mixtikl in order for it to play - e.g. loops and MIDI files are not themselves saved to the mixtikl file!
Add-on Zipped Tiklpaks/Paks
There is a lot that can be used in Mixtikl. See here for what is available!
Navigating Mixtikl is pretty straightforward, and how you do it depends on whether you have the iOS, Android or Desktop versions.
To action or activate a cell, button or area
- Tap
- Either tap or or mouse click the cell (i.e. desktop version).
- Applies to :
- Tap/Hold
- Either tap or mouse click the cell (i.e. desktop version) for a second or two.
- Applies to :
- Content Cell to loop / un-loop it.
- Some buttons in the top display area.
- Keyboard (desktop only)
- Either position the yellow Cell Selector with the nav keys (L, R, Up, Down) on to the cell or button and press the Enter key or press the relevant keyboard shortcut.
- Applies to :
General Activation Areas
- Menu button for the Main Menu.
- Top middle area (volume slider) in the Mixer Screen for global volume.
- Bottom "?" in most screens for contextual online help on that screen.
- When in Content list via the Content Cell Menu, tap the speaker item at the far right of list item to preview content
Controlling Knobs and Sliders
- Select the knob or slider control (as above);
- Tap/hold the bottom pop up slider control and drag L/R to select new position;
- Release
- On keyboard, select as above and use L/R keys to change value and Enter to accept the value.
Keyboard Up/Down, L/R & Enter (Desktop version)
- Use L/R and Up/Down to move around the screen
- Enter will select highlighted cell
- In an Options Lists, L/R will toggle option value
- In the Content List L/R can be used to preview / play content
Cancelling from lists
- Tap the top left hand display area when it says "Cancel" or "Mixtikl"
- Additional for Desktop versions:
- Press the Escape key
- Press the * key
Clearing contents of a Content or FX Cell
- Select the cell and select "clear" item from the pop-up Content Cell Menu or FX Cell Menu
- Select the Tools cell, select "Clear" from the pop-up Tools Menu and select the cell you want to clear.
- IMPORTANT: Remember to tap the Tools cell again to turn it off; you can tell a tool is "Active" when the tools cell has a red outline.
- Additional for Desktop versions:
Desktop Control
- Spacebar: toggles play/stop
- Escape key: cancel from a menu or list
- Delete to clear cell
- Left and Right arrows are L/R
- Others as below except that in lists 3 is page down, and 9 page up
Desktop Menus
These are shown at the top, and are only visible on the desktop versions.
- Mixtikl
- About Mixtikl: Displays load screen with Version number
- Quit or Exit: Closes Mixtikl
- Options
- Restore Window Size
- Show the User_Content folder
- Check for Update When Mixtikl Starts (check or uncheck)
- Output Devices: Select your audio output driver (Desktop Standalone, not Plugin)
- Input Devices: Select your audio input driver (Desktop Standalone, not Plugin)
- Help
- Online User Guide: Go to the online User Guide
- Mixtikl Forum: Go to the online Mixtikl Forum
- Online Licence: Go to the online EULA
- Mixtikl Product Key: Enter your Mixtikl Product key and licence information
- Intermorphic Creativity Tools: Goes to Intermorphic Website tool pages
Keyboard / Keypad shortcuts
In addition to being able to navigate and control Mixtikl with your mouse, the following shortcuts are available for the Desktop versions.
Mixer
- 1 - Play/Stop mix
- 2 - Up
- 3 - Trigger a cell or spot cell (also T) [See Content Cell Screen]
- 4 - Left
- 5 - Action / Select
- 6 - Right
- 7 - Key shortcut (7, Col, Row : e.g. 7, 2, 1);
- Columns
- 1 - Volume/Pan
- 2 - Solo/Mute
- 3,4,5,6 - Mix Sections
- 7 - Rules
- 8 - FX
- Rows
- top toolbar: Up
- tracks: 1-9,*(10), 0 (11), #(12)
- bottom toolbar: Down
- 8 - Down
- 9 - Tools Cell
- 0 - Clear Cell
- * - Menu / Cancel
- 2 - Up
- 3 - Page Up
- 4 - Stop Preview
- 5 - Select
- 6 - Preview / play content
- 7 - None
- 8 - Down
- 9 - Page Down
- 0 - Clear Cell
- * - Cancel
Quick Help & FX
- 2 - Up
- 3 - Page Up
- 5 - Select
- 8 - Down
- 9 - Page Down
- 0 - Clear Cell
- * - Cancel
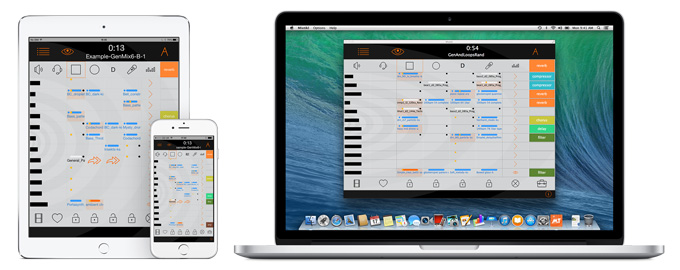
 Menu
Menu Open
Open Play/Stop: Tap to play or stop the mix
 Content Cells (Cols 3-6): Tap any content cell to display the
  Content : Tap the Content button to display the
  New
New
 Random: Now tap this to create your random mix which you will then see in the
  FX Cells (Col 8): These are cells in the far right column (Track FX) or top of that column (Global FX)
 Export
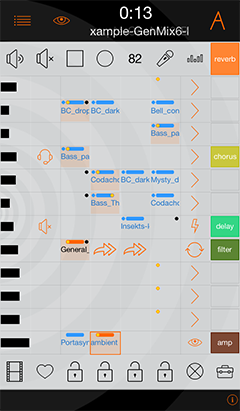

 Visualiser
 Time, Name, Tips
 Vis Settings
 Track Vol/Pan Display Toggle
 Mute/Solo
 Mix Record
 Mix Tempo, Pitch & Rules Button
  Microphone Recording
  EQ
EQ  Global FX
 Vol / Pan (Col 1)

 Solo / Mute / None (Col 2)
 Sequence
 Loop
Loop One Shot
 Tap
Tap
 Online Videos
 Store / Recall
 Mix Sections 1-4
 Clear
Clear Tools
Tools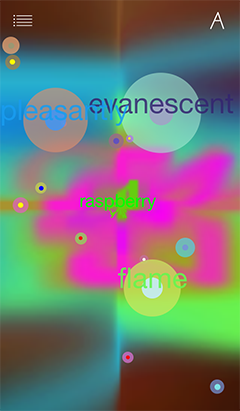


 Empty
Empty From Mix
 Show Paks
 Mixer
Mixer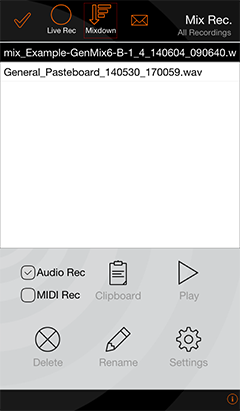
 Mixdown Audio Recording
  Live Audio Recording
 Email mix recording
 Audio / MIDI
 Play/Stop
 Copy to Clipboard
 Delete
 Rename
 Mix Recording Settings
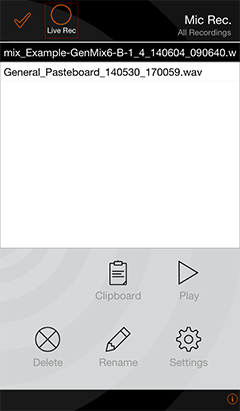

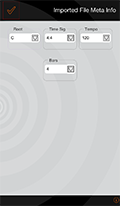
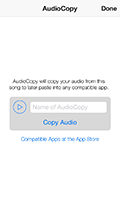
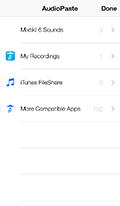
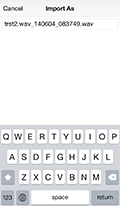

 Visualiser
 Play/Stop
 Volume
 Vis Settings
 Save
Save Import
 More
More Rec & Preview
 User Guide
 Please Rate
 Forum
Forum Tidy (iOS/Android only)
 Wotja Info
 Noatikl Info
 Store
Store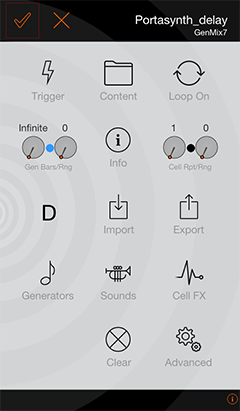
 Trigger
 Loop
Loop  Gen Bars/Range
 Info
Info Cell Repeat/Range
 Roots & Rules
 Import (iOS only)
 Generators
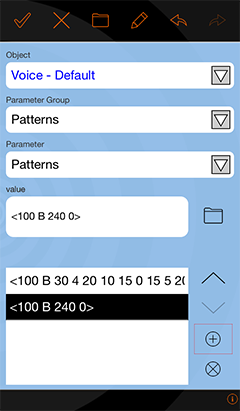
 Sounds
 Cell FX
 Clear
Clear Advanced
 Skip
Skip Silent
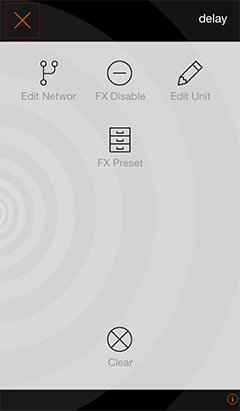
 Edit Network
 Disable/Enable
  Edit FX
  Preset
  Clear
Clear 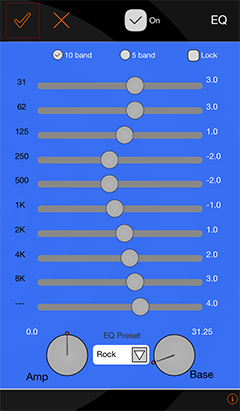


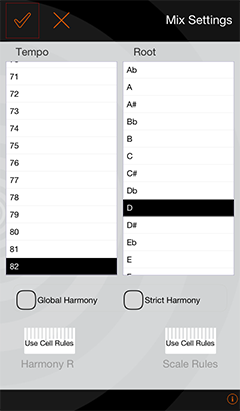
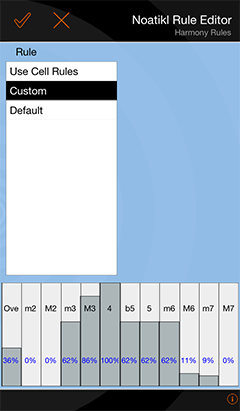
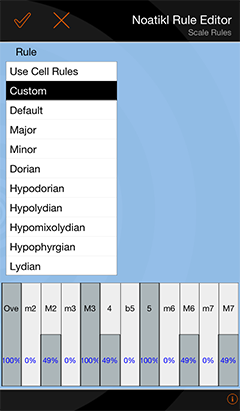
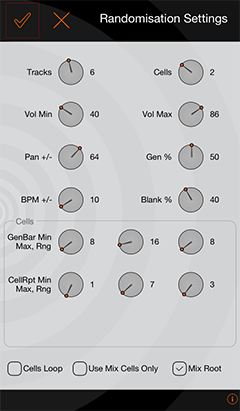

 Vis
Vis  Mixer
Mixer  Open
Open  Clipboard
  Save
Save