
NME 3
Guide 3.3.0 A - 30 Dec 16
 Noatikl Music Engine (NME) 3
Guide 3.3.0 A - 30 Dec 16|
Generative MIDI Music
The Intermorphic Noatikl (MIDI) Music Engine (NME) is a generative music engine. It is the evolution of the SSEYO Koan Generative Music Engine (SKME) and precursor to the Intermorphic Music Engine (IME) as used in Wotja 4+.
The NME utilises a range of generative / aleatoric / stochastic / algorithmic music techniques and parameters and creates MIDI notes and MIDI controller events through the interaction of 4 different kinds of NME Objects: Voice (with 6 Voice Types), Rule (Scale, Harmony, Rhythm & Next Note), Piece and File. There can be multiple instances of the first two objects in a "piece" and there are a large number of Voice parameters to affect and direct the composition.
Apps that include it
 Noatikl 3 - See Noatikl Web Guide
 Mixtikl 7 - See Mixtikl Web Guide
 Wotja 3 - See Wotja Web Guide
 Tiklbox - See Tiklbox Web Guide
In NME 3 but not in the IME:
- Support for scripting: This is primarily because there is no ability for use to use scripts on iOS, but we will review this area once we create Desktop Wotja that uses the IME.
In the IME but not in NME 3:
- Wotja TTM (Text to Music) parameters
- Wotja Mix level settings Ramp up, Playlist Duration, Playlist Duration Range, Playlist Ramp Down
Sound Generation
The NME MIDI data can (as app available or permitted) be used to drive external MIDI software or hardware synths, FX units and samplers or can be played through the Intermorphic Partikl Sound Engine for truly portable generative music.
Next Steps
Fundamental to understanding how the NME works is understanding two types of Objects: Voice and Rule. We cover these right at the start as once you get your head around them, you are on your way! Before we do that, though, we first need to introduce the "Generator Network", which defines how everything is hooked up together.
Generator Network
The generator network defines how all the generators/voice objects in the piece are associated with MIDI channels,which in turn can be associated with PSE Sound Networks and FX Networks. It also defines how these generators/voices are linked to each other (e.g. Following voices [below], where one voice follows the output of another). In it you can:
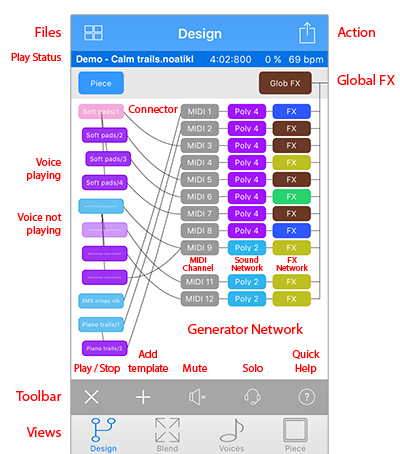
Generator Network
- Drag Generator/Voice to MIDI Channel (or vice-versa) for easy MIDI channel mapping
- Drag Generator/Voice to Generator/Voice for easy Follow/Repeat voice networks
- Tap Synth/FX buttons to display the built-in PSE Synth/FX Network Editors
- Drag Generators/Voices around for easy re-ordering (Desktop version)
If you drag from a Voice box to a MIDI channel box that will tell the system that the Generator/Voice will play through the defined MIDI channel. If a new voice is added to a piece, the voice won't be assigned to a specific MIDI channel; if you haven't yet hooked-up a Generator/Voice to a MIDI channel, Noatikl will decide on a free MIDI channel to hook-up the Voice to when it starts playing.
The generator network interface works the same way in both deskop and mobile versions, and looks similar, too. You can see it in the central area of the Noatikl mobile screen grab, below.
Voice Object
Every Noatikl piece includes one or more Voice Objects ("Voices"). These are MIDI generators and are the things that actually generate the MIDI notes and MIDI events according to various parameter values used by it. They're called Voices for historical reasons, but are equally well referred to as a "Generators".
Each Voice Object composes according to its defined Voice Type of which are 6, and each Voice Type has a corresponding associated colour:
Tip: Where the interface displays the Voice's name (e.g. Fred), that element will flash when the Voice plays.
Voice Types (VT)
-
Rhythmic Voices are the default Voice Type and compose according to the parameters in the Rhythmic / Basics parameter set. Notes have their durations composed according to the Rhythm Rules you define for your voice, to fit as well as possible within the bar structure of your piece.
-
Ambient Voices have notes composed such that their durations are defined by the parameters in the Ambient parameter set. Rhythm rules are not used for Ambient Voices. An Ambient Voice plays its notes without any respect for tempo or bar timings! Ambient Voices are wonderful for creating drifting, floating sounds for either background or foreground use as drones or for musical texture.
-
Following Voices are fascinating. They are used to create Voices which work in a call-response manner, following the behaviour of other Voices in a variety of exciting ways according to parameters in the Following parameter set.
-
Repeat Bar Voices are like Rhythmic Voices, with the added feature that they can be defined to repeat work that they have composed in previous bars, according to rules defined in the Repeat Bar parameter set. When not repeating previous bars, Repeat Bar Voices work in exactly the same way as Rhythmic Voices.
-
Fixed Pattern Voices are Voices that play in accordance with various fixed MIDI-like patterns. These patterns have a specific syntax and are able to follow generative sequencing rules, and can adapt automatically to changes in Scale Rules. They are great for bringing some structure to your composition. Fixed Pattern Voices can also be capable of mutating their patterns while playing, according to parameters defined in the Fixed Pattern parameter set. When not following a pattern (e.g. when mutating), Fixed Pattern Voices compose as Rhythmic Voices.
-
Listening Voices are Voices that detect incoming MIDI note events (monophonic, not polyphonic) and present them as a virtual composed note which can be followed by a Follows Voice, allowing you to create simple hyperinstruments (something that generates music that can respond in some way to external events which we also sometimes now refer to as adaptive generative music [AGM]).
Listening voices do not require any use of scripting, but in Noatikl Desktop they can also be used with scripting for more advanced hyperinstruments.
Rule Object
Rule Object - Scale Rules
Every Voice composes notes according to the settings of 4 types of Rule Objects it has associated with it.
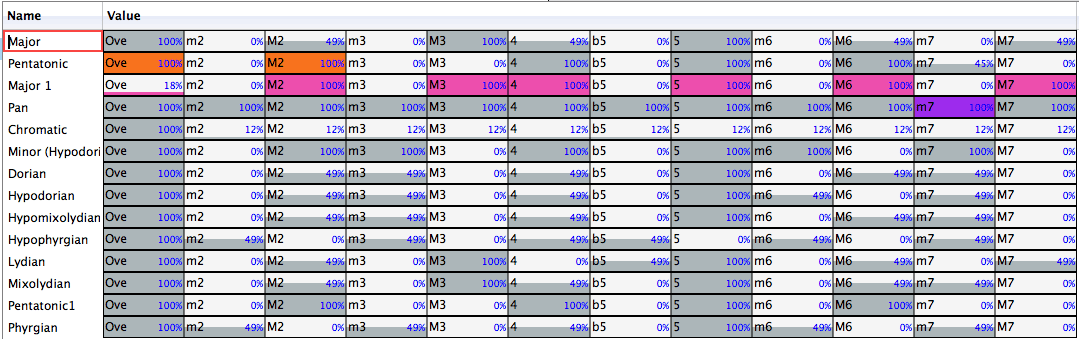
The four Rule Objects are Scale Rule, Harmony Rule, Next Note Rule, Rhythm Rule. Each Rule Object contains one or more "Rules", such as "Major" or "Minor".
Each Rule is an array of the values of the elements for that Rule Object (such as the values of 12 scale intervals). These values represent the relative probability (from 0% to 100%) (the "weighting") of that Rules' element being chosen by a Voice for a note to be composed. An element with a value of 0 will not be chosen for composition.
Important: When the Pitch Range for a Voice is wide enough, Scale Rules will "wrap around" to accomodate the extra range in notes available.
Changes to the values in these Rules, as with changes to any other NME parameter, allows an instant change in the music generated.
Tip: Where the interface displays the Rule elements, tap or click one one at the appropriate position to change the value of that element; the NME will attempt to make that element flash when it has been selected to play a note.
Rule Objects
Scale Rule
- The Scale Rule selected for a Voice defines the notes in the musical scale that are available for use by that Voice. You may create as many Scale Rules as you want. You typically give a Scale Rule a name that tells you what it represents (such as Major or Minor).
-
12 Elements
Each with % weighting values
These elements represent the semitone distance from the Root note defined for this Piece, these being: 0ve (root), m2, M2, m3, M3, 4, b5, 5, m6, M6, m7, M7
Harmony Rule
- The Harmony Rule selected for a Voice defines how likely it is that a note for that Voice will harmonize at a given musical interval in semitones with any note already composed (and in use by) by any *other* Voice. You may create as many Harmony Rules as you want.
-
12 Elements
Each with % weighting values
These elements represent in semitones the possible harmonies available, these being: 0ve (root), m2, M2, m3, M3, 4, b5, 5, m6, M6, m7, M7
-
Example
Imagine that you have three Voices, called X, Y and Z.
Imagine that at some time in the piece, the NME has already chosen to play note C for Voice X, and note G for Voice Y. At that time, the NME thinks about composing a note for Voice Z. It looks at the notes available for it to compose, and adjusts the probabilities of choosing each of those notes, by applying the Harmony Rule element values for each of those two composed notes which are active at time (i.e. notes C and G).
Harmonies are always calculated based on a rising direction up from the Piece Root. So, if the Piece Root is B and the NME is considering if it can compose note D for Voice Z, and it looks at the note it needs to harmonize with which is note C for Voice X; then Noatikl figures-out the Harmony Rule values for Voice Z from the C of Voice X, up and through the Octave (i.e. E, F, F#, G, G# etc.).
Next Note Rule
- The Next Note Rule selected for a Voice defines the distances in semitones available to be used between each note composed for that Voice. You may create as many Next Note Rules as you want.
-
12 Elements
Each with % weighting values
These elements represent in semitones the distance a new note will be from the last composed note, these being: 0ve (root), m2, M2, m3, M3, 4, b5, 5, m6, M6, m7, M7
Rhythm Rule
- The Rhythm Rule selected for a Voice defines the note durations available for notes played by that Voice. This rule is combined with other factors, including the remaining length of time a Voice has left in the current bar (the NME tries to avoid having notes from non-Ambient voices drifting across bar boundaries). You may create as many Rhythm Rules as you want.
-
9 Elements
Each with % weighting values
These elements represent the permitted note durations, these being: 1, 1/2., 1/2, 1/4., 1/4, 1/8., 1/8, Triplet, 1/16
Voice - Rhythmic
Voice Type - Rhythmic & "Basics" parameters.
The "Voice Rhythmic" parameters encompass the main parameters of every Voice and also govern those of the default Voice Type, which is the Rhythmic Voice.
Name
Every voice in a Noatikl file has a unique name. You can use any name you want, provided it is not empty, and provided it is not a single question mark (which has a reserved meaning for use with Rules, which you will find out about later).
Mute
Toggle this setting (Yes/No) to mute or unmute the voice. Certain Voice Types might take some time to respond, depending on how far in advance their notes are composed.
When the keyboard focus is on the Mute cell, you have various extra menu options available to you in the "Control" Menu. These are as follows:
- Solo Voice
- Unmute All Voices
- Mute All Voices
If you hold down the ctrl key when you click on the mute cell, you will toggle all other voice's mute states, without changing the mute state of the voice that you ctrl-click on. This can be very handy.
Patch
Every Voice is assigned a given Patch. This specifies the sound that you will hear whenever the Voice plays a note. The exact sound you hear depends on the sound source you have associated with the Voice; this could be the PSE or you might be driving an external MIDI synth.
In general, the NME does not emit any MIDI bank select CC information for a Vvoice before it emits the Patch Change MIDI event. However, you can force the NME to emit such information, by typing-in a special format patch value; where you type-in the patch in the format: patch.msb.lsb, for example:
98.53.4
In this example, the NME will emit bank select CCs for both MSB and LSB according to the settings you supply (53 and 4 respectively, in this case). If you don't specify a value for the lsb, then the NME will only emit a Bank Select MSB CC (CC number 0). If you supply the lsb, then the NME will also emit a Bank Select MSB CC (CC number 32).
Send MIDI Bank/Patch?
Not all software synthesizers for your favourite sequencer like having Patch data supplied to them via a Patch Change MIDI event. If this is the case, simply change the Send MIDI Bank/Patch? parameter to No (unchecked), and the NME won't send any MIDI patch change events.
MIDI Channel
A Voice emits data on a MIDI Channel. MIDI channels are numbered from 1 to 16. The default MIDI channel for a Voice is actually MIDI channel 0 – which tells the NME to assign a free channel from 1 to 16 automatically, as best it can. MIDI channel 10 is always reserved for percussion sounds, such as drum sounds or other untuned sound.
Voice Type
Every Voice composes according to its Voice Type.
Pitch
Set the Pitch to be the minimum pitch for which you want your Voice to compose. The NME will ensure that it composes no notes less than this pitch value.
Phrase Length
Set this to define the shortest possible sequence of notes that your Voice will compose in sequence. The Voice composes a sequence of notes, followed by a sequence of rests. The length of each sequence of notes is governed by this and the Phrase Length Range parameter.
Phrase Length Range
This value defines the upper limit to the number of notes that your Voice will compose in sequence. For example, if the Phrase Length is 3, and the Phrase Length Range is 25, then the minimum phrase will be 3 notes, and the maximum phrase length will be (3+25) = 28 notes.
Phrase Gaps
Set this to define the shortest possible sequence of rests that your Voice will compose. Your Voice composes a sequence of notes, followed by a sequence of rests. The length of each sequence of rests is governed by this and the Phrase Gaps Range parameter.
Phrase Gaps Range
This value defines the upper limit to the number of rests that your Voice will compose in sequence. For example, if the Phrase Gaps is 3, and the Phrase Gaps Range is 25, then the minimum phrase will be 3 rests, and the maximum phrase length will be (3+25) = 30 rests.
Note Rest %
This value defaults to zero. If not zero, then the defined percentage of notes that would otherwise be played by your Voice will instead be treated as a rests of the same duration. This is very useful for making any Voice sound sparser. Give it a go: this parameter is very powerful, and applies to all Voice Types.
Voice - Ambient
Voice - Type Ambient
Units
You define the Unit of Measure for which the other Ambient Voice parameters are interpreted. This may be one of the following values:
- Seconds (thousandths of a)
The parameters including Duration are all interpreted as being in thousandths of a second (i.e. Milliseconds). So, a Duration value of 1000 means one second.
- Beats (60ths of a)
The parameters including Duration are all interpreted as being in 60ths of a beat. In the NME a Beat is defined as being one crotchet; you get 4 beats in a bar of 4:4 music. So, a Duration value of 60 means one beat. A Duration value of 30 means a quaver. A Duration value of 20 means a triplet. A Duration value of 15 means a semi-quaver. A Duration value of 240 means 4 beats (which is a full bar if the Piece Meter is 4:4).
- Full seconds
The parameters including Duration are all interpreted as being in seconds. So, a Duration value of 10 means ten seconds.
Duration
The Ambient Voice parameters govern how Ambient Voices work.
This defines the minimum duration for which the Ambient Voice will play when it composes a note. The actual value chosen for each note is a value between Duration, and Duration plus the Duration Range. Each and every note composed for this Ambient Voice will have a note whose duration is separately calculated.
Duration Range
This is combined with the Duration parameter, to determine the duration for which the Ambient Voice will play when it composes a note. The actual value chosen for each note is a value between Duration, and Duration plus the Duration Range. Each and every note composed for this Ambient Voice will have a note whose duration is separately calculated.
Gap Minimum
This defines the minimum duration for which the Ambient Voice will play when it composes a rest. The actual value chosen for each rest is a value between Gap Minimum, and Gap Minimum plus the Gap Range. Each and every rest composed for this Ambient Voice will have a rest whose duration is separately calculated.
Tip: This is the Duration used for the Phrase Gaps / Phrase Gaps Range parameters i.e. it allows the duration of gaps to be different to that of the notes.
Gap Range
This is combined with the Gap Minimum parameter, to determine the duration for which the Ambient Voice will play when it composes a rest. The actual value chosen for each rest is a value between Gap Minimum, and Gap Minimum plus the Gap Range. Each and every note composed for this Ambient Voice will have a note whose duration is separately calculated.
Tip: This is the Duration Range used for the Phrase Gaps / Phrase Gaps Range parameters i.e. it allows the duration of gaps to be different to that of the notes.
Phrase Length
Set this to define the shortest possible sequence of notes that your Voice will compose in sequence. The Voice composes a sequence of notes, followed by a sequence of rests. The length of each sequence of notes is governed by this and the Phrase Length Range parameter.
Phrase Length Range
This value defines the upper limit to the number of notes that your Voice will compose in sequence. For example, if the Phrase Length is 3, and the Phrase Length Range is 25, then the minimum phrase will be 3 notes, and the maximum phrase length will be (3+25) = 28 notes.
Phrase Gaps
Set this to define the shortest possible sequence of rests that your Voice will compose. Your Voice composes a sequence of notes, followed by a sequence of rests. The length of each sequence of rests is governed by this and the Phrase Gaps Range parameter.
Phrase Gaps Range
This value defines the upper limit to the number of rests that your Voice will compose in sequence. For example, if the Phrase Gaps is 3, and the Phrase Gaps Range is 25, then the minimum phrase will be 3 rests, and the maximum phrase length will be (3+25) = 30 rests.
Note Rest %
This value defaults to zero. If not zero, then the defined percentage of notes that would otherwise be played by your Voice will instead be treated as a rests of the same duration. This is very useful for making any Voice sound sparser. Give it a go: this parameter is very powerful, and applies to all Voice Types.
Voice - Follows
Voice - Type Follows
The Follows Voice parameters govern how Following Voices work.
Select the Voice which you want your Voice to follow. If you don't specify a Voice to follow, then the following Voice won't play. You may follow any Voice in the piece you want, of any type. You may even follow a Voice that is following another Voice that is following another Voice... provided that you don't try to define a cyclic dependency which loops back to the current Voice!
Percent
This parameter sets the percentage of notes that the Followed Voice responds to so as to emit a note. Set to 100 if you want the Following Voice to emit a note for every note played by the Followed Voice. Set to a smaller value if you want to thin-out the notes played by the Following Voice. This is also useful for building networks of chords, where if you have a number of Following Voices all following either each other or one main Voice, and if those Following Voices have the Percent Parameter to less than 100, then sometimes you will hear dense chords, and sometimes you will hear thinner chords.
Strategy
This parameter defines the pitch to use for a note generated by the Following Voice. The available values are:
- Chordal Harmony
This causes the Following Voice to choose notes which respect the currently defined Scale, Harmony and Next Note Rules.
- Interval Within Scale Rule
This causes the Following Voice to choose notes which are offset from the followed note, such they are at an interval within the Scale Rule, defined as a value randomly selected between the Shift / Interval and Shift / Interval plus Shift / Interval Range values.
For example, if these values are 1 and 2 respectively, then each time a note is chosen, it will be between 1 and (1+2)=3 Scale Rule intervals up from the Followed Voice's note. It is important to understand that this refers to the non-zeroed elements in the current Scale Rule, in other words only those notes that are available within the Scale Rule.
So, in our example, if we were using a Major Scale Rule, and if the followed note were C4 (Middle C), and if Noatikl chose a value of 2 as its random value; then the played note would be E4 (Middle C), which is the second note up from Middle C within the Major Scale Rule.
- Semitone Shift
This causes the Following Voice to choose notes which are offset up from the followed note, such they offset from the followed note by a number of semitones which is a value randomly selected between the Shift / Interval and Shift / Interval plus Shift / Interval Range values. A note chosen in this way ignores the current Scale Rule.
For example, if these values are 1 and 2 respectively, then each time a note is chosen, it will be between 1 and (1+2)=3 semitones up from the Followed Voice's note.
So, in our example, if we were using a Major Scale Rule, and if the followed note were C4 (Middle C), and if Noatikl chose a value of 3 as its random value; then the played note would be D#4 (Middle D#), which is the third semitone note up from Middle C. This value is used even though it is not in the current scale rule.
Units
You define the Unit of Measure by which the Delay and Delay Range parameters are interpreted. This may be one of the following values:
- Seconds (thousandths of a)
The parameters including Duration are all interpreted as being in thousandths of a second (i.e. Milliseconds). So, a Duration value of 1000 means one second.
- Beats (60ths of a)
The parameters including Duration are all interpreted as being in 60ths of a beat. In Noatikl a Beat is defined as being one crotchet; you get 3 beats in a bar of 4:4 music. So, a Duration value of 60 means one beat. A Duration value of 30 means a quaver. A Duration value of 20 means a triplet. A Duration value of 15 means a semi-quaver. A Duration value of 240 means 4 beats (which is a full bar if the Piece Meter is 4:4).
- Full seconds
The parameters including Duration are all interpreted as being in seconds. So, a Duration value of 10 means ten seconds.
Delay
This defines the minimum delay after which the Following Voice will play a followed note. The actual value chosen for each note is a value between Delay, and Delay plus the Delay Range. Each and every note composed for this Following Voice will have a note whose delay is separately calculated.
Delay Range
This is combined with the Delay parameter, to determine the delay after which the Following Voice will play a followed note. The actual value chosen for each note is a value between Delay, and Delay plus the Delay Range. Each and every note composed for this Following Voice will have a note whose delay is separately calculated.
Shift / Interval
Used when the Strategy is either Interval Within Scale Rule or Semitone Shift.
This causes the Following Voice to choose notes which are offset in some way from the followed note, according to the Strategy; where the offset is defined as a value randomly selected between the Shift / Interval and Shift / Interval plus Shift / Interval Range values.
S/I Range
This represents the "Shift/Interval Range", and is used when the Strategy is either Interval Within Scale Rule or Semitone Shift.
This causes the Following Voice to choose notes which are offset in some way from the followed note, according to the Strategy; where the offset is defined as a value randomly selected between the Shift / Interval and Shift / Interval plus Shift / Interval Range values.
Voice - Repeat Bar
Voice - Type Repeat Bar
The Repeat Bar parameters govern how Repeat Bar Voices work. Repeat Bar Voices compose as if they were of Rhythmic Voice Type.
Voice
You define the name of the Voice from which you would like, from time-to-time, to repeat past bars of music. If you simply want to repeat bars played in the past for the current Voice, simply select the magic value of '?', which is also the default value.
Percent
When the Voice starts composing a new bar, it takes a look at this parameter value. This defines for what percent of the time the Voice should repeat previously-composed music. Set this parameter to 100 if you always want past composed music to be repeated (where available!); set to 0 if you never want past music repeated by this Voice. When the Voice doesn't choose to repeat past data it composes a new bar of music were it to be of Rhythmic Voice Type.
Bars
Defines the number of bars for which the Voice should repeat a past-composed chunk of music. The actual value chosen is somewhere between Bars and Bars + Bars Range.
Bars Range
Defines the upper limit of the number of bars for which the Voice should repeat a past-composed chunk of music. The actual value chosen is somewhere between Bars and Bars + Bars Range.
History
Defines the number of bars in the past, from which the Voice will choose the past-composed music to repeat. The actual value chosen is somewhere between History and History + History Range.
History Range
Defines the upper limit of the number of bars in the past, from which the Voice will choose the past-composed music to repeat. The actual value chosen is somewhere between History and History + History Range.
Voice - Pattern
Voice - Type Fixed Pattern
The Fixed Pattern parameters govern how Fixed Pattern Voices work. Fixed Pattern Voices compose as if they were of Rhythmic Voice Type.
See the also the NME Pattern Syntax section.
Use Percent
When the Voice starts a new sub-pattern at the start of a bar, it consults the value you have defined for Use Percent. This parameter determines the probably of the Voice using the Pattern for the bar; or alternatively, compose a completely new bar (that you will hear only once!) were it to be of Rhythmic Voice Type.
If Use Percent is 100, then the Voice will always use the pattern. If Use Percent is 50, then teh Voice will instead compose a new bar every other bar or so. Note that the Voice will never interrupt a sub-pattern that it is playing; the Use Percent parameter is considered only on a sub-pattern boundary, at the start of a new bar.
Mutation Factor
The mutation factor is used when a bar is considered for mutation (which can happen only if Bars Between is not zero! The Mutation Factor determines the level of mutation to apply. If set to 10.0%, then when playing from a sub-pattern, this means that each note that would be played from the pattern, has a 10% chance of having a different one composed, with subsequence pattern playbacks keeping that mutation. Note that if Mutate Rhythm? is set to Yes, then if the composed note is longer than the composed-over pattern note, this might overlap and cancel-out some other notes in the sub-pattern.
Bars Between
This parameter defines the number of bars that the Voice waits between, before trying to mutate a bar in a pattern according to the Mutation Factor. If Bars Between is set to zero, the Voice can never mutate. Set to 1 if you want mutation every bar, 2 if you want mutation every other bar, etc. ...
The actual number of bars used is selected randomly each time, somewhere in the range from Bars Between, to Bars Between plus Bars Range.
Bars Range
This parameter is used to help define the number of bars between attempts by the Voice to mutate the current pattern. The actual number of bars used is selected randomly each time, somewhere in the range from Bars Between, to Bars Between plus Bars Range.
Mutate Rhythm?
If set to No, then the timing of the sub-pattern is preserved perfectly; only the frequency of the pattern notes will be changed when the pattern is mutated. Otherwise, the duration of each note is chosen from the rhythm rules and phrase/phrase gap rules for the Voice.
Meter
Defines the Meter to be used by the Voice, such 4:4 or 3:4 or 6:8. A value of ?, which is the default, means to use the Meter defined for the Piece. A different value allows the Voice to work with a completely different meter, which can be used for interesting polyphonic effects.
Patterns
Defines the Pattern to be used by a Fixed Pattern Voice.
Select the Patterns parameter to display any Pattern Editor Dialog that is available. Information on the syntax to use is detailed below.
Pattern Syntax Overview
The pattern syntax is somewhat complicated, and, until such time as we have created a pattern editor for the NME, will require a bit of effort to get to grips with.
A pattern is a text string in a specific format, surrounded by < and > symbols. Patterns can be grouped together as list of patterns. Because of this we refer to patterns as a "Pattern" when there is only one, or as "Sub-Patterns" when there are many in the list of patterns. We know it is a bit confusing, so we'll say it again in another way: each Pattern is made-up of a number of Sub-Patterns.
There are 4 types of Sub-Pattern:
- Note
- R - Rhythm only: Defines note durations to use, but leaves selection of the note pitches to use up to the Voice acting as a Rhythmic Voice. A negation duration represents a rest.
- Important Note: This is the only pattern type in a Noatikl file that can be imported into Wotja.
- B - Both: i.e. "Melodic" pattern using scale rule intervals. Includes a series of both paired note durations and scale rule interval values. A scale rule interval value of 1 represents the 0ve scale interval used by the Voice and a value of 0 represents a rest.
- F – Forced Frequency: i.e. "Melodic" pattern using fixed MIDI pitches. Defines the root pitch (60 is Middle C) to use for the pattern and a series of both paired note durations and relative pitches. The pitch values are relative to the root pitch and are independent of scale rule. A pitch value of 0 represents the root pitch and a value of -1 means treat this note as a rest note. These patterns can be useful for drum riffs, e.g. with MIDI drums.
- R - Rhythm only: Defines note durations to use, but leaves selection of the note pitches to use up to the Voice acting as a Rhythmic Voice. A negation duration represents a rest.
- Sequence
- S – Sequence: Sequenced patterns allow the NME to use generative rules to select which sub patterns to use while playing a pattern as a generative sequence of sub-patterns.
The NME employs an underlying "time unit" that is 1/60th of a crotchet/quarter note. NME note Duration values map onto standard music notation in the following way (irrespective of meter) [# NME time units - Composed note length]:
- 240 - whole note (i.e. one bar of 4:4)
- 120 - minim/half note
- 60 - crotchet/quarter note
- 30 - quaver/eighth note
- 20 - triplet/twelfth note
- 15 - semi-quaver/sixteenth note
So by way of example:
- one bar of 4:4 is 4 * 60 = 240 NME time units.
- one bar of 3:4 is 3 * 60 = 180 NME time units.
- one bar of 2:4 is 2 * 60 = 120 NME time units.
- one bar of 1:4 is 1 * 60 = 60 NME time units.
- one bar of 6:8 is 6 * 30 = 180 NME time units.
- one bar of 9:8 is 9 * 30 = 270 NME time units.
You are of course free to experiment using other time unit values, which will mean different things. E.g. 10 time units is a 24th note etc.
Note Sub-Pattern Syntax:
Tip: To aid understanding and visual clarity, we use the following color coding: durations, velocity values and scale intervals.
<[prob][.M] pattype {[dur][.vff[-vffr]] [scaleint]}*>
Where:
- prob : the relative probability that this sub-pattern is selected; relevant only where there is more than one sub-pattern! The default value is 100%.
- M : Flag indicating that the sub-pattern is to be "muted", i.e. not allowed to be selected. This can be useful for testing of individual sub patterns; where you might want to "solo" a sub-pattern by muting out all the others.
- pattype : One of:
- R: Rhythm pattern
- B: Both pattern
- F: Forced Frequency pattern type, followed by the root note in MIDIpitch. e.g. F60.
- dur : Note Duration / NME time units.
-
See above for note duration values.
In R patterns a negative duration indicates a rest for that time; in F patterns a pitch of -1 indicates a rest for the note duration.
If a note sub-pattern is not an exact even number of bars (e.g. 2 and and half bars at the current meter!) then the engine will pad to silence to the end of the nearest bar boundary.
- vff: Velocity Force Factor (optional, any integer value)
- vffr: Velocity Force Factor Range (optional, any integer value and used in conjunction with the above).
- Note: Velocity Force Factor is an INTEGER % SCALE FACTOR applied to the velocity, where the velocity is first determined from the velocity envelopes. For example, in a pattern [dur][.vff[-vffr]] 60.50 means a note of length 60 Noatikl time units with 50% VFF scaling, 30.15 means a note of length 30 Noatikl time units with 15% VFF scaling, and 120.100-20 means a note of length 120 Noatikl time units and with 100% VFF scaling with a range of 20%.
- The scaled pattern note velocity can never be any less than 1.
- The scaled pattern note velocity can never be any greater than 127.
- Note that a pattern note velocity scaling factor of 0 always returns minimum MIDI velocity, which is 1. You cannot use a factor of 0 to "completely mute" a note.
- Example: A Voice's velocity (min) envelope has a value of 100, with a velocity range envelope vallue of 20 - the velocity for a given note is selected randomly in that range, to be (say) 104. Where defined, the pattern note's Velocity Force Factor is used to scale that velocity, to a final value from 1 to 127. e.g. if the Velocity Force Factor is 50 (%), in this example we'd chose a final velocity value of: 104 * 50 (%) = 52. The Velocity Force Factor Range value, if defined, applies a range to the scaling factor.
-
- scaleint: Scale interval (not present for Rhythm patterns).
- B rule: interpreted as being the first valid note in current Voice's Scale Rule; i.e. the first element in the Voice's Current Scale Rule which does not have a zero value. "1" is therefore usually the root note (c.f. the Pitch parameter). "0" has the special meaning of indicating a "REST" for the note duration.
- F rule: distance in semitones up from the root note (so "0" means the root note). E.g. if F60 (Middle C), then a pitch value of 5 means MIDI pitch 65.
Sequence Sub-Patterns Syntax
<S100 R 1.20 2.1 1-2.1-4 2.1>
Syntax
<[S][prob][.M] R {[seqnum[-seqnumrange].[repeattimes[-repeattimesrange]] [seqnum[-seqnumrange].[repeattimes[-repeattimesrange]]}* >
Where:
- S : identifies a sequence sub-pattern
- prob : relative probability of being chosen when there is more than one sequence sub-pattern.
- M: Mute the sub-pattern (i.e. prevent it being selected!). If none can be selected, then a non-sequence sub-pattern is chosen to play at random as usual each time.
- R: Rhythm pattern type (always required)
- seqnum: Sequence Number.
- The index of the non-sequence sub-pattern to play. Default is 1. The sub-patterns are numbered from 1 up.
- seqnumrange : Sequence Number Range. Default is 0.
- repeattimes: Repeat Times Minimum.
- The number of times to repeat this sub-pattern, when selected. A value of "0", will cause the sub-pattern (when selected) to keep playing forever until the end of the piece! Default is 1.
- repeattimesrange : Repeat Times Range. Default is 0.
Which sub-pattern is chosen by the Voice depends on a few things:
If there is at least one sequenced sub pattern, then a sequence is used to drive the sub-pattern. Which sequence to use, is based on the Voice making a weighted random selection from the available sub-patterns. When (if!) the sequenced sub-pattern end is reached, the Voice will make another selection as to which sequenced sub-pattern to use.
Otherwise, a sub-pattern is chosen, based on the Voice making a weighted random selection from the available sub-patterns. This sub-pattern is played through to the end, at which point the Voice will make another selection as to which sub-pattern to play.
A Note Sub-Pattern that is less than a whole number of bars at the Voice's current Meter, will be padded automatically with silence to ensure that it remains bar synchronised.
Patterns: Examples
The NME has its own pattern format, which allows it to play specified notes and rests in different ways. Patterns are affected by the various Rules being used by the Voice.
Tip: To aid understanding and visual clarity in the examples, we use the following color coding: durations, velocity values and scale intervals.
Below are a number of example patterns. Copy and paste these into Noatikl to try them out.
Rhythm: <100 R 60 60 60.127 60>
Both: <100 B 60.15-30 1 60 2 60.127 3 15 7>
Forced Frequency: <100 F60 60.127 1 60 4 30 5 15.70-120 7>
Sequence: <S100.M R 1.1 2-0.1-0 3-0.1-0 >
Two patterns. Select randomly from these two each time!
<100 B 60 1 60 2 60 3 60 4>
<100 B 30 9 30 8 30 7 30 6 30 5 30 4 30 3 30 2>
Forced Frequency pattern. Plays note with pitch 58 (or MIDI patch 59 on Ch10): note on, note off, note on, note off etc.
<100 F58 15 1 45 -1 15 1 45 -1 15 1 45 -1>
Forced Frequency pattern: Plays a series of notes for a whole bar (or patches in the drum kit on Ch10) starting at base pitch 40, each one a 16th note...
<100 F40 15 1 15 7 15 6 15 13 15 2 15 8 15 4 15 11 15 13 15 2 15 8 15 2 15 2 15 8 15 4 15 14>
Two sequenced sub-patterns. Play 1 once, then 2 once...
<S100 R 1.1 2.1>
<100 B 60 1 60 2 60 3 60 4>
<100 B 30 9 30 8 30 7 30 6 30 5 30 4 30 3 30 2>
Two sequenced sub-patterns. Play 1 twice, then 2 twice...
<S100 R 1.2 2.2>
<100 B 60 1 60 2 60 3 60 4>
<100 B 30 9 30 8 30 7 30 6 30 5 30 4 30 3 30 2>
Two sequenced sub-patterns. Play 1 or 2 twice, then 1 or 2 twice...
<S100 R 1-1.2 1-1.2>
<100 B 60 1 60 2 60 3 60 4>
<100 B 30 9 30 8 30 7 30 6 30 5 30 4 30 3 30 2>
Two sequenced sub-patterns. Play 1 once, then 2 twice, the one or 2 once, then 2 once...
<S100 R 1.1 2.2 1-1.1 2.1>
<100 B 60 1 60 2 60 3 60 4>
<100 B 30 9 30 8 30 7 30 6 30 5 30 4 30 3 30 2>
Two sequenced sub-patterns. Play 1 once, then 2 forever...
<S100 R 1.1 2.0>
<100 B 60 1 60 2 60 3 60 4>
<100 B 30 9 30 8 30 7 30 6 30 5 30 4 30 3 30 2>
Voice - Chords
The Chord parameters let you configure any Voice Type to generate chords automatically.
In outline, use the Depth and Depth Range values to define the "Chord Depth"; which is the number of notes that will play at any one time for a given Voice. The first note in any chord is composed according to the normal mechanism for the Voice Type; additional notes that cause a chord to be built-up may be generated automatically according to the Chord parameters.
Depth
Specify the minimum Depth of chord that you want your Voice to play with. A value of 1 will mean that the Voice will not chord (unless the Depth Range parameter is greater than zero).
The Depth defines the number of notes that are played by the voice at any one time.
Depth Range
Specify the relative maximum Depth of chord that you want your Voice to play with. A value of 0 means that whenever the Voice is played, it will play a number of notes equal to the Depth. A value of one or more means that whenever the Voice is played, it will play a number of notes equal to a randomly selected value between the Depth and the Depth plus the Depth Range.
Percent
This parameter tells the Voice the percentage chance that it should actually emit any given note in the chord (after the first note, of course!). Set to 100 if you want the Chording Voice to always emit a note for every note played by the Voice. Set to a smaller value if you want to thin-out the notes played within the chord. This allows you to create chords of varying depth; sometimes dense, sometimes thin.
Strategy
This parameter tells the Voice what it should do when it decides the pitch to use for a note generated within a chord. The available values are:
- Chordal Harmony
This causes the Voice's chord notes to be selected according to the currently defined Scale, Harmony and Next Note Rules.
- Interval Within Scale Rule
This causes the Voice's chord note to be selected offset from the followed note, such they it is at an interval within the Scale Rule beyond the previous note in the chord, defined as a value randomly selected between the Shift / Interval and Shift / Interval plus Shift / Interval Range values.
For example, if these values are 1 and 2 respectively, then each time a note is chosen within the chord, it will be between 1 and (1+2)=3 Scale Rule intervals up from the previous note in the chord. It is important to understand that this refers to the non-zeroed elements in the current Scale Rule, in other words only those notes that are available within the Scale Rule.
So, in our example, if we were using a Major Scale Rule, and if the first note in the chord were C4 (Middle C), and if the Voice chose a value of 2 as its random value; then the played note would be E4 (Middle C), which is the second note up from Middle C within the Major Scale Rule.
- Semitone Shift
This causes the the Voice's chord note to be selected offset up from the previous note in the chord, such it is offset from the previous chord note by a number of semitones which is a value randomly selected between the Shift / Interval and Shift / Interval plus Shift / Interval Range values. A note chosen in this way ignores the current Scale Rule.
For example, if these values are 1 and 2 respectively, then each time a note is chosen, it will be between 1 and (1+2)=3 semitones up from the previous note in the chord.
So, in our example, if we were using a Major Scale Rule, and if the previous note in the chord were C4 (Middle C), and if the Voice chose a value of 3 as its random value; then the played note would be D#4 (Middle D#), which is the third semitone note up from Middle C. This value is used even though it is not in the current Scale Rule.
Units
You define the Unit of Measure by which the Delay and Delay Range parameters are interpreted. This may be one of the following values:
- Seconds (thousandths of a)
The parameters including Duration are all interpreted as being in thousandths of a second (i.e. Milliseconds). So, a Duration value of 1000 means one second.
- Beats (60ths of a)
The parameters including Duration are all interpreted as being in 60ths of a beat. In the NME a Beat is defined as being one crotchet; you get 3 beats in a bar of 4:4 music. So, a Duration value of 60 means one beat. A Duration value of 30 means a quaver. A Duration value of 20 means a triplet. A Duration value of 15 means a semi-quaver. A Duration value of 240 means 4 beats (which is a full bar if the Piece Meter is 4:4).
- Quantized Beats (60ths of a)
This works the same way as Beats (60ths of a) except that where the Delay has a special value of 10, 15 or 20; the delay is interpreted in a special way that is very useful for some breakbeat-based music. Specifically, in this case, the calculated value for the delay is rounded to the nearest sub-multiple of the Delay value. So, for example, if the engine calculates a value of 43, and if Delay is 20, the used value for the delay is actually 40 (which is the nearest multiple of 20).
Delay
This defines the minimum delay after which the Chording Voice will play a followed note. The actual value chosen for each note is a value between Delay, and Delay plus the Delay Range. Each and every note composed for this Chording Voice will have a note whose delay is separately calculated.
Delay Range
This is combined with the Delay parameter, to determine the delay after which the Chording Voice will play a followed note. The actual value chosen for each note is a value between Delay, and Delay plus the Delay Range. Each and every note composed for this Chording Voice will have a note whose delay is separately calculated.
Shift / Interval
Used when the Strategy is either Interval Within Scale Rule or Semitone Shift.
This causes the Chording Voice to choose notes which are offset in some way from the followed note, according to the Strategy; where the offset is defined as a value randomly selected between the Shift / Interval and Shift / Interval plus Shift / Interval Range values.
S/I Range
This represents the "Shift/Interval Range", and is used when the Strategy is either Interval Within Scale Rule or Semitone Shift.
This causes the Chording Voice to choose notes which are offset in some way from the followed note, according to the Strategy; where the offset is defined as a value randomly selected between the Shift / Interval and Shift / Interval plus Shift / Interval Range values.
Pitch Offset
This parameter defines the amount that the pitch of each note in the chord should be offset, in semitones, from the previous note in the chord; the actual value selected might be overridden according to the various rules that apply to the Voice, but in general, this parameter allows you to "shape" a chord to have a given range of pitch values. In combination with the Delay-related parameters, this allows you to create some very interesting arpeggiation effects.
For example, a value of +12 would tend to space each note in the chord by a range of 12 semitones (which is one octave), with each subsequent value in the chord being higher in pitch that the previous.
For example, a value of -12 would tend to space each note in the chord by a range of 12 semitones (which is one octave), with each subsequent value in the chord being lower in pitch that the previous.
Velocity Factor
This parameter allows you to specify the range of relative velocities for the notes in a chord. Each subsequent note in the chord is the defined percentage louder (for a positive value) or quieter (for a negative value) than the previous note in the chord. A value of zero means that all notes in the chord are played with the same velocity.
The Voice velocity envelope values are ignored when this parameter is applied.
For example, a value of -30 would tell the Voice to generate its chords such that each auto-chorded note is 30% quieter than each preceding note in the chord; giving a noticeable tailing-off effect.
Voice - Listening
Voice - Type Listening
The monophonic "Listening Voice" listens out on its MIDI channel for incoming MIDI notes. It is silent (it does not generate or emit MIDI notes). When a note is detected, e.g. C60, it echoes a virtual note that can be "heard" only by a Following Voice which is then used to create an actual note. It will only detect a subsequent note if it first receives a note off for the previous note.
The virtual note created by a Listening Voice is pitch shifted, if necessary, to fit within the band of pitch values set by its Pitch and Pitch Range parameters (see Rhythmic Voice).
Playing with a Listening Voice:
- Ensure Noatikl has been setup, as below.
- Ensure your Listening Voice is on the MIDI channel you are expecting to detect MIDI notes, and follow that voice with a Following Voice and suitable patch (PSE Sound). Tip: Use the Chording parameters to play chords!
- Press play in Noatikl app to start your piece and for the Listening Voice to detect the MIDI notes fed into it (and remember that the Listening Voice will only detect a subsequent note if it first receives a note off for the previous note!).
Noatikl Desktop Setup:
MIDI emitting app or MIDI Device feeding MIDI notes into the Noatikl app- Load the MIDI app (e.g. MIDI Mock) and ensure you have it set up to send MIDI notes on the MIDI channel you want, e.g. MIDI Channel 1 or Omni.
- Load Noatikl and in the top Control Bar ensure that you have set the MIDI Input droplist set to the mechanism you are using to feed your MIDI notes into Noatikl.
- In the top Control Bar also set the "Listen?" checkbox to on.
Noatikl Mobile Setup:
MIDI emitting app or MIDI Device feeding MIDI notes into the Noatikl app- Load the MIDI app (e.g. MIDIKeys) and ensure you have it set up to send MIDI notes on the Virtual MIDI channel you want, e.g. MIDI Channel 1 or Omni.
- In Noatikl > Settings, select the MIDI Input button which takes you to the MIDI Input Devices screen:
- Toggle on the relevant Channels for your desired MIDI Input Device(s).
- Ensure that the "Enable MIDI Input" toggle at the bottom is set to on.
Voice - Rules
The Voice Rule parameters let you select the various rules that govern how your Voice works. The Rules themselves are edited in the relevant Rule Object. See Rule Objects.
Harmony Rules
Select the Harmony Rule that you want your Voice to use. If you select the value labelled ?, this tells the Voice to use the value defined in the Piece Object. If that value is in turn the ? value, then your Voice will choose a rule to use at random when it starts playing. See Rule Objects.
Next Note Rules
Select the Next Note Rule that you want your Voice to use. If you select the value labelled ?, this tells the Voice to use the value defined in the Piece Object. If that value is in turn the ? value, then your Voice will choose a rule to use at random when it starts playing. See Rule Objects.
Rhythm Rules
Select the Rhythm Rule that you want your Voice to use. If you select the value labelled ?, then your Voice will choose a rule to use at random when it starts playing. See Rule Objects.
Scale Rules
Select the Scale Rule that you want your Voice to use. If you select the value labelled ?, this tells the Voice to use the value defined in the Piece Object. If that value is in turn the ? value, then your Voice will choose a rule to use at random when it starts playing. See Rule Objects.
Harmonise?
The default value for this parameter is "Yes", which means that the Voice will be considered for harmonisation with other voices. Set to "No" if for some reason you do not want other voices to harmonize with this voice.
Voice Root
Normally, you want your Voice to use the Piece Root. This is represented by the value ? However, sometimes you really want to force your Voice to use a different Root note; in which case, set the Voice Root to be whatever value suits.
This allows you to work-around the following sort of problem:
Imagine that you have a sampler, wher you load-up a variety of loops against MIDI note C3 up to D3. To have your piece drive this from a Rhythmic Voice such that the sounds you hear are not affected by changes to the Piece Root, you should set the Voice Root to e.g. C3 and your Voice will then be unaffected by changes to the Piece Root. Note that in this specific example, it would probably be a good idea to set the Harmonize? Flag to No.
Voice - Scripts
Note: Scripts are supported ONLY in Noatikl Desktop versions (Standalone / Audio Plugins).
The Voice Scripts parameters allow you to embed small Trigger Scripts, which are small bits of code in the widely used Lua language, that are triggered when various events happen when the Voices is playing. Using trigger scripts allows you to tell the Voice to behave in powerful ways while it is playing. See Scripting for further details.
Start
Select to show the Start trigger script in the Script Editor Window.
The Start Trigger Script is called once at the start of the Piece, when the piece starts playing.
function nt_trigger_start()
  print ("Voice start!")
end
Bar
Select to show the Bar trigger script in the Script Editor Window.
The Bar Trigger Script is called at the start of every bar while the piece is playing.
function nt_trigger_bar(bar)
  print ("Voice Bar number", bar)
end
Composed
Select to show the Composed trigger script in the Script Editor Window.
The Composed Script is called when Noatikl composes a note. Use this to emit MIDI CC events and what have you.
function nt_trigger_composed(noteon, channel, pitch, velocity)
  print ("Voice Composed", noteon, channel, pitch, velocity)
end
MIDI In CC
Select to show the MIDI In CC trigger script in the Script Editor Window.
The MIDI In CC Trigger Script is called whenever a MIDI CC event is received by the MIDI Input device.
function nt_trigger_midiin_cc(channel, cc, value)
  print ("Voice MIDI In CC", channel, cc, value)
end
MIDI In Note
Select to show the MIDI In Note trigger script in the Script Editor Window.
The MIDI In Note Trigger Script is called whenever a MIDI Note On or Off event is received by the MIDI Input device.
function nt_trigger_midiin_note(noteon, channel, pitch, velocity)
  print ("Voice MIDI In note ", noteon, channel, pitch, velocity)
end
Stop
Select to show the Stop trigger script in the Script Editor Window.
The Stop Trigger Script is called once at the end of the Piece, just as the Piece stops playing.
  function nt_trigger_stop()
    print ("Piece stop!")
  end
See Also
Voice - Comments
This Voice Comments parameters allow you to store comments in your Voice, in the form of copyright information and any notes you might want to make for future reference.
Copyright
Enter the Copyright information you might want to record for the Voice. In the case of a Voice from a template pack, this might contain a copyright notice associated with that template.
Notes
Enter any detailed notes you might want to make about this Voice for future reference.
Voice - Articulation
The Voice Articulation parameters define the percentage of the duration of composed note, i.e. they determine how long a composed note actually plays for. The NME used to always compose notes to be played "Legato" (no gap between one note and the next) - this allows you to play them staccato.
Articulation (min)
1 is very staccato and 100 is legato (the new default).
Articulation range
Max articulation is the value of Articulation (min) + Articulation range, and is used in combination with the variation values (below).
Articulation variation (min)
The minimum variation in staccato between notes, c.f. other parameters that adopt the min + range approach.
Articulation variation range
The range in variation of stacatto between the notes (in addition to the min).
Voice - Controllers
The Voice Controllers parameters define some of the key MIDI controller values that are emitted by the Voice.
Damper/Hold (64)
Set this value to other than the default of "-1", if you want to emit a Damper/Hold MIDI controller (MIDI CC 64) at the specified value on this Voice's MIDI line. This is a funny MIDI controller, with only two states; in that a value of 64 or greater activates Damper/Hold, and any value of 63 or less means to turn it off! Leave this value at the default of "-1" if you don't want the Voice to emit any information for this MIDI controller.
Harmonic Content (71)
Set this value to other than the default of "-1", if you want to emit a Harmonic Content MIDI controller (MIDI CC 71) at the specified value on this Voice's MIDI line. Leave this value at the default of "-1" if you don't want the Voice to emit any information for this MIDI controller.
Reverb (91)
Set this value to other than the default of "-1", if you want to emit a Reverb MIDI controller (MIDI CC 91) at the specified value on this Voice's MIDI line. Leave this value at the default of "-1" if you don't want the Voice to emit any information for this MIDI controller.
Chorus (93)
Set this value to other than the default of "-1", if you want to emit a Chorus MIDI controller (MIDI CC 93) at the specified value on this Voice's MIDI line. Leave this value at the default of "-1" if you don't want the Voice to emit any information for this MIDI controller.
Damper Release
If you are using Damper/Hold (64), then you will find that your notes can start building-up and never decay! In which case, set the Damper Release parameter to "Yes", which tells the Voice to momentarily release the damper just before the end of every bar. This prevents build-up of notes and generally sounds wonderful.
Portamento (65)
Set this value to other than the default of "-1", if you want to emit a Portamento MIDI controller (MIDI CC 65) at the specified value on this Voice's MIDI line. Leave this value at the default of "-1" if you don't want the Voice to emit any information for this MIDI controller.
MIDI Channel Sharing
The default value of "Yes" means that this Voice can share its MIDI channel with other Voices. This is only considered if you have defined the MIDI Channel parameter for a Voice to be 0.
Voice - MicroCtrl
The Voice Microcontroller parameters (there are two) allow you to define very powerful Microcontrollers to be associated with your Voice.
Microcontrollers are very powerful and you can think of them as built-in, highly configurable MIDI event generators. They can either synchronise to the tempo of your piece, or you can let them run free-floating. Experiment with them – they can do a huge amount to make your music interesting and dynamic.
Tip: if you want to synchronise your Microcontroller to the time-base, so that your MIDI controller is synchronised to bar boundaries in your music, you'll need to use the Beat Cycle Length parameter.
MIDI CC
This tells your Voice which MIDI controller (also referred to as the MIDI CC) to emit for this microcontroller. When the Microcontroller is active, the Voice will emit values for this MIDI controller that change at various times, with behaviour that you define using the various parameters in this Parameter.
Mode
The Mode defines the shape of the waveform that the Voice will use to shape this waveform.
The Mode may be one of the following values:
- -1 – Off
The microcontroller is off. This is the default value.
- 0 - Random Drift
The microcontroller will drift between the Minimum and Minimum plus Range, changing at times specified by the Update and Update Range parameters, by an amount between the Change and Change plus Change Range parameters.
- 1 - LFO (Min-Max-Min)
A triangular waveform, that starts at the minimum value, works up to the maximum value, and works back to the minimum value.
- 2 - LFO (Max-Min-Max)
A triangular waveform, that starts at the maximum value, works down to the minimum value, and works back to the maximum value.
- 3 - Sawtooth (Min-Max)
A sawtooth waveform, that starts at the minimum value, works up to the maximum value, and then starts again from the minimum value.
- 4 - Sawtooth (Max-Min)
A sawtooth waveform, that starts at the maximum value, works down to the minimum value, and then starts again from the maximum value.
Minimum
Defines the minimum value that may be emitted by the Microcontroller.
Range
The microcontroller will emit a value between the Minimum and Minimum plus Range values.
So for example, if you define Minimum to be 20, and Range to be 100, the value that is emitted will be in the range 20 to 120 inclusive.
Change
Defines the amount by which the microcontroller will change, every time it is allowed to change. Typically set to a value of 1. If this value is set to 0, the Microcontroller will change only if the Change Range is greater than or equal to 1.
Change Range
Defines the upper limit to the amount by which the microcontroller will change, every time it is allowed to change. Typically set to a value of 1. If this value is set to 0, the Microcontroller will change only if the Change Range is greater than or equal to 1.
For example, if you define Change to be 1, and Change Range to be 3, the value that is emitted will vary by a value between 1 and (3+1)=4 each time.
Update
Defines the minimum time in milliseconds between changes in the emitted Microcontroller value. The system might not be able to emit changes as quickly as you want, if you set a very small value! If you don't want changes to happen very often, then use a large value.
Ignored if Beat Cycle Length is non-zero.
Update Range
Defines the upper limit in the time in milliseconds between changes in the emitted Microcontroller value. Use this parameter to apply some uncertainty in when the changes will occur.
For example, if you define Update to be 1000, and Update Range to be 500, the value that is emitted will change every 1000 to 1500 milliseconds (or in other words, every 1 to 1.5 seconds).
Ignored if Beat Cycle Length is non-zero.
Update Units
You define the Unit of Measure by which the Update and Update Range parameters are interpreted. This may be one of the following values:
- Seconds (thousandths of a)
The Update and Update Range are interpreted as being in thousandths of a second (i.e. Milliseconds). So, a Update value of 1000 means one second.
- Full seconds
The Update and Update Range are interpreted as being in seconds. So, a Update value of 10 means ten seconds.
Beat Cycle Length
This parameter is critical for generating effects which synchronise with the bar timing of your Voice. If you want to achieve an effect like a filter-sweep that synchronises to your bar boundary, then this is the parameter to use.
Here are some of the values you could use.
Note in the NME a Beat is defined as being one crotchet; you get 4 beats in a bar of 4:4 music. So, a Duration value of 60 means one beat. A Duration value of 30 means a quaver. A Duration value of 20 means a triplet. A Duration value of 15 means a semi-quaver. A Duration value of 240 means 4 beats (which is a full bar if the Piece Meter is 4:4).
Phase Shift%
Use this parameter if you want to start the microcontroller from a start-point other than at the very start of its cycle.
Voice - Micro Delay
The Voice Micro Note Delay parameters provide fine variation in the times of Note events generated by a Voice. This can be used to give a Voice more “human” feel.
Delay Range
The maximum amount of delay generated by micro note delay changes, that may be applied to note events. Zero means off (which is the default).
Delay Change
The amount of change in the micro delay that is applied by Noatikl between note on/off events. The value drifts between zero (off) and the Delay Range, changing by plus or minus the Delay Change value each time.
Delay Offset
Fixed amount of offset note delay to apply, used only when the Micro Note Delay controller is in use. The default value is zero.
Voice - Micro Pitch
The Voice Micro Pitch parameters provide fine variation through use of the MIDI Pitch Wheel controller.
Tip: This is not normally used on MIDI line 10, which is the drum/percussion line!
Bend Sensitivity
A value from 0 to 24, meaning how many semitones are controlled by the full available range of Micro Pitch parameters. The default value is 2, which represents two semitones.
Pitch Bend Offset
Fixed amount of pitch-bend to apply on this MIDI line, used to tune/de-tune an instrument.
The default value is zero, which means to apply no offset pitch bend.
From -8192 to +8191; which covers a range of pitch bend defined by the Bend Sensitivity parameter.
Pitch Range
The maximum amount of micro pitch change that can be applied. Zero means off (which is the default). The maximum value allowed is 8191. The value chosen is added to the pitch bend offset.
Pitch Change
The amount of change in Micro Pitch that is applied by Noatikl between “update” periods. The value drifts between zero (off) and the Pitch Range, changing by plus or minus the Pitch Change value each time.
Pitch Update
The time in milliseconds between updates to the pitch controller. The actual value chosen is selected randomly each time, to be a value somewhere between Pitch Update and Update Range.
Update Range
The upper limit of time between updates to the pitch controller. The actual value chosen is betwen Pitch Update and Update Range.
Voice - Note > MIDI
Normally, Voices compose and emit MIDI note events. The Voice Note to MIDI CC Mapping parameters allow you to tell a Voice to emit MIDI controller data instead of MIDI note events.
Why would you want to do this? Well, it lets you use a Voice as a very powerful generative MIDI event generator with a huge range of potential applications.
CC for Note On?
If you want this Voice to emit a MIDI CC instead of note on/off events, set this parameter to Yes.
Note On CC
If you have set CC for Note On? to Yes, then instead of emitting a note on event, the Voice will emit the specified MIDI CC, with a value equal to the composed pitch.
CC For Velocity?
If you want this Voice to emit a MIDI CC proportionate to the Velocity of the composed note (in addition to any controller defined for Note On CC), then set this parameter to Yes.
Velocity CC
If you have set CC for Velocity? to Yes, then the Voice will (in addition to the Note On CC value) emit the specified MIDI CC, with a value equal to the composed velocity.
CC for Note Off?
If you want this Voice to emit a MIDI CC when a note off occurs, set this parameter to Yes. This applies only if CC for Note On? Is set to Yes.
Note On CC
If you have set CC for Note Off? to Yes, then instead of emitting a note off event, the Voice will emit the specified MIDI CC, with a value equal to the composed pitch of the stopped note.
Voice - Envelopes
Voice Envelopes are supported for a number of parameters. Envelopes work in the same way for all of these, so they are all grouped here.
Each envelope is a collection of up to 100 data points. A piece starts with the value at the left side of the envelope, and as it progresses, eventually ends up with the value from the far right of the envelope.
You can draw direct on to the envelope with your mouse.
Alternatively, you may use one of the various powerful envelope editing tools that we have made available to you.
To use the envelope editing tools:
- Right-click (win) or ctrl-click (mac) on the envelope tool
- Select the option you want. e.g. random, curve up etc.
- Select the range using the mouse...
- Then: either press space or enter, or select pop-up envelope tool to apply to the selected range.
- Select freehand mode to return to the normal click-to-paint mode.
Velocity Envelope
This allows you to define how the Velocity level is changed automatically for your Voice throughout playback of the piece. The velocity defines relatively how loud each note is.
The actual Velocity value used at any point in the piece is calculated as being a value somewhere in the range from Velocity, to Velocity plus the value of the Velocity Range envelope.
Velocity Range Envelope
The value in this envelope is added to the value in the Velocity Envelope.
Velocity Change Envelope
The velocity for any composed note can change by a value between Velocity Change Envelope value (VCE) and the VCE plus the Velocity Change Range Envelope value.
Velocity Change Range Envelope
The value in this envelope is added to the value in the Velocity Change Envelope.
User Envelope 1 (Volume)
This allows you to define an envelope that is used to emit a MIDI CC of your choice. The default value for this MIDI CC is 7, which is the Volume controller.
-
MIDI CC
Use this to define the MIDI CC that you want to be emitted by this envelope. The default value is 7, which is the Volume controller.
-
Enabled?
Use this to turn your envelope on or off.
-
Envelope
Micro User (Envelope 1)
This provides fine variation in the values generated by the User Envelope 1. Any value generated by this micro controller is added to the Micro User Envelope 1 value, to give fine variation in any such envelope.
-
Range
The maximum amount of micro change in the User Envelope 1 that can be applied. Zero means off (which is the default).
-
Change
The amount of micro change in the User Envelope that is applied by Noatikl between “update” periods. The value drifts between zero (off) and the Range, changing by plus or minus the Change value each time.
-
Update
The time in milliseconds between updates to the Micro User Envelope value. The actual value chosen is selected randomly each time, to be a value somewhere between Update and Update Range.
-
Update Range
The upper limit of time between updates to the Micro User Envelope value. The actual value chosen is betwen Update and Update Range.
User Envelope 2 (Pan)
This allows you to define an envelope that is used to emit a MIDI CC of your choice. The default value for this MIDI CC is 10, which is the Pan controller.
-
MIDI CC
Use this to define the MIDI CC that you want to be emitted by this envelope. The default value is 10, which is the Pan controller.
-
Enabled?
Use this to turn your envelope on or off.
-
Envelope
Piece - Basics
The Piece Basic parameters allow you to define some of the key parameters that govern your composition at the Piece level.
Name
Always uses the text "Piece". You can't change this value.
Length Units
The duration time units for which the piece should play. The default value is Seconds, but you can set to Bars if you so wish.
Piece Length
The minimum duration, in seconds / bars, for which to play this piece before restarting. The duration chosen is somewhere in the range of Piece Length, to Piece Length plus Piece Length Range. If Length Units is Seconds, then the chosen duration is rounded-up to the nearest bar boundary.
Piece Length Range
Defines an upper range in values, for which to play this piece before restarting
Piece Rest
The minimum duration, in seconds, for which this piece will rest with silence before restarting. The duration chosen by Noatikl is a randomly selected value in the range of Piece Rest, to Piece Rest plus Piece Rest Range. If Length Units is Seconds, then the chosen duration is rounded-up to the nearest bar boundary.
Piece Rest Range
Defines an upper range in values, for which this piece will rest with silence before restarting.
Auto Restart?
Defines if, when the piece has reached the end and applied any rest, it should restart automatically or not. If set to Yes, the Piece will keep playing with appropriate random variations. If set to No, the piece will simply stop playing at the end until you tell it to Stop.
Meter
Defines the Meter to be used by this Piece, such 4:4 or 3:4 or 6:8. A Voice will generally use this Meter, but the Meter value to be used for each Voice may actually override this setting. This approach allows Voices to be configured to work with a completely different Meter, which can be used for interesting polyphonic effects.
Piece - Tempo
The Piece Tempo parameters allow you to define the tempo parameters for your piece.
The tempo parameters are used in these two situations:
- when "cooking" a MIDI file
- when "real-time" playing standalone and not synced
In all other circumstances, the Tempo parameters in this view are ignored. When not cooking a MIDI file, and when using the Noatikl Plug-in or Noatikl standalone in Sync? mode, the tempo is provided by the sequencer, and all of the Tempo parameters are ignored.
Name
Always uses the text "Piece". You can't change this value.
Tempo
The minimum Tempo to use for this piece, in Beats Per Minute.
The actual Tempo to use is a value between Tempo, and Tempo plus Range.
Range
A value defining the maximum tempo to use, in Beats Per Minute.
The actual Tempo used by the piece is a randomly-selected value between Tempo, and Tempo plus Range.
Change
A value that defines if the tempo should change value according to an envelope defined by Envelope. When selected, the tempo value used for each bar is offset by the Envelope value scaled by the Envelope Range.
Envelope
A value showing the range of envelope value changes that this piece should be follow, used if Change is set to Yes. Use this if you want to apply a dynamic tempo envelope to your piece.
Envelope Range
A value defining what range of values are indicated by the Envelope. Defined in Beats Per minute.
Piece - Rules
The Piece Rules parameters allow you to define the default Rules used by the piece.
Name
Always uses the text "Piece". You can't change this value.
Scale Rules
Set this to define the default Scale Rule to use when the piece plays. Individual Voices are allowed to override this setting if they so wish.
Harmony Rules
Set this to define the default Harmony Rule to use when the piece plays. Individual Voices are allowed to override this setting if they so wish.
Next Note Rules
Set this to define the default Next Note Rule to use when the piece plays. Individual Voices are allowed to override this setting if they so wish.
Piece - Roots
The Piece Roots parameters allow you to define some of the key parameters that govern your piece.
Name
Always uses the text "Piece". You can't change this value.
Piece Roots
The Root Pitch to use for this Piece. For example, if you are using a Major Scale Rule, then set this value to be C, for you Piece to play in the key of C Major.
Piece - Scripts
Note: Scripts are supported ONLY in Noatikl Desktop versions (Standalone / Audio Plugins).
The Piece Scripts parameters allow you to embed small Trigger Scripts, which are small bits of code in the widely used Lua language, that are triggered when various events happen when the piece is playing. Using trigger scripts allows you to tell the piece to behave in very powerful ways while it is playing.
Name
Always use the text "Piece". You can't change this value.
Start
Select to show the Start trigger script in the Script Editor Window.
The Start Trigger Script is called once at the start of the Piece, when the piece starts playing.
function nt_trigger_start()
  print ("Piece start!")
end
Bar
Select to show the Bar trigger script in the Script Editor Window.
The Bar Trigger Script is called at the start of every bar while the piece is playing.
function nt_trigger_bar(bar)
  print ("Bar number", bar)
end
MIDI In CC
Select to show the MIDI In CC trigger script in the Script Editor Window.
The MIDI In CC Trigger Script is called whenever a MIDI CC event is received by the MIDI Input device.
function nt_trigger_midiin_cc(channel, cc, value)
  print ("Piece MIDI In CC", channel, cc, value)
end
MIDI In Note
Select to show the MIDI In Note trigger script in the Script Editor Window.
The MIDI In Note Trigger Script is called whenever a MIDI Note On or Off event is received by the MIDI Input device.
function nt_trigger_midiin_note(noteon, channel, pitch, velocity)
  print ("Piece MIDI in note ", noteon, channel, pitch, velocity)
end
Stop
Select to show the Stop trigger script in the Script Editor Window.
The Stop Trigger Script is called once at the end of the Piece, just as the Piece stops playing.
  function nt_trigger_stop()
    print ("Piece stop!")
  end
See Also
File
The File Object allows you to define some book-keeping parameters of your file. None of these parameters affect the way that you piece sounds.
Name
An internal value representing your File. Always a value of "File". You can't change this value.
Title
The title of your Piece.
Author
The author of your Piece.
NME Scripting
Scripts are supported ONLY in the following apps: Noatikl Desktop (Standalone / Audio Plugins).
Introduction to NME Scripting
The NME contains a powerful scripting engine which, while entirely optional to use, offers tremendous power. NME Scripts and NME Scripting (hereafter just "scripts", scripting etc.) can be used in two separate contexts:
-
Trigger Scripts
The most common way to use scripting in the NME is to use the Script Editor Window accessed from the Desktop Noatikl Voice Scripts and Piece Scripts Objects. This lets you attached to the Piece or to Voice Objects small Trigger Scripts. These are small bits of code in the widely used Lua language. These scripts are triggered when various events happen when a piece is playing. Using trigger scripts allows you to tell the Voice or Piece Objects to behave in very powerful ways while the piece is playing.
-
Script Window
The other way to use scripting in the NME, is to use the Noatikl Script Window accessed from Desktop Noatikl via Menu > Tools > Noatikl Script Editor. This allows you to create and run scripts written in the Lua language, to manipulate Noatikl editor windows to, for example, dynamically create random Noatikl compositions. This window is for commands of the syntax
noatikl_Window*.
Scripts are written using the widely used Lua scripting langauge. Lua is very powerful, fast and easy to learn. Lua is a very popular embedded scripting langage, and is widely used in the gaming and multimedia worlds. The NME adds various nme-specific functions to the Lua language. These extensions are outlined later in this document. We give you lots of examples to get you started.
Note that the NME supports the Lua table, Lua string and Lua math standard Lua libraries. It does not support the io or os libraries.
Why would you want to use Scripting?
With careful use of trigger scripts, you can build a custom hyperinstrument!
You can, if you wish, create trigger scripts to run at the following times:
- start of playback
- every bar
- when a note is composed by noatikl
- end of playback
- in response to MIDI CC via e.g. keyboard controller
- in response to MIDI Note on/off via e.g. keyboard controller
Every script can do pretty much anything to the NME in real-time, such as manipulating music rules, playing with mutation, and what have you.
We also have a hyperinstrument mode, and allow the Note on/off commands to control parameters and/or trigger "Listening" Voices, that can in turn trigger off other musical events such as auto-chording events or following voices.
The scripts are in the very widely used Lua scripting language.
A note on print
Note that the standard Lua function print may be used to display text in the Noatikl Script Window (if you happen to have that displayed; this is very useful for debugging your scripts!
A note on Comments in Lua script
Single-line comments in Lua script start with the two minus characters:
-- This is a comment
To comment-out a block of text in Lua, enclose the text in --[[ and ]] as in this example
  print ("Hello")
  --[[
  This is a big block
  of text that I want to comment out!
  ]]
  print ("World")
Trigger Scripts ("Triggers")
Triggers can be assigned to most Objects, including the Piece and Voice Objects.
Not all script functions are available to you within trigger scripts; specifically, the functions that open and manipulate windows are not available from Triggers (these are reserved for use from the Noatikl Script Window). You can enter these scripts using the following parameter groups / views:
There are a variety of Trigger Scripts types that you may invoke.
Start
The Start Trigger Script is called once at the start of the Piece, when the piece starts playing.
function nt_trigger_start()
  print ("Piece start!")
end
Bar
The Bar Trigger Script is called at the start of every bar while the piece is playing.
function nt_trigger_bar(bar)
  print ("Bar number", bar)
end
Composed
The Composed Script is called when a Voice composes a note and is only available to Voice Objects. Use this to emit MIDI CC events and what have you.
Advanced users might also be interested in reading about using this script with embedded calls to noatikl_Trigger_EmitListeningNote, to help build hyperinstruments.
function nt_trigger_composed(noteon, channel, pitch, velocity)
  print ("Composed", noteon, channel, pitch, velocity)
end
MIDI In CC
The MIDI In CC Trigger Script is called whenever a MIDI CC event is received by the MIDI Input device.
function nt_trigger_midiin_cc(channel, cc, value)
  if (cc == 1)
  then
    print ("MIDI In CC", channel, cc, value)
  end
end
NOTE on Omni: The NME delivers all MIDI CC events to this trigger from all MIDI channels, even if this trigger is a voice trigger script with a voice targeting a different MIDI channel. This is known as Omni behaviour. If you want your voice trigger to respond only if the supplied MIDI CC is from the same channel as your Voice, use script like this:
function nt_trigger_midiin_cc(channel, cc, value)
  if (channel == noatikl_Trigger_GetMidiChannel())
  then
    -- Matches our voice channel!
    print ("MIDI In CC", channel, cc, value)

    if (cc == 1)
    then
      noatikl_Trigger_Parameter_Set("Patch", value)
    end
  end
end
MIDI In Note
The MIDI In Note Trigger Script is called whenever a MIDI Note On or Off event is received by the MIDI Input device. See the hyperinstrument section for a detailed discussion.
function nt_trigger_midiin_note(noteon, channel, pitch, velocity)
  print ("note ", noteon, channel, pitch, velocity)
end
NOTE on Omni: The NME delivers all MIDI Note events to this trigger from all MIDI channels, even if this trigger is a voice trigger script with a voice targeting a different MIDI channel. This is known as Omni behaviour. If you want your voice trigger to respond only if the supplied MIDI Note is from the same channel as your Voice, use script like this:
function nt_trigger_midiin_note(noteon, channel, pitch, velocity)
 if (channel == noatikl_Trigger_GetChannel())
  then
    print ("note ", noteon, channel, pitch, velocity)
  end
end
Stop
The Stop Trigger Script is called once at the end of the Piece, just as the Piece stops playing.
  function nt_trigger_stop()
    print ("Piece stop!")
  end
The Script Editor Window
When you decide to edit a Trigger Script parameter, you are presented with a Script Editor window.
The text panels support the usual context-sensitive text editor menus and keyboard accelerators (allowing for fast copy and paste operations).
The Script Editor window allows you to edit trigger scripts associated with your object.
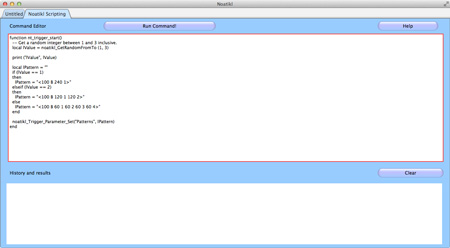
Script Editor Window
Test
Pressing this button will compile any Lua script that you type in the large text area at the top of the window, and display any results in the bottom panel. Use the Test to quickly check your script for obvious syntax errors!
Help
Pressing the Help button displays help on the NME Scripting system!
Clear
Pressing the Clear button quickly erases the text in the top panel.
Default
Pressing the Default button will replace any text in the top panel, with a new, empty default trigger script appropriate to the script parameter you are currently viewing.
OK
Pressing the OK button will save your changes. These are used when the piece next starts playing.
Cancel
Pressing the Cancel button will discard your changes.
Test Results
Any test results are displayed in the Test Results area at the bottom.
Clear
Pressing the Clear button in the bottom area, quickly erases the text in the bottom panel.
Noatikl Script Window
The Noatikl Script Window is accessed from Desktop Noatikl via Menu > Tools > Noatikl Script Editor. It is used to create and run scripts to manipulate Noatikl Editor Windows and for commands of the syntax noatikl_Window*; for example, to dynamically create random compositions.
It is also used for displaying messages from print calls within your trigger scripts!
The text panels support the usual context-sensitive text editor menus and keyboard accelerators (allowing for fast copy and paste operations).
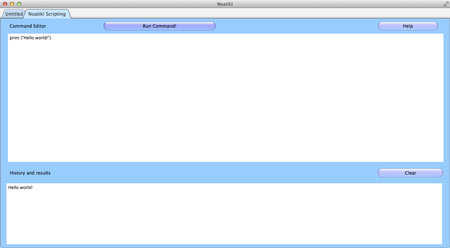
Noatikl Script Window
Run Command!
Pressing this button will run any Lua script that you type in the large text area at the top of the window, and display any results in the bottom panel
An example you might like to try would be this:
print ("Hello world!")
History and Results
Any results are displayed in the History and Results area at the bottom.
This is where the output from any print statements in your scripts are displayed (including those within trigger scripts).
Help
Pressing the Help button displays help on the NME Scripting system!
Clear
Pressing the Clear button quickly erases the bottom panel.
Scripting Cookbook
Trigger Script Cookbook
A great way to start thinking about trigger scripts, is to look at various real examples of how to do various interesting things with trigger scripts!
Example: Change the scale to use depending on time of day
This is a script that you could use as a piece-level Bar trigger script.
  function nt_trigger_start()
    -- NME script to get hour of day as 24-hour clock value
    -- ... and select scale accordingly!
    local lTime = tonumber(noatikl_GetDate("%H"))
    if ((lTime > 20) or (lTime <8))
    then
      noatikl_Trigger_Parameter_Set("Scale Rules", "early morning scale")
    else
      noatikl_Trigger_Parameter_Set("Scale Rules", "middle of day scale")
    end
  end
Example: randomly select a pattern to use for a voice
This is a voice-level Bar trigger script.
function nt_trigger_start()
  -- Get a random integer between 1 and 3 inclusive.
  local lValue = noatikl_GetRandomFromTo (1, 3)

  print ("lValue", lValue)

  local lPattern = ""
  if (lValue == 1)
  then
    lPattern = "<100 B 240 1>"
  elseif (lValue == 2)
  then
    lPattern = "<100 B 120 1 120 2>"
  else
    lPattern = "<100 B 60 1 60 2 60 3 60 4>"
  end

  noatikl_Trigger_Parameter_Set("Patterns", lPattern)
end
Example: script trigger that allows trigger scripts to emit MIDI CC events, with an optional delay
This is a script that you could use as a piece-level Bar trigger script.
  function nt_trigger_bar(bar)

    -- Voice trigger...
    -- Apply a pan sweep through the bar from left to right,
    -- to show-off the use of noatikl_Trigger_EmitMidiCC.

    local lDuration = noatikl_Trigger_GetBarDuration()

    local lMidiChannel = noatikl_Trigger_GetChannel()
    local lDelay = 0
    local lCC = 10 -- Pan controller!
    local lValue = 0
    while lDelay <= lDuration do
      local lValue = (127 * lDelay) / lDuration
      -- Note that the "lDelay" is optional; we're using the in this specific
      -- demo, to get a sweep effect from start to end of the bar.
      noatikl_Trigger_EmitMidiCC(lMidiChannel, lCC, lValue, lDelay)
      lDelay = lDelay + 20
    end
  end
Example: piece bar trigger, that automatically adjusts the piece root every 10 bars
function nt_trigger_bar (bar)

  if ((bar % 10) == 0)
  then
    -- Every 10 bars, change the root at random,
    -- from all those available!
    local lRoots = {"A", "A#", "B", "C", "C#", "D", "D#", "E", "F", "F#", "G", "G#"}
    local lIndex = noatikl_GetRandomFromTo(1,12)
    local lRoot = lRoots[lIndex]
    print ("Root", lRoot)
    noatikl_Trigger_Parameter_Set("Piece Roots", lRoot)

    -- Un-comment the following line to set tempo at random, too,
    -- to a value related to the selected root!
    -- noatikl_Trigger_Parameter_Set("Tempo", 100 + lIndex * 5)
  end
end
Example: piece start trigger, that automatically adjusts the tempo to suit the time of day
function nt_trigger_start()
  print("Piece!")

  -- NME script to get hour of day as 24-hour clock value
  -- ... and adjust tempo accordingly!
  local lTime = tonumber(noatikl_GetDate("%H"))
  if ((lTime > 20) or (lTime <8))
  then
    print ("late night / early morning!")
    local lRandom = noatikl_GetRandomFromTo(0,50)
    noatikl_Trigger_Parameter_Set("Tempo", 50 + lRandom)
  else
    print ("middle of day!")
    local lRandom = noatikl_GetRandomFromTo(0,50)
    noatikl_Trigger_Parameter_Set("Tempo", 100 + lRandom)
  end
end
Example: voice start trigger, that automatically cycles the patch every time it starts playback
function nt_trigger_start()
  print("Voice!")

  local lPatch = noatikl_Trigger_Parameter_Get_AsNumber("Patch")
  lPatch = lPatch + 1
  if (lPatch > 100)
  then
    lPatch = 0
  end
  noatikl_Trigger_Parameter_Set("Patch", lPatch)
end
Example: voice trigger, that automatically changes patch every bar
function nt_trigger_bar(bar)
  print("Voice1 ", bar)
  local lPatch = noatikl_Trigger_Parameter_Get_AsNumber("Patch")
  lPatch = lPatch + 1
  if (lPatch > 100)
  then
    lPatch = 0
  end
  noatikl_Trigger_Parameter_Set("Patch", lPatch)
end
Example: bringing voices into the piece
In this example, imagine that you have a mutating drum Voice that you want to have muted at the start of the piece and come in with a bang at the start of bar 20. And you don't want the mutations to start until bar 21...
How would that work in the world of script?
Here is the Voice Start trigger:
function nt_trigger_start()
  -- When we start, disable mutation for this Voice!
  -- And set mute, too!
  noatikl_Trigger_Parameter_Set("Mute", "Yes")
  noatikl_Trigger_Parameter_Set("Mutation Factor", 0)
end
Here is the Voice Bar trigger:
function nt_trigger_bar(bar)
  if (bar == 20)
  then
    -- At bar 20, unmute the voice!
    noatikl_Trigger_Parameter_Set("Mute", "No")
  end

  if (bar == 21)
  then
    -- At bar 21, adjust the mutation factor!
    noatikl_Trigger_Parameter_Set("Mutation Factor", 20)
  end
end
The power of using scripts like this, is that:
- The drums alway start on the bar specified.
- They don't morph until they are audible.
- The drum elements can now make staggered entry despite all being on the same MIDI channel.
Example: Emit MIDI CC in response to composed note events
function nt_trigger_composed(noteon, channel, pitch, velocity)
  -- Keep track of last composed note using the global (for this voice)
  -- called GLastNote ...
  -- Note that the "pitch" parameter should be ignored when noteon is false.

  lMidiChannel = noatikl_Trigger_GetChannel()

  if (noteon)
  then
    if (GLastNote ~= nil)
    then
      noatikl_Trigger_EmitMidiCC(lMidiChannel, 11, GLastNote, 10)
    end

    GLastNote=pitch
    noatikl_Trigger_EmitMidiCC(lMidiChannel, 11, pitch, 0)
  else
    if (GLastNote ~= nil)
    then
      noatikl_Trigger_EmitMidiCC(lMidiChannel, 11, GLastNote, 10)
      GLastNote = nil
    end
  end
end
Noatikl Script Window Cookbook
A great way to start thinking about scripting in the Noatikl Script Window is to look at an example.
Example: the simplest possible start
print ("Hello world")
Example: open all Noatikl files in a sub-folder with a .txt extension, adjust some parameters and re-save with .noatikl file extension.
local lFileList = noatikl_FindFilePaths("myfolder1", "myfolder2")

local index = 0
while true do

  index = index + 1
  local lFilePath = lFileList[index];
  if (lFilePath == nil)
  then
    break
  end

  if (string.find(lFilePath, '.txt'))
  then
    local lWindow = noatikl_Window_OpenPath(lFilePath)

    -- Change some file parameters
    noatikl_Window_Object_Parameter_Set(lWindow, "File", 1, "Author", "my company")
    noatikl_Window_Object_Parameter_Set(lWindow, "File", 1, "Midi Output Device", "?")
    noatikl_Window_Object_Parameter_Set(lWindow, "File", 1, "Midi Input Device", "?")
    noatikl_Window_Object_Parameter_Set(lWindow, "File", 1, "Midi Sync?", "No")

    -- Change some parameters for every voice in the file...
    local lCount = noatikl_Window_Object_GetCount(lWindow, 'Voice')

    local lIndex = 1
    while lIndex <= lCount do

      noatikl_Window_Object_Parameter_Set(lWindow, "Voice", lIndex, "Copyright", "Copyright my company")

      lIndex = lIndex + 1
    end

    local lSaveToPath = string.gsub(lFilePath, '.txt', '.noatikl')

    noatikl_Window_SaveToPath(lWindow, lSaveToPath)

    print ("Saved", lFilePath)

    noatikl_Window_Close(lWindow)
  end
end

print ('Done!')
Hyperinstrument
Scripts are supported ONLY in Noatikl Desktop versions (Standalone / Audio Plugins).
You might also want to refer to the scripting overview and the scripting reference.
What is a hyperinstrument?
A hyperinstrument can be defined as being an instrument that can have extraordinary, semi-automated response to relatively simple real-time inputs.
The NME can function as a hyperinstrument for 2 main reasons: The NME can real-time harmonise with incoming MIDI note events and control events (otherwise known as "MIDI CCs"), and the NME's generative engine is an instrument that creates more than the sum of your direct inputs with keyboard, mouse, and MIDI. In other words, the NME's generative engine, MIDI control, scripting and direct MIDI input harmonisation all work together to make itself greater than the sum of its parts; a customisable generative hyperinstrument!
See the Hyperinstrument - Quick Start if you want to get started quickly.
How does the NME work as a hyperinstrument?
You can respond to any incoming MIDI CC however you want; for example, to change the current scale or adjust a harmony rule in real-time in response to incoming MIDI CC events.
You can also respond to any incoming MIDI Note on/off event however you want; for example, you could use some notes (such as accidentals in a scale) to change parameter values, and pass-through the others to the NME. In other words, you can use certain specific notes to trigger various complex responses by the NME, for example; or to enable/disable the chording parameters only for certain notes (immediately that a note is triggered!); or to 'fix' "invalid" notes; or to change scale; or pretty much whatever you can imagine.
All note on/off events received by the NME via the MIDI input device (or plug-in input) are normally passed through automatically to the destination MIDI output device (or plug-in output); with the exception that where you have a Listening voice with a Note On trigger script, the note on/off events for that voice's MIDI channel are not immediately passed-through by noatikl; in this case, the only way to get them out is via a call to noatikl_Trigger_EmitListeningNote within the nt_trigger_midiin_note trigger script for a voice. Note that the noatikl_Trigger_EmitListeningNote will work only if your voices is a Listening voice, and if Listen? is ticked in the Noatikl Desktop Control panel.
To re-iterate, for lines that are not being listened to with a voice that has a Note Trigger Script: the any note on/off events effectively bypass the NME and are passed-on with minimum latency (though the NME does harmonize against them). On lines that are marked as listening voice type, and where there is a note trigger script with embedded, then you'd need to have a call to this function within that script:
noatikl_Trigger_EmitListeningNote(noteon, pitch, velocity)
which results in note on/off events on that line being sent via noatikl's internal composition engine.
Here is real, working example of a Voice MIDI In Note trigger script that you could use in your own piece. Note that the call to noatikl_Trigger_EmitListeningNote will have an effect only if the voice is a Listening Voice:
  function nt_trigger_midiin_note(noteon, channel, pitch, velocity)
    if (channel == noatikl_Trigger_GetChannel())
    then
      -- Simply pass-through all notes to the Listening Voice.
      -- If we wanted to, we could respond to certain pitches to do different
      -- things!
      noatikl_Trigger_EmitListeningNote(noteon, pitch, velocity)
    end
  end
When you call this function, this causes the note to be emitted as though the Listening Voice were "following" that note in accordance with the "Following Voice" parameters. So, if you want the exact note to be passed through, then using the follows strategy of semitone shift and set the offset to be zero.
The note emitted by the NME after it applys the "following" rules, is auto-chorded (if you have this set-up); and any Voice that you have configured to follow this Listening Voice, will follow that note.
The above comments apply if you play into the Listening Voice with a monophonic feed. If you're supplying a polyphonic feed, then slightly more complex rules apply. In this case, only the first note in any ongoing chord from the controller is treated with the Following Voice parameters; all other notes active in any chord are harmonised with, and passed out directly to the MIDI stream. So as you play solo/chords on your controller, the system caters for that polyphony in a good way; the first active note in the chord is processed by the NME (and auto-chorded or followed as required), and all other notes in the chord are passed straight through with minimal latency (and are, of course, harmonized with by the NME).
Note: we recommend use of noatikl_Trigger_EmitListeningNote with the Noatikl Desktop Standalone: some sequencer hosts can too much latency to make this mode effective with the plug-in (Reaper is effective!). And note, that if using this mode with the plug-in, it is likely to work best when getting input from a MIDI port or direct from the device, and outputting data to a port (e.g. MIDI Yoke or IAC port). If you find otherwise, please let us know.
Note that the MIDI input could come from MIDI backing track, in sequencer, instead of course; depending on what routing options are available to you in your host sequencer.
Quick Start - Listening voices / Hyperinstrument
Note: Example requires Noatikl Desktop 2.5+
To have a Vvoice "listen" to incoming MIDI data, you need to follow the instructions below.
- Set "MIDI Input" to be your MIDI input device.
- Ensure that "Listen?" (in the top Control Bar) is ticked.
-
Set the voice you want to listen to MIDI input, such that:
- the Voice Type is Listen
- the MIDI In Script is something like this:
function nt_trigger_midiin_note(noteon, channel, pitch, velocity)
 print ("voice midiin!")
 if (channel == noatikl_Trigger_GetChannel())
 then
   -- Simply pass-through all notes to the Listening Voice.
   -- If we wanted to, we could respond to certain pitches to do different
   -- things!
   noatikl_Trigger_EmitListeningNote(noteon, pitch, velocity)
 end
end
Note: in and of itself, that will NOT make any notes in response to incoming MIDI events (we'll add that later!). All it does for now, is tell the NME where to listen, and as notes come in, information is written to the Noatikl Script window.
Example (configured to use Network Session on Mac as MIDI input): Click here for noatikl file
-
If you want your LISTENING Voice to make sounds itself; you must set it to auto-chord with depth of 2 or greater; the Voice itself (which is at chord depth 1) represents the incoming MIDI event, and doesn't make any sounds; the auto-chording notes (if you use them!) *do* make sounds.
Example (configured to use Network Session on Mac as MIDI input): Click here for noatikl file
-
If you want an DIFFERENT Voice to make sounds in response to your incoming MIDI note event, set it to FOLLOW the Listening Voice.
Example (configured to use Network Session on Mac as MIDI input): Click here for noatikl file.
-
You can combine techniques 5 and 6, if you want.
Example (configured to use Network Session on Mac as MIDI input): Click here for noatikl file
See Also
Scripting Objects
Objects and Parameters
The following table lists the various Objects and their associated parameters together with how those objects/parameters are available to NME scripts, showing: the object name; the parameter group / view (where shown to a user); the displayed name (where shown to a user); the parameter name (as supplied to functions and which is always unique for a given object); and the range of legal values that you may supply.
Object: "Voice"
| Parameter Group / View | Displayed Name | Script Parameter Name | Notes |
|---|---|---|---|
| Voice - Basics | Name | "Voice" | |
| Mute | "Mute" | Yes or No | |
| Patch | "Patch" | ||
| Use Patch? | "Use Patch?" | Yes or No | |
| MIDI Channel | "MIDI Channel" | Value in range 0, 16 | |
| Voice Type | "Voice Type" | ||
| Pitch | "Pitch" | ||
| Pitch Range | "Pitch Range" | Value in range 11, 127 | |
| Phrase Length | "Phrase Length" | Value in range 1, 256; also in Voice - Ambient | |
| Phrase Length Range | "Phrase Length Range" | Value in range 0, 256; also in Voice - Ambient | |
| Phrase Gaps | "Phrase Gaps" | Value in range 0, 256; also in Voice - Ambient | |
| Phrase Gaps Range | "Phrase Gaps Range" | Value in range 0, 256; also in Voice - Ambient | |
| Note Rest % | "Phrase Note Rest %" | Value in range 0, 100; also in Voice - Ambient | |
| Voice - Ambient | Units | "Ambient Units" | |
| Duration | "Ambient Duration" | Value in range 0, 32000 | |
| Duration Range | "Ambient Duration Range" | Value in range 0, 32000 | |
| Gap Minimum | "Ambient Gap Min" | Value in range 0, 32000 | |
| Gap Range | "Ambient Gap Range" | Value in range 0, 32000 | |
| Voice - Following | Follow Voice | "Follow Named Voice" | |
| Percent | "Follow Percent" | Value in range 0, 100 | |
| Strategy | "Follow Strategy" | ||
| Units | "Follow Delay Unit" | ||
| Delay | "Follow Delay" | Value in range 0, 32000 | |
| Delay Range | "Follow Delay Range" | Value in range 0, 32000 | |
| Shift/Interval | "Follow Shift/Interval" | Value in range -60, +60 | |
| S/I Range | "Follow Shift/Interval Range" | Value in range -60, +60 | |
| Voice - Repeat | Voice | "Repeat Specific Voice" | |
| Percent | "Repeat Bars Percent" | Value in range 0, 100 | |
| Bars | "Repeat For Bars" | Value in range 1, 100 | |
| History Range | "Repeat Bar History Range" | Value in range 0, 100 | |
| History | "Repeat Bar History" | Value in range 1, 100 | |
| Bars Range | "Repeat For Bars Range" | Value in range 0, 100 | |
| Voice - Patterns | Patterns | "Patterns" | |
| Use Percent | "Patterns Use Percent" | Value in range 0, 100 | |
| Mutation Factor | "Mutation factor" | ||
| Bars Between | "Mutate No. Bars" | Value in range 0, 100 | |
| Bars Range | "Mutate No. Bars Range" | Value in range 0, 100 | |
| Mutate Rhythm? | "Mutation of Rhythm" | Yes or No | |
| Meter | "Meter" | ||
| Voice - Chords | Depth | "Chord Depth" | Value in range 1, 32 |
| Pitch Offset | "Chord Pitch Offset" | Value in range -60, +60 | |
| Delay | "Chord Delay" | Value in range 0, 32000 | |
| Depth % | "Chord Depth Percent" | Value in range 0, 100 | |
| Delay Unit | "Chord Delay Unit" | ||
| Velocity Factor | "Chord Velocity Factor" | Value in range -100, +100 | |
| Delay Range | "Chord Delay Range" | Value in range 0, 32000 | |
| Depth Range | "Chord Depth Range" | Value in range 0, 32 | |
| Strategy | "Chord Strategy" | ||
| Shift/Interval | "Chord Shift/Interval" | Value in range -60, +60 | |
| S/I Range | "Chord Shift/Interval Range" | Value in range -60, +60 | |
| Voice - Rules | Harmony Rules | "Harmony Rules" | |
| Next Note Rules | "Next Note Rules" | ||
| Rhythm Rules | "Rhythm Rules" | ||
| Scale Rules | "Scale Rules" | ||
| Harmonize? | "Harmonize?" | Yes or No | |
| Voice Root | "Voice Root" | ||
| Voice - Scripts | Start | "Script_Start" | |
| Bar | "Script_Bar" | ||
| Composed | "Script_Composed" | ||
| MIDI In CC | "Script_MidiIn_CC" | ||
| MIDI In Note | "Script_MidiIn_Note" | ||
| Stop | "Script_Stop" | ||
| Voice - Comments | Copyright | "Copyright" | |
| Notes | "Notes" | ||
| Voice - Controllers | Damper/Hold (64) | "Damper/Hold (64)" | Value in range -1, 127 |
| Harmonic Content (71) | "Harmonic Content (71)" | Value in range -1, 127 | |
| Reverb (91) | "Reverb (91)" | Value in range -1, 127 | |
| Chorus (93) | "Chorus (93)" | Value in range -1, 127 | |
| Damper Release | "Damper Release" | Yes or No | |
| Portamento (84) | "Portamento (65)" | Value in range -1, 127 | |
| MIDI Channel Sharing | "MIDI Channel Reallocation" | Yes or No | |
| Voice - Micro Controller 1 | MIDI CC | "User Controller 1 Midi Command" | |
| Mode | "User Controller 1 Mode" | ||
| Minimum | "User Controller 1 Minimum" | Value in range 0, 127 | |
| Range | "User Controller 1 Range" | Value in range 0, 127 | |
| Change | "User Controller 1 Change" | Value in range 0, 127 | |
| Change Range | "User Controller 1 Change Range" | Value in range 0, 127 | |
| Update | "User Controller 1 Update" | Value in range 0, 10000 | |
| Update Range | "User Controller 1 Update Range" | Value in range 0, 10000 | |
| Update Units | "User Controller 1 Update Unit" | ||
| Beat Cycle Length | "User Controller 1 Beat Cycle Length" | Value in range 0, 32000 | |
| Phase Shift% | "User Controller 1 Phase Shift" | Value in range 0, 100 | |
| Voice - Micro Controller 2 | MIDI CC | "User Controller 2 Midi Command" | |
| Mode | "User Controller 2 Mode" | ||
| Minimum | "User Controller 2 Minimum" | Value in range 0, 127 | |
| Range | "User Controller 2 Range" | Value in range 0, 127 | |
| Change | "User Controller 2 Change" | Value in range 0, 127 | |
| Change Range | "User Controller 2 Change Range" | Value in range 0, 127 | |
| Update | "User Controller 2 Update" | Value in range 0, 10000 | |
| Update Range | "User Controller 2 Update Range" | Value in range 0, 10000 | |
| Beat Cycle Length | "User Controller 2 Beat Cycle Length" | Value in range 0, 32000 | |
| Update Units | "User Controller 2 Update Unit" | ||
| Phase Shift% | "User Controller 2 Phase Shift" | Value in range 0, 100 | |
| Voice - Micro Note Delay | Delay Range | "Micro Note Delay Range" | Value in range 0, 1000 |
| Delay Change | "Micro Note Delay Change" | Value in range 0, 1000 | |
| Delay Offset | "Micro Note Delay Offset" | Value in range -1000, +1000 | |
| Voice - Micro Pitch | Bend Sensitivity | "Pitch Bend Sensitivity" | Value in range 0, 24 |
| Pitch Bend Offset | "Pitch Bend Offset" | Value in range -8192, +8191 | |
| Pitch Range | "Micro Pitch Range" | Value in range 0, 8191 | |
| Pitch Change | "Micro Pitch Change" | Value in range 0, 1000 | |
| Pitch Update | "Micro Pitch Update" | Value in range 0, 10000 | |
| Update Range | "Micro Pitch Update Range" | Value in range 0, 10000 | |
| Voice - Micro User Envelope | Range | "Micro Volume Range" | Value in range 0, 127 |
| Change | "Micro Volume Change" | Value in range 0, 127 | |
| Update | "Micro Volume Update" | Value in range 0, 1000 | |
| Update Range | "Micro Volume Update Range" | Value in range 0, 10000 | |
| Voice - Note to MIDI CC Mapping | CC for Note On? | "MIDI CC instead of Note?" | Yes or No |
| Note On CC | "MIDI CC Note On Value" | ||
| CC for Velocity? | "MIDI CC for Note On Velocity?" | Yes or No | |
| Velocity CC | "MIDI CC Note On Velocity" | ||
| CC for Off? | "MIDI CC for Note Off?" | Yes or No | |
| Note Off CC | "MIDI CC Note Off Value" | ||
| Voice - User Envelope 1 (Volume) | MIDI CC | "User Envelope 1 MIDI CC" | |
| Enabled? | "User Envelope 1 Enabled" | Yes or No | |
| Envelope | "Volume" | ||
| Voice - User Envelope 2 (Pan) | MIDI CC | "User Envelope 2 MIDI CC" | |
| Enabled? | "User Envelope 2 Enabled" | Yes or No | |
| Envelope | "Pan (10)" | ||
| Voice - Envelope - Velocity | Velocity | "Velocity" | |
| Voice - Envelope - Velocity Range | Velocity Range | "Velocity Range" | |
| Voice - Envelope - Velocity Change | Velocity Change | "Velocity Change" | |
| Voice - Envelope - Velocity Change Range | Velocity Change Range | "Velocity Change Range" |
Object: "Scale Rule"
| Parameter Group / View | Displayed Name | Script Parameter Name | Notes |
|---|---|---|---|
| Scale Rule | Value | "Value" |
Object: "Harmony Rule"
| Parameter Group / View | Displayed Name | Script Parameter Name | Notes |
|---|---|---|---|
| Harmony Rule | Value | "Value" |
Object: "Rhythm Rule"
| Parameter Group / View | Displayed Name | Script Parameter Name | Notes |
|---|---|---|---|
| Rhythm Rule | Value | "Value" |
Object: "Next Note Rule"
| Parameter Group / View | Displayed Name | Script Parameter Name | Notes |
|---|---|---|---|
| Next Note Rule | Value | "Value" |
Object: "Piece"
| Parameter Group / View | Displayed Name | Script Parameter Name | Notes |
|---|---|---|---|
| Piece - Basics | Piece Length | "Piece Length" | Value in range 1, 32000 |
| Piece Length Range | "Piece Length Range" | Value in range 0, 32000 | |
| Piece Rest | "Piece Gap" | Value in range 0, 10 | |
| Piece Rest Range | "Piece Gap Range" | Value in range 0, 20 | |
| Auto Restart? | "Piece Auto Restart" | Yes or No | |
| Meter | "Meter" | ||
| Piece - Tempo | Tempo | "Tempo" | Value in range 1, 400 |
| Range | "Tempo Range" | Value in range 0, 400 | |
| Change? | "Tempo Change" | Yes or No | |
| Envelope | "Tempo Envelope" | ||
| Envelope Range | "Tempo Envelope Range" | Value in range 0, 400 | |
| Piece - Rules | Scale Rules | "Scale Rules" | |
| Harmony Rules | "Harmony Rules" | ||
| Next Note Rules | "Next Note Rules" | ||
| Piece - Roots | Piece Roots | "Piece Roots" | |
| Piece - Scripts | Start | "Script_Start" | |
| Bar | "Script_Bar" | ||
| MIDI In CC | "Script_MidiIn_CC" | ||
| MIDI In Note | "Script_MidiIn_Note" | ||
| Stop | "Script_Stop" |
Object: "File"
| Parameter Group / View | Displayed Name | Script Parameter Name | Notes |
|---|---|---|---|
| File | Title | "Title" | |
| Author | "Author" | ||
| Midi Output Device | "Midi Output Device" | ||
| Midi Input Device | "Midi Input Device" | ||
| Midi Sync? | "Midi Sync?" | Yes or No | |
| Notes | "Notes" |
See Also
Scripting Reference
The NME contains many powerful scripting features. This page lists all the available functions, objects, and parameters.
Note that the NME supports the Lua table, Lua string and Lua math standard Lua libraries. It does not support the io or os libraries.
A note on print
App: Noatikl Desktop - Note that the standard Lua function print may be used to display text in the Noatikl Script Window (if you happen to have that displayed; this is very useful for debugging your scripts!
The following functions can be used from any script.
noatikl_GetRandom ()
This function returns a random integer.
Example:
local lValue = noatikl_GetRandom ()
noatikl_GetRandomFromTo (minimum, maximum)
This function returns a random integer in the range of the two supplied values.
The function has two arguments:
- minimum the minimum value that can be returned
- maximum the maximum value that can be returned
Example:
  -- Get a random integer between 0 and 50 inclusive.
  local lValue = noatikl_GetRandomFromTo (0, 50)
noatikl_GetTime ([table])
Returns the current time. It works the same way as the the Lua os.time function.
noatikl_GetDate ([format [, time])
Returns the current date. It works the same way as the the Lua os.date function.
Example:
  -- NME script to get hour of day as 24-hour clock value
  -- ... and adjust tempo accordingly!
  local lTime = tonumber(noatikl_GetDate("%H"))
  if ((lTime > 20) or (lTime < 8))
  then
    print ("late night / early morning!")
    local lRandom = noatikl_GetRandomFromTo(0,50)
    noatikl_Trigger_Parameter_Set("Tempo", 50 + lRandom)
  else
    print ("middle of day!")
    local lRandom = noatikl_GetRandomFromTo(0,50)
    noatikl_Trigger_Parameter_Set("Tempo", 100 + lRandom)
  end
The following functions can only be used from any trigger script
noatikl_Trigger_Parameter_Set (parameter_name, newvalue)
This function is used to set the object's parameter to the supplied value, for the object within whose trigger script you place this call.
The function has two arguments:
- parameter_name the name of the parameter for which you want to set the value.
- newvalue the new value to use.
Example:
function nt_trigger_start()
  -- Set the current patch (assuming we make this call from within a
  -- Voice's trigger script!)
  local lPatch = 20
  noatikl_Trigger_Parameter_Set("Patch", lPatch)
end
noatikl_Trigger_Parameter_Get (parameter_name)
This function returns the value of the named parameter, for the object within whose trigger script you place this call. Note that the value returned is always a string, which you can convert to a number using tonumber().
The function has one argument:
- parameter_name the name of the parameter for which you want to determine the current value.
Example:
function nt_trigger_start()
  -- Get the current patch (assuming we make this call from within a
  -- Voice's trigger script!)
  local lPatch = noatikl_Trigger_Parameter_Get("Patch")
  print("Patch", lPatch)
end
noatikl_Trigger_Parameter_Get_AsNumber (parameter_name)
This function returns the value of the named parameter, for the object within whose trigger script you place this call. Note that the value returned is always a number, so you should use this call only when you know that the parameter in question can be treated as a number.
The function has one argument:
- parameter_name the name of the parameter for which you want to determine the current value.
Example:
function nt_trigger_start()
  -- Get the current patch as a number (assuming we make this call from within a
  -- Voice's trigger script!)
  local lPatch = noatikl_Trigger_Parameter_GetAsNumber("Patch")
  print("Patch", lPatch)
end
noatikl_Trigger_GetChannel()
This function returns the MIDI channel (assuming the script is called from within a voice script!). The value returned is a value between 1 and 16.
Example:
function nt_trigger_start()
  local lChannel = noatikl_Trigger_GetChannel ()
  print ("Channal", lChannel)
end
noatikl_Trigger_GetRuleElement (object_type, object_name, element_index)
This function returns the rule element value of the specified index, for the named object. The value returned is a value between 0 and 127.
The function has the following arguments:
- object_type the object type (e.g. Scale Rule).
- object_name the name of the object (e.g. Major).
- element_index the index of the element; starting at zero for the initial element.
Example 1:
function nt_trigger_start()
  -- Dump out the scale rule element values, for the major scale.
  local lIndex = 0
  while (lIndex < 12)
  do
    local lValue = noatikl_Trigger_GetRuleElement ("Scale Rule", "Major", lIndex)
    print ("lValue", lValue)
    lIndex = lIndex + 1
  end
end
Example 2:
function nt_trigger_start()
  local lCount = noatikl_Trigger_Object_GetCount(l'Scale Rule')
  print ('Scale Rule objects=', lCount)

  local lIndex = 1
  while (lIndex <= lCount)
  do
    -- Dump out the scale rule element values, for the scale!
    local lName = noatikl_Trigger_Object_GetName('Scale Rule', lIndex)
    print ('Scale', lName)

    local lItemIndex = 0
    while (lItemIndex < 12)
    do
      local lValue = noatikl_Trigger_GetRuleElement ("Scale Rule", lName, lItemIndex)
      print ("lItemIndex", lItemIndex, "lValue", lValue)
      lItemIndex = lItemIndex + 1
    end

    lIndex = lIndex + 1
  end
end
noatikl_Trigger_EmitListeningNote(noteon, pitch, velocity)
This function emits the specified note via the current voice; the function is allowed only within a nt_trigger_midiin_note trigger script. See the hyperinstrument guide for a detailed discussion. Note that this function will have an effect only if will work only if your Voice is a Listening Voice, and if Listen? is ticked in the Noatikl Desktop Control panel.
The function has the following arguments:
- noteon true for a note on event, false for a note off event.
- channel the MIDI channel to use; from 1 to 16.
- pitch the MIDI pitch to use; from 0 to 127.
- velocity the MIDI velocity to use, from 0 to 127.
Example:
function nt_trigger_midiin_note(noteon, channel, pitch, velocity)
  if (channel == noatikl_Trigger_GetChannel())
  then
    noatikl_Trigger_EmitListeningNote(noteon, pitch, velocity)
  end
end
noatikl_Trigger_EmitMidiCC (channel, cc, value [, delay])
This function emits the specified MIDI CC event.
The function has the following arguments:
- channel the MIDI channel to use; from 1 to 16.
- cc the MIDI CC to use; from 0 to 127.
- value the controller value to use, from 0 to 127.
- delay an optional delay to use, from 0 up, defaulting to 0; in NME pattern time units (where 60 represents one crotchet or quarter note). The delay is relative to the current NME timebase relevant to the trigger script in question.
Example:
function nt_trigger_bar(bar)
  -- Voice trigger...
  -- Apply a pan sweep through the bar from left to right,
  -- to show-off the use of noatikl_Trigger_EmitMidiCC.

  local lDuration = noatikl_Trigger_GetBarDuration()

  local lMidiChannel = noatikl_Trigger_GetChannel()
  local lDelay = 0
  local lCC = 10 -- Pan controller!
  local lValue = 0
  while lDelay <= lDuration do
    local lValue = (127 * lDelay) / lDuration
    -- Note that the "lDelay" is optional; we use this in this specific
    -- demo, to get a sweep effect from start to end of the bar.
    noatikl_Trigger_EmitMidiCC(lMidiChannel, lCC, lValue, lDelay)
    lDelay = lDelay + 20
  end
end
noatikl_Trigger_GetBarDuration ()
This function returns the duration of the piece bar, in NME pattern time units; where 240 represents four crotchets or one whole note or a bar of 4:4 time.
Example:
function nt_trigger_start()
  local lDuration = noatikl_Trigger_GetBarDuration()
  print ("lDuration", lDuration)
end
noatikl_Trigger_Object_GetCount (object)
Returns the number of objects of the specified type, in the current Noatikl file.
The function has the following arguments:
- object the object of interest.
Example:
function nt_trigger_start()
  lCount = noatikl_Trigger_Object_GetCount('Voice')
  print ('Voice objects=', lCount)
end
noatikl_Trigger_Object_GetName (object_type, object_index)
Returns the name of the specified object.
The function has the following arguments:
- object_type the type of the object of interest.
- object_index the index of the object of interest.
Example:
function nt_trigger_start()
  local lCount = noatikl_Trigger_Object_GetCount('Voice')
  print ('Voice objects=', lCount)
  local lIndex
  while (lIndex <= lCount)
  do
    print (noatikl_Trigger_Object_GetName('Voice', lIndex)
    lIndex = lIndex + 1
  end
end
noatikl_Trigger_Object_Parameter_Get (object_type, object_index, parameter_name)
Returns the value of the parameter, for the specified object index of the specified object type, in the playing piece.
The function has the following arguments:
- object_type the type object of interest.
- object_index the index of the object of interest.
- parameter_name the parameter of interest.
Example:
function nt_trigger_start()
  local lVal = noatikl_Trigger_Object_Parameter_Get("File", 1, "Author")
  print ('Author=', lVal)
end
noatikl_Trigger_Object_Parameter_Set (object_type, object_index, parameter_name, newvalue)
Sets the parameter to the the supplied value, for the specified object index of the specified object type, in the playing piece.
The function has the following arguments:
- object_type the type object of interest.
- object_index the index of the object of interest.
- parameter_name the parameter of interest.
- newvalue the new value to use.
Example:
function nt_trigger_start()
  noatikl_Trigger_Object_Parameter_Set("File", 1, "Author", "John Smith")
end
noatikl_Trigger_SetRuleElement (object_type, object_name, element_index, newvalue)
This function set the rule element value of the specified index, for the named object, to the specified value. The value must be between 0 and 127.
The function has the following arguments:
- object_type the object type (e.g. Scale Rule).
- object_name the name of the object (e.g. Major).
- element_index the index of the element; starting at zero for the initial element.
- newvalue the new element value to use, in a range from 0 to 127.
Example 1:
function nt_trigger_start()
  -- Set the scale rule element values, to odd settings (!), for the major scale.
  local lIndex = 0
  while (lIndex < 12)
  do
    noatikl_Trigger_SetRuleElement ("Scale Rule", "Major", lIndex, (lIndex * 127) / 12)
    lIndex = lIndex + 1
  end
end
Example 2:
function nt_trigger_start()
  local lCount = noatikl_Trigger_Object_GetCount('Scale Rule')
  print ('Scale Rule objects=', lCount)

  local lIndex = 1
  while (lIndex <= lCount)
  do
    -- Set the scale rule element values, for the scale, to stupid values!
    local lName = noatikl_Trigger_Object_GetName('Scale Rule', lIndex)
    print ('Scale', lName)

    local lItemIndex = 0
    while (lItemIndex < 12)
    do
      local lValue = (lItemIndex * 127) / 12
      noatikl_Trigger_SetRuleElement ("Scale Rule", lName, lItemIndex, lValue)
      lItemIndex = lItemIndex + 1
    end

    lIndex = lIndex + 1
  end
end
noatikl_Trigger_GetEnvelopePercent (object_type, object_name, par_name, percent)
This function returns the percent value for the specified envelope at the given percent position. The value returned is a value between 0 and 127.
The function has the following arguments:
- object_type the object type (e.g. Scale Rule).
- object_name the name of the object (e.g. Major).
- par_name the name of the envelope parameter (e.g. Volume).
- percent the percent value; from 0 to 100.
Example:
function nt_trigger_start()
  local lCount = noatikl_Trigger_Object_GetCount('Voice')
  print ('Voice objects=', lCount)

  local lIndex = 1
  while (lIndex <= lCount)
  do
    -- Dump out the voice volumes envelopes!
    local lName = noatikl_Trigger_Object_GetName('Voice', lIndex)
    print ('Voice', lName)

    local lPercent = 0
    while (lPercent <= 100)
    do
      local lValue = noatikl_Trigger_GetEnvelopePercent ("Voice", lName, "Volume", lPercent)
      print ("Volume percent", lPercent, "value", lValue)
      lPercent = lPercent + 1
    end

    lIndex = lIndex + 1
  end
end
noatikl_Trigger_SetEnvelopePercent (object_type, object_name, par_name, percent, newvalue)
This function sets the envelope value at the specified percent, for the named object, to the specified value. The value must be between 0 and 127.
The function has the following arguments:
- object_type the object type (e.g. Scale Rule).
- object_name the name of the object (e.g. Major).
- par_name the name of the envelope parameter (e.g. Volume).
- percent the percent value; from 0 to 100.
- newvalue the new element value to use, in a range from 0 to 127.
Example:
function nt_trigger_start()
  local lCount = noatikl_Trigger_Object_GetCount('Voice')
  print ('Voice objects=', lCount)

  local lIndex = 1
  while (lIndex <= lCount)
  do
    -- Ramp-up every voice volume envelope!
    local lName = noatikl_Trigger_Object_GetName('Voice', lIndex)
    print ('Voice', lName)

    local lPercent = 0
    while (lPercent <= 100)
    do
      local lValue = (lPercent * 127) / 100
      noatikl_Trigger_SetEnvelopePercent ("Voice", lName, "Volume", lPercent, lValue)
      lPercent = lPercent + 1
    end

    lIndex = lIndex + 1
  end
end
The following functions can only be used from the Noatikl Desktop Noatikl Script Window.
noatikl_Window_New ()
Creates a new piece; the user is first prompted with the template selection dialog. Returns a file handle that you must use in other related function calls; returns 0 in the case of an error.
Example:
  -- Create a new piece Window, and keep it open!
  local lWindow = noatikl_Window_New()
noatikl_Window_OpenPath ([filepath])
Opens the piece from the specified path. Returns a file handle that you must use in other related function calls; returns 0 in the case of an error.
The function has the following arguments:
- filepath the path of the piece to open. If this argument is not supplied, the user is first presented with a file browser to select a piece to open.
Example:
  -- Open a piece Window, and keep it open!
  local lWindow = noatikl_Window_OpenPath("/myfolder/myfile.noatikl")
noatikl_Window_Close (window)
Closes the Noatikl piece window returned by an earlier call to noatikl_Window_Open.
The function has the following arguments:
- window the window handle of the piece to be closed.
Example:
  -- Open a piece Window
  local lWindow = noatikl_Window_OpenPath("/myfolder/myfile.noatikl")
  -- and immediately close it!
  noatikl_Window_Close(lWindow)
noatikl_Window_GetCount (window)
Returns the number of currently open Noatikl piece windows.
Example:
local lCount = noatikl_Window_GetCount()
print ("lCount", lCount)
noatikl_Window_GetWindow (index)
Returns the window handle for the specified window index; returns 0 if no window exists for that index.
The function has the following arguments:
- index the index of the window for which the handle is being queried.
Example:
local lCount = noatikl_Window_GetCount()
print ("lCount", lCount)

local lIndex = 1
while (lIndex <= lCount)
do
  local lWindow = noatikl_Window_GetWindow(lIndex)
  print (lWindow)
  local lPath = noatikl_Window_GetPath(lWindow)
  print (lPath)
  lIndex = lIndex + 1
end
noatikl_Window_GetPath (window)
Returns the file path used by the window in question.
The function has the following arguments:
- window the window handle of the piece being queried.
Example:
-- Run through all open Noatikl piece windows,
-- and print out the file paths.
local lCount = noatikl_Window_GetCount()

local lIndex = 1
while (lIndex <= lCount)
do
  local lWindow = noatikl_Window_GetWindow(lIndex)
  local lPath = noatikl_Window_GetPath(lWindow)
  print (lPath)
  lIndex = lIndex + 1
end
noatikl_Window_SaveToPath (window, path)
Save the Noatikl piece window returned by an earlier call to noaikl_Window_Open, to the specified path.
The function has the following arguments:
- window the window handle of the piece to be saved.
- path the path where the piece should be saved.
Example:
  -- Try to save the piece with a different name... immediately close it!
  noatikl_Window_SaveToPath("/myfolder/myfilenew.noatikl")
noatikl_Window_FindFilePaths (subfolder [, subfolder2]
Find all Noatikl pieces relative to the Noatikl document root. Return as an array of file paths.
The function has the following arguments:
- subfolder the subfolder under which to search.
- subfolder2 option subfolder to search under the subfolder.
Example:
local lFileList = noatikl_FindFilePaths("templates", "timdidymus1")

local index = 0
while true do

  index = index + 1
  local lFilePath = lFileList[index];
  if (lFilePath == nil)
  then
    break
  end

  print ("File path", lFilePath)
end
noatikl_Window_Object_GetCount (window, object)
Returns the number of objects of the specified type, in the specified Noatikl piece.
The function has the following arguments:
- window the window handle of the piece to be saved.
- object the object of interest.
Example:
local lCount = noatikl_Window_Object_GetCount(lWindow, 'Voice')
print ('Voice objects=', lCount)
noatikl_Window_Object_GetName (window, object_type, object_index)
Returns the name of the specified object.
The function has the following arguments:
- window the window handle of the piece to be saved.
- object_type the type of the object of interest.
- object_index the index of the object of interest.
Example:
local lCount = noatikl_Window_Object_GetCount(lWindow, 'Voice')
print ('Voice objects=', lCount)
local lIndex
while (lIndex <= lCount)
do
  print (noatikl_Window_Object_GetName(lWindow, 'Voice', lIndex)
  lIndex = lIndex + 1
end
noatikl_Window_Object_SetName (window, object_type, object_index, newname)
Sets the name of the specified object.
The function has the following arguments:
- window the window handle of the piece to be saved.
- object_type the type of the object of interest.
- object_index the index of the object of interest.
- newname the new name to use for the object; this must be unique, and must be a valid name.
Example:
local lCount = noatikl_Window_Object_GetCount(lWindow, 'Voice')
print ('Voice objects=', lCount)
local lIndex
while (lIndex <= lCount)
do
  -- Make-up a new name, based on the index number!
  lNewName = lIndex
  noatikl_Window_Object_SetName(lWindow, 'Voice', lIndex, lNewName)
  lIndex = lIndex + 1
end
noatikl_Window_Object_Parameter_Get (window, object_type, object_index, parameter_name)
Returns the value of the parameter, for the specified object index of the specified object type, in the specified Noatikl piece.
The function has the following arguments:
- window the window handle of the file to be saved.
- object_type the type object of interest.
- object_index the index of the object of interest.
- parameter_name the parameter of interest.
Example:
local lVal = noatikl_Window_Object_Parameter_Get(lWindow, "File", 1, "Author")
print ('Author=', lVal)
noatikl_Window_Object_Parameter_Set (window, object_type, object_index, parameter_name, newvalue)
Sets the parameter to the the supplied value, for the specified object index of the specified object type, in the specified Noatikl piece.
The function has the following arguments:
- window the window handle of the file to be saved.
- object_type the type object of interest.
- object_index the index of the object of interest.
- parameter_name the parameter of interest.
- newvalue the new value to use.
Example:
noatikl_Window_Object_Parameter_Set(lWindow, "File", 1, "Author", "John Smith")
noatikl_Window_GetRuleElement (window, object_type, object_name, element_index)
This function returns the rule element value of the specified index, for the named object. The value returned is a value between 0 and 127.
The function has the following arguments:
- window the window handle of the piece
- object_type the object type (e.g. Scale Rule).
- object_name the name of the object (e.g. Major).
- element_index the index of the element; starting at zero for the initial element.
Example:
local lWindow = noatikl_Window_New()

local lCount = noatikl_Window_Object_GetCount(lWindow, 'Scale Rule')
print ('Scale Rule objects=', lCount)

local lIndex = 1
while (lIndex <= lCount)
do
  -- Dump out the scale rule element values, for the scale!
  local lName = noatikl_Window_Object_GetName(lWindow, 'Scale Rule', lIndex)
  print ('Scale', lName)

  local lItemIndex = 0
  while (lItemIndex < 12)
  do
    local lValue = noatikl_Window_GetRuleElement (lWindow, "Scale Rule", lName, lItemIndex)
    print ("lItemIndex", lItemIndex, "lValue", lValue)
    lItemIndex = lItemIndex + 1
  end

  lIndex = lIndex + 1
end
noatikl_Window_SetRuleElement (window, object_type, object_name, element_index, newvalue)
This function set the rule element value of the specified index, for the named object, to the specified value. The value must be between 0 and 127.
The function has the following arguments:
- window the window handle of the file
- object_type the object type (e.g. Scale Rule).
- object_name the name of the object (e.g. Major).
- element_index the index of the element; starting at zero for the initial element.
- newvalue the new element value to use, in a range from 0 to 127.
Example:
local lWindow = noatikl_Window_New()

local lCount = noatikl_Window_Object_GetCount(lWindow, 'Scale Rule')
print ('Scale Rule objects=', lCount)

local lIndex = 1
while (lIndex <= lCount)
do
  -- Set the scale rule element values, for the scale, to stupid values!
  local lName = noatikl_Window_Object_GetName(lWindow, 'Scale Rule', lIndex)
  print ('Scale', lName)

  local lItemIndex = 0
  while (lItemIndex < 12)
  do
    local lValue = (lItemIndex * 127) / 12
    noatikl_Window_SetRuleElement (lWindow, "Scale Rule", lName, lItemIndex, lValue)
    lItemIndex = lItemIndex + 1
  end

  lIndex = lIndex + 1
end
noatikl_Window_GetEnvelopePercent (window, object_type, object_name, par_name, percent)
This function returns the percent value for the specified envelope at the given percent position. The value returned is a value between 0 and 127.
The function has the following arguments:
- window the window handle of the piece
- object_type the object type (e.g. Scale Rule).
- object_name the name of the object (e.g. Major).
- par_name the name of the envelope parameter (e.g. Volume).
- percent the percent value; from 0 to 100.
Example:
local lWindow = noatikl_Window_New()

local lCount = noatikl_Window_Object_GetCount(lWindow, 'Voice')
print ('Voice objects=', lCount)

local lIndex = 1
while (lIndex <= lCount)
do
  -- Dump out the voice volumes envelopes!
  local lName = noatikl_Window_Object_GetName(lWindow, 'Voice', lIndex)
  print ('Voice', lName)

  local lPercent = 0
  while (lPercent <= 100)
  do
    local lValue = noatikl_Window_GetEnvelopePercent (lWindow, "Voice", lName, "Volume", lPercent)
    print ("Volume percent", lPercent, "value", lValue)
    lPercent = lPercent + 1
  end

  lIndex = lIndex + 1
end
noatikl_Window_SetEnvelopePercent (window, object_type, object_name, par_name, percent, newvalue)
This function sets the envelope value at the specified percent, for the named object, to the specified value. The value must be between 0 and 127.
The function has the following arguments:
- window the window handle of the piece
- object_type the object type (e.g. Scale Rule).
- object_name the name of the object (e.g. Major).
- par_name the name of the envelope parameter (e.g. Volume).
- percent the percent value; from 0 to 100.
- newvalue the new element value to use, in a range from 0 to 127.
Example:
local lWindow = noatikl_Window_New()

local lCount = noatikl_Window_Object_GetCount(lWindow, 'Voice')
print ('Voice objects=', lCount)

local lIndex = 1
while (lIndex <= lCount)
do
  -- Ramp-up every voice volume envelope!
  local lName = noatikl_Window_Object_GetName(lWindow, 'Voice', lIndex)
  print ('Voice', lName)

  local lPercent = 0
  while (lPercent <= 100)
  do
    local lValue = (lPercent * 127) / 100
    noatikl_Window_SetEnvelopePercent (lWindow, "Voice", lName, "Volume", lPercent, lValue)
    lPercent = lPercent + 1
  end

  lIndex = lIndex + 1
end
Credits
Intermorphic is Tim Cole & Pete Cole - yes, just two brothers - and we have now been working together in generative music since 1990. However, without the incredible support and interest from so many over the years then we would not be where we are today with our current Apps, Engines and Content. Our thankyou list below is an ever expanding one, in no particular order, and does not include everyone (sorry to those we have missed!). We offer our heartfelt thanks and gratitude to:
- All our old friends and colleagues from SSEYO days including from the early days Jon Pettigrew, John Wilkinson, Steve Crawshaw & Chandra Modi and including from later days (1996 onwards) Jerry Leach, Paul Blampied, Jerry Swan, Nick Barefoot, Simon Robertson, Kerry-Anna Saia, Natalie Da Gama Rose, John Tenkoni and also including Jesper Bennedbaek, Wenwu Wang etc. from our Tao Group audio days (we are focusing primarily on audio and so there are way too many to list here, but they include all those who went on to work at Antix Labs!)
- Timothy Didymus and Mark Harrop, longstanding friends, colleagues and artists with incredible talent whose sublime generative music creations have, on the many occasions when times were hard, given us the much needed inspiration to press onwards.
- All customers, and most especially those who wish to continue with us as we move forward - we love you, thank you!
- Everyone who made contributions to our forums, has helped others and given feedback or who has blogged, tweeted, facebooked or otherwise written nicely about or shared content they have made with our apps and in so doing helped others to find us - we love you, thank you!
- Our outstanding beta testers for their testing efforts and everyone who has given feedback, found bugs and helped with suggestions.
- Early content creators such as David Muddyman, Andrew Garton, Paul Weir and Igor Dvorkin.
- Finally, a big thanks to Brian Eno for his support and kindness to us in the SSEYO Koan years.