Install / RemoveQuick StartNoatikl DesktopNoatikl MobileVidoesFAQ |
NME Voice Types & RulesNME Voice Parameters |
Piece ParametersNME Scripting |
Noatikl from Intermorphic Ltd.
© 2007-2015 Intermorphic Ltd. All Rights Reserved. Rev: V2.8.1 A Sept 10 2015. E&OE.
© 2007-2015 Intermorphic Ltd. All Rights Reserved. Rev: V2.8.1 A Sept 10 2015. E&OE.
Noatikl (pronounced "noh – tickle") is a very powerful generative (MIDI) music creativity application. It is the evolution of the SSEYO Koan Generative Music System.
Noatikl generates its MIDI notes and MIDI controller events via the integrated Noatikl (MIDI) Music Engine (NME). This MIDI data can be used to drive 3rd party external MIDI software or hardware, such as synths, FX units and samplers, that you connect to Noatikl, or the integrated (but optional to use) Partikl Sound Engine (PSE), a powerful, advanced and modular synth + live FX network.
Don't forget to check out the 30 second videos!
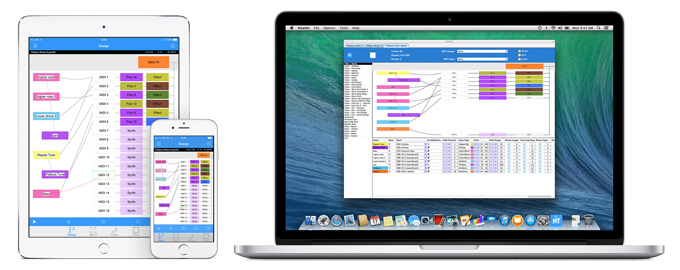
Noatikl is available for both Desktop (Windows/Mac OS X) and Mobile (iOS). Those using Desktop Audio software generally have a preferred workflow, using either a DAW with Plugins, or using and connecting a number of Standalone apps. So that you can use Noatikl Desktop in the way you prefer, there are 2 versions - Noatikl Desktop Standalone and the Noatikl Desktop Audio Plugins (VSTi/Aui). The Desktop versions (only) also have extensive built-in scripting features which allow them to be used as a customisable hyperinstruments.
This guide details the various Noatikl app interface elements and what they do, as well as other kinds of application specific things such as installation, connecting to external MIDI sources etc. When it comes to defining how the music and sounds are generated, however, we direct you instead to the NME Guide and PSE Guide which cover all relevant objects, parameters and settings available.
The NME utilises a range of generative / aleatoric / stochastic / algorithmic music techniques and parameters and creates MIDI notes and MIDI controller events through the interaction of 4 different kinds of NME Objects: Voice (with 6 Voice Types), Rule (Scale, Harmony, Rhythm & Next Note), Piece and File. There can be multiple instances of the first two objects in a "piece" and there are a large number of Voice Object parameters to affect and direct the composition.
Rather than being a traditional composer or instrumentalist, with the Noatikl app you are conductor, director, curator or gardener. You set up the rules and settings that let it generate a composition for you, in real time, in all its detail. Random events in combination with a powerful set of musical rules are used to create a stream of music that is ever-changing and continually fresh, but which is entirely in accordance to your personal artistic choices and musical direction. How you interpret what you hear is filtered through your own internal knowledge of music. This combination of chance and logic is what allows the music to stay fresh, interesting and unpredictable.
Noatikl Mobile for iOS is installed via the iTunes App Store as part of the download process.
Use this where:
Versions:
Noatikl Desktop Standalone runs as a tool on its own, but you can also use it to generate and send MIDI events to a MIDI output device or virtual MIDI port. You can use it in this manner with any Windows (e.g. Sonar, Reaper, Cubase etc.) or Mac (Logic, Cubase, Pro Tools etc.) MIDI sequencer (also referred to as a DAW or Digital Audio Workstation) or standalone software synth or sampler.
We have created tutorials and template projects to "get you started"for some of the popular sequencers. Download the file below, extract the contents to the appropriate place on your computer, and then follow the appropriate tutorial to see how the template project works:
Use this where:
Versions:
If you're just using Noatikl to render audio using Noatikl's built-in synthesizer, then there are no special requirements for configuring a Noaitkl Plug-in variant to work within your DAW. Noatikl will "just work".
However, if you want to process MIDI event data from a Noatikl plug-in variant, then you are likely to have some configuration work to do first.
The most fundamental challenge with the Plug-in variants of Noatikl, is that Noatikl is quite unique in the music world; in that it generates MIDI data across more than one MIDI channel. Why does this make things difficult? Well, most MIDI Plug-ins are designed to deal with single channels of MIDI data, such as echo or delay effects; or even to generate simple sequences that target a single MIDI channel (such as standalone bass lines or drum riffs).
However, if you were to assign a Noatikl Plug-in variant to a MIDI track in your sequencer, you would find that you could attach that MIDI track to render through only one soft synth (such as a VSTi synth). This is not good ... as what you really want to do is render each channel of data generated by Noatikl through a different synth! Some sequencers are not able to split output from MIDI Plug-ins attached to a MIDI track, on a per-MIDI channel basis, to target different synthesizers with data from different MIDI channels generated by noatikl!
That said, many sequencers do work well with the Noatikl VSTi; Reaper, Sonar and Cubase being examples.
There is a huge range of plug-in formats, each of which behaves differently on different platforms. Noatikl is a MIDI-based generative music engine, and therefore is designed to emit (and respond to) MIDI events. However, each sequencer requires a slightly different variant of plug-in!
If you wish to use Noatikl as a plug-in MIDI event generator, then which plug-in variant to use, depends on what tool you are using, and which platform you are running on (e.g. Mac OS X or Windows).
Just to add to the challenge, not all hosts handle VSTi plug-ins correctly, and they all have their own ideosyncratic behaviours. So you'll probably need to experiment to find the Noatikl variant that works best with your favourite host. If in doubt, the standalone Noatikl version can usually be configured to work well with your sequencer; though the flexibility of the plug-in approach makes it well worth the effort in giving a plug-in variant of Noatikl a try too!
Noatikl Desktop Standalone / Desktop Audio Plugin for Windows are available for downloaded here from the Intermorphic website as 30 day trial full versions, and are installed as below. See Enter the Product Key on how to unlock them after the trial period is up.
noatikl_win64_standalone_setup.zip / noatikl_win32_standalone_setup.zip or noatikl_win64_plugin_setup.zip / noatikl_win32_plugin_setup.zipnoatikl_win64_standalone_setup.exe or noatikl_win64_plugin_setup.exenoatikl.exe (standalone)noatikl_VSTi_win.dll (VSTi plugin)
c:\Program Files\VstPlugIns
c:\Program Files (x86)\VstPlugIns, but this is no longer supported.Noatikl Desktop Standalone & Desktop Audio Plugins for Windows are made available via our website as 30 day trial versions. To continue to use them after the 30 day evaluation period requires that you purchase the revelant licence(s) from the Intermorphic webstore. Following your purchase you will be sent an Order Confirmation email that contains your Order ID, Customer ID (the email you used for purchase) and Product Key, or in some cases just a Product Key.
Note: The Product Key for the Noatikl Desktop Audio Plugin is different to the one for the Noatikl Desktop Standalone version, therefore you must enter your Product Key into the same product that you have licenced or it will not be accepted. For example, you must enter the Noatikl Desktop Audio Plugin licence key into the Noatikl Desktop Audio Plugin. To enter your Desktop Audio Plugin product key, launch the Plugin from your Windows Desktop Audio Workstation (DAW) or Sequencer that is a VST host (e.g. Sonar, Reaper, Ableton, Cubase etc) and then follow the instructions below.
As you are entering your Product Key into a plugin on a Windows PC, then you might need to ensure that you are running the host software (e.g. Reaper 3) "as Administrator" in order to get the product key to stick.
As of Noatikl 2.8.1 the Audio Unit plugin no longer requires a Product Key, but instead a Mac App Store purchased and installed version of Noatikl 2.8+.
IMPORTANT: If you purchased a Noatikl Plugin Licence from the Intermorphic Store but have NOT ALSO purchased Noatikl at the Mac App Store (and have a Noatikl 2.8+ version installed), then in order to activate the Noatikl Audio Unit Plugin you must FIRST ensure you have successfully enter your Product Key into a previous version of the Audio Unit Plugin. To check your license status for the Noatikl Audio Unit Plugin: From the plugin's Menu bar, select Help -> Noatikl Product Key.Garage Band 10 users: See the following - How do I use Audio Unit plugins?
noatikl_AU_mac.component.zip.noatikl_AU_mac.componentHard Disk/Library/Audio/Plug-Ins/Components
Use the following steps, which are also shown in one of the video tutorials:
Start > Programs > Intermorphic > Noatikl
Finder > Applications > Noatikl
Once launched, the load screen will display for a few seconds as Noatikl loads up and show status updates such as "Loading skin" "version number " and "Loading content". Once Noatikl has loaded the load screen will disappear.
It may seem odd to put this information right at the top of the guide, but it is because knowing how to back up your creative work (and transfer to/from device) is so very important and thus needs to be easy to find.
However you use our IM Apps, we strongly recommend you regularly and suitably back up your "Suitable Content" (see below) to somewhere safe: you don't want to lose it!
Details in this section apply to Noatikl or Mixtikl ("IM Apps"), as relevant.
Noatikl [NT2.5+]
Noatikl 2.3+ and Mixtikl 6 (OS X/Windows)
Our Desktop IM Apps save to a specific folder and look for content in that folder. This is to allow Suitable Content (above) to be shared/used between both mobile and desktop versions of those apps. We call this folder the "Intermorphic Folder". It is a *flat folder* (where tilde [~] or %HOMEPATH% in the pathname is a shortcut for your user account name), and is found here:
~/Music/Intermorphic/ (Mac)%HOMEPATH%\Music\Intermorphic (Windows)~/Music/Intermorphic/IMTPALLoopEssentials1.zipNoatikl 2.3+ and Mixtikl 6 (iOS)
Refer to Apple's docs on iTunes Apps File Sharing, as this is the latest information from them on how to do this.
Mixtikl 6 (Android)
Note: If you want to remove Noatikl so you can reinstall an older version, see the instructions here.
Start > Programs > Intermorphic > Noatikl >
Hard Disk/Applications
Noatikl to the TrashHard Disk/Library/Audio/Plug-Ins/Components
noatikl_AU_mac.component to the TrashHard Disk/Library/Audio/Plug-Ins/VST
noatikl_VSTi_mac.vst to the TrashTip: If you want some (older) online video tutorials, you can find them here.
The following short text tutorials are to get you started fast, doing some very basic things with minimum fuss. The principles are the same for both Noatikl Desktop and Noatikl Mobile (even if slightly different).
Noatikl is a very deep app and quick tutorials are no substitute for further investigation - they are just to get you started! To that end, in most steps we link to further information where you can go on to read and learn more about various screens and what they are for.
~/Music/Intermorphic/ and Windows: %HOMEPATH%\Music\Intermorphic.~/Music/Intermorphic/ and Windows: %HOMEPATH%\Music\Intermorphic. Noatikl Desktop comes in Standalone and AudioPlugin (VSTi / UAi) versions. It is a deep product and it does take time to master - but it is worth the effort. This section will go though the main areas of the desktop interface so that you can become familiar with what does what and we will go on from there.
Note: do also check out Noatikl Mobile, which has the majority of the power of Noatikl Desktop.
Ensure you have installed Noatikl Desktop and have it correctly setup for MIDI Out if you wish to use that. If you use Logic, also note the special instructions for Logic.
When you first load Noatikl Desktop you see the following screen which gives you some quick pointers on what to do next:

Noatikl Start screen
Noatikl Desktop Standalone doesn't come with any demo pieces, but we do have two finished pieces from Tilkbox Relax for you to try out.
To load and play them, you need to do is to have Noatikl Desktop Standalone installed, be online and then click the following Music URL or Dropbox links. Once the pieces have loaded, just press the Noatikl Play button and enjoy!
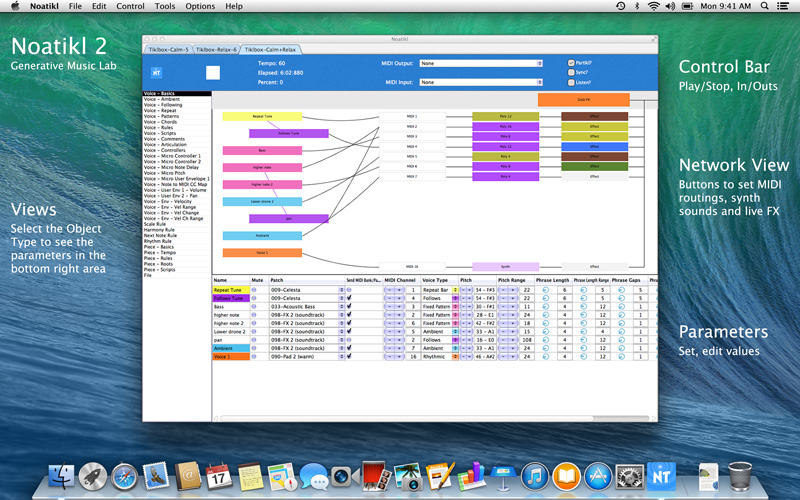
Noatikl Desktop UI
The screenshot above was taken of Noatikl playing a mix of the two pieces above and it contains a number of generators (voices). This helps illustrate the different areas in the Desktop interface.
The top "Control" bar contains the Play/Stop button (press Play to hear Noatikl), as well as information on piece progress, and fast access to some key MIDI options (as these are very important for many Noatikl users).
The Play button starts you playing. You will only see this button for Noatikl standalone; for the plug-in variants of Noatikl, play/stop is controlled directly by your DAW's transport controls.
Note: you might first want to set-up a MIDI device through which to render your music. See MIDI Routing or MIDI Output for more info on this.
Note: if you have Sync? selected, then playback won't start making any sounds until the sequencer that you are listening to has the play button pressed on its own transport control. In this case, you must first press Play before Noatikl can respond to events from your sequencer's transport control.
The Stop button stops you playing. You will only see this button for Noatikl standalone; for the plug-in variants of Noatikl, play/stop is controlled directly by your DAW's transport controls.
Press the Play This File! checkbox to indicate which of your open documents is to be played in response to the Transport control in your DAW. Remember that Noatikl can have more than one document open at once, so this checkbox tells the DAW which of the open Noatikl files to play.
When the piece is playing, you will see various interesting properties get displayed in the Playback group:
This shows the current Piece tempo. If you are using one of the Noatikl Plug-in variants, then this value will be the value that is forced by the sequencer host in which Noatikl is running.
The elapsed time in Measures:Beats:Ticks format (MBT).Note that if you are using of of the Noatikl Plug-in variants, then this value might be up to a bar ahead of the value displayed by your sequencer's transport control; this is because Noatikl composes ahead according to a latency dictated by the behaviour of your host sequencer.
The approximate elapsed Noatikl Piece position, relative to the Piece Duration.
Whether or not you have "Partikl?" checked (which allows sounds and effects to be rendered via the PSE), you can optionally ask Noatikl to deliver MIDI event data from the Voices in your piece to a MIDI Output device.
If you are running within a sequencer which does not support MIDI routing from one VST to another then you must select any value other than "Sequencer MIDI Pipeline" (otherwise your MIDI events will not generate any sound in the sequencer).
If you are using some other VST Host which allows MIDI data to be routed from one VST into another one (e.g. Reaper), then you may select any of the available options; though you are most likely to want to select the "Sequencer MIDI Pipeline" option.
Mac: select an IAC port, and maybe use MidiPipe by SubtleSoft to render your audio data. Please refer to the Noatikl video tutorial - "creating your first piece on Mac" which will get you going in about 1 minute.
Windows – use a MIDI output device; use MIDI Yoke or Maple if you want to route data from Noatikl to your DAW!
In general, use the "Sequencer MIDI Pipeline" option.
You can tell Noatikl to listen-out for incoming MIDI data on the specified port. Noatikl can use incoming MIDI information for various purposes, including synchronisation and as a hyper-instrument through Listening Voices.
By default, the "Partikl?" checkbox is ticked. This means that Noatikl will play the MIDI events generated by the generative Voices, through the built-in PSE.
You can use the Sync feature to allow Noatikl (when playing through an external MIDI device or port) to synchronise with audio playback in your favourite Sequencer. Once this checkbox is selected, then playback won't start making any sounds until the Sequencer that you are listening to has the play button pressed on its own transport control.
Note: you will experience a degree of MIDI latency (i.e. all notes offset by a certain amount) and some small variation in the note playback timing (typically +/- 5 or 10ms). We are looking at ways to minimise this in later updates. If you record the Noatikl output to a MIDI file, then it is fairly easy to adjust for the latency and also quantise (if you want) the note timing.
Check the "Sync?" checkbox and set your Noatikl MIDI input device to listen-out to the MIDI port to which you have told your Sequencer to send MIDI sync information.
Press the Noatikl Play button.
Noatikl will then start and stop playing automatically in response to your pressing the play and stop buttons in the Sequencer.
For an example of setting this us see also this FAQ entry.
Press the play / stop buttons in your transport control.
Using Logic Pro on the Mac, you can use MidiPipe by SubtleSoft to provide the "cabling" between Noatikl and Logic. Please refer to the Noatikl video tutorial - "creating your first piece on Mac" which will get you going in 1 minute. Set-up couldn't be easier.
To use MIDI sync in Noatikl AU for Logic 8:
This is provided to protect against MIDI feedback, which can occur with some sequencers, notably Logic (which will by default present all data output to a port, as an input to all other ports).
The central "Network" editor / panel is where you marry voices (note generators) to MIDI channels, PSE synth sounds and FX. It shows a view of all NME Voices, together with cells showing the associated MIDI channel and any PSE Synth, Track Effect and Global Effect settings. Refer to the NME Guide for information on Voice and Piece parameters and the PSE Guide for information on Synth and FX parameters and Networks.
If you drag from a Voice box to a MIDI channel box that will tell the system that the Voice will play through the defined MIDI channel. If a new voice is added to a piece, the voice won't be assigned to a specific MIDI channel; if you haven't yet hooked-up a Voice to a MIDI channel, Noatikl will decide on a free MIDI channel to hook-up the Voice to when it starts playing.
The Voice "Patch" parameter defines which MIDI Patch command to send for each MIDI channel - in general, you should only hook-up multiple Voices to the same MIDI channel if they all share the same Patch parameter.
MIDI Channel 10 is reserved for the Drum instrument. Every voice with a Drum Patch, should generally be attached to MIDI Channel 10.
If the "Partikl?" checkbox is checked, then MIDI events are routed for each channel through a PSE configuration defined by the associated Synth box, which by default will use the PSE's built-in MIDI Wavetable synth (using the Patch defined by the Voice's Patch parameter). If you want to use a custom sound, click the Synth button to invoke the Synth editor dialog.
The output from every Synth box can be passed through a custom PSE Effect network. If you want to use an Effect, click the Effect button to invoke the Effect editor dialog!
The output from every PSE Effect is added together and passed through a Global Effect network. If you want to use a Global Effect, click the "Glob FX" button to invoke the Global Effect editor dialog. This dialog looks the same as for the Track Effect dialog.
By default, the dialog shows no effects units. You can alter the network to use a custom set of sound effects units in various configurations; or select from a list of built-in preset effects.
The left view lets you select which type of NME Objects you want to edit the parameters for in the Parameter panel below.
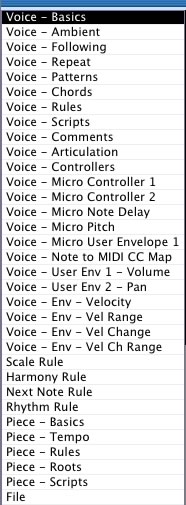
Object Type View
This is probably the most important Object Type in Noatikl. A Voice is a Noatikl object that represents a generator of Music data. For example, a Voice can be used to play a fixed musical pattern. Or, a voice can be used to create notes according to various musical rules. A Voice can also be used to emit MIDI controller information that is used to control your favourite sequencer. You must have at least one Voice in your Noatikl composition but you may have many more if you want. The basic behaviour of a Voice is defined by its Voice Type property. You may tell Noatikl that individual Voices use specific Scale Rules (other any other of the supported Rules).
Scale Rule, Harmony Rule, Next Note Rule and Rhythm Rule. These rules provide the settings that govern what notes are composed, and when. Each Voice object can use it own rules, as well the Piece Rules object (below).
There is always exactly one Piece object in your Noatikl composition. The Piece object manages various high-level properties of your composition. These include things like what musical rules to follow by default (where not overridden by individual Voices), the Tempo to follow, and various other global properties.
You can store certain basic bookkeeping information related to your file, such as the title of the composition and the author. The File object doesn't define any data that affects what you hear in your composition.
The bottom "Parameters" view contains a table where you can view and edit all of the NME Objects and Parameters that make-up your Noatikl composition. It gives you access access to all the editors for the group of objects and parameters you select in the left panel. In the above picture, the Voices are listed together with their basic parameter values. Voices will flash here to show that they are playing a note.
You can add Voices (or other musical objects) within the table, so that each row represents a different Voice, and each column represents a different attribute of that Voice. Use the menu items to add, delete and copy voices and other objects.
Open Noatikl, and then From the Noatikl menu, select File -> New.
This presents you with the Template list (first image below) containing a large selection of Noatikl templates from which you may base your new Noatikl composition.
Select the 'Simple file' item from the list of templates. This will present you with an empty piece (second image below). Then just press Play.
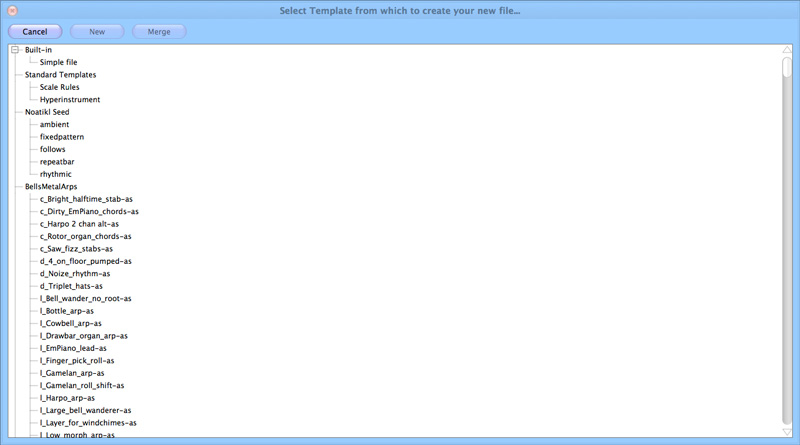
Template List

Empty Piece
Creates a new piece for editing; select the template that you want to use as the basis for your new piece, via the dialog that is presented to you. Which templates get listed, depends on which template packs you have got installed.
Browse for a Noatikl or Partikl file to open.
Browse for a Noatikl or Partikl template or file to merge into the currently open piece.
From any installed templates, browse for a template that you want to merge-in to your current piece; Noatikl does the "right thing", pulling in all voices and rules from that template (it does *not* replace any rules, but will bring-in rules that do not currently exist in your piece); copies-in all voices and renames each voice if required to keep them unique. Try merging in one or more drum templates! Note that any sound definitions are not merged in. If you want the sound definitions, you'll need to open a new file from that template, and export/import the sounds you want using the Synth and Effects cells.
As for Templates, but browse for a Noatikl file that you want to merge-in to your current piece. Try taking any piece, merging-in any other piece, and amaze yourself at what you hear.
Close the currently open piece.
Save your document as a Partikl file with its current name in its current folder location.
Note: There are two file formats supported by Noatikl 2.
Save your document as a Partikl file with a new name or folder location.
Import a Noatikl or Partikl document from the clipboard.
Export your Noatikl rules and all sound settings as a Partikl document to the clipboard.
Save your file's core Noatikl rules as a Noatikl document with a new name or folder location.
Export your file's core Noatikl rules as a Noatikl document on the clipboard.
Open from a list of your recently accessed Noatikl files (not available in the Mac standalone version).
Use the Edit menu items to copy and paste object parameters. The menu items available under Edit are as follows:
Where possible, Noatikl presents an Undo option.
Where possible, Noatikl presents an Redo option.
Adds-in a new default object of the currently viewed type.
Cuts the currently focused object.
Copies the currently focused object.
Copies the currenly focused parameter.
Pastes in the most recently copied or cut object or parameter.
Deletes the currently focused object.
Restores the currently focused parameter to its default value.
Restores all parameters in the currently focused column to their defaults.
Restores all parameters in the currently focused row to their defaults.
Use the Control menu items to play / stop tracks. The menu items available under Control are as follows:
Starts or stops the piece playing (you can also use the Ctrl+Spacebar shortcut).
Solos the selected voice.
Unmutes all voices.
Mutes all voices.
Use the Tools menu items to access integrated helper utilities. The menu items currently available under Tools are as follows:
Displays the Noatikl script window.
Launches a utility to capture (as fast they can be generated) a user configurable number of takes to sequentially numbered MIDI files. For MIDI file saving, see also Preferences.

MIDI File Cooker
Starts off/stops the "cooking" process (make sure you have a Noatikl file loaded, and have set the number of "Files to Create" and "Record MIDI files to folder" below).
Closes the dialog.
Use the slider to select a number from 1-100 (or double click the number field to enter a number).
Tells you how many MIDI files have just been recorded.
Tells you the total size of the MIDI files that have just been cooked.
Uuse this button to see the folder where the recordings are saved.
Important note: when cooking a MIDI file, the tempo comes from the NME Piece Tempo parameters; not from any host sequencer.
Shows the folder where Noatikl saves MIDI recordings.
Shows the folder under which Noatikl saves and opens Partikl files such as your custom Synth and Effects networks.
Shows the folder under which Noatikl saves and opens your custom Synth networks.
Shows the folder under which Noatikl saves and opens your custom Effects networks.
Displays a pop up with instructions on how to find this folder.
Use the relevant Preferences menu item to define the key settings that the way that Noatikl works. These include settings for MIDI CC Events, and also to allow automatic MIDI recording of a live playback (see also Tools), as follows:
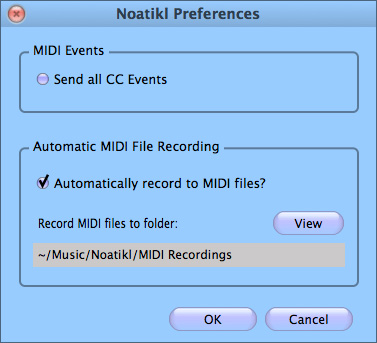
Preferences Menu
Mac: Noatikl > Preferences...; Windows: Options > Preferences...
If you want to send MIDI output from Noatikl to a MIDI port or device, you will need to redirect the "MIDI Output" from Noatikl using a technique appropriate to your version of Noatikl.
If you are using a DAW/Sequencer, you must also assign one or more MIDI tracks to listen-out to the port to which you are directing your Noatikl output! Note that for quick testing of this approach on Windows, you have the option of directly targeting your built-in Windows wavetable synth.
You'll find a lot of information on how to configure the various variants of Noatikl in the Noatikl FAQ.
Reaper is very easy to use with the Noatikl VSTi or Noatikl Audio Unit!
Follow these instructions to get something playing in under two minutes!
To use Noatikl AU with Logic is very easy; simply download the template project zip and follow the video tutorial.
Sonar works well with the Noatikl VSTi (albeit with some possible keyboard issues in older versions of Sonar)! There can also be some timing problems inherent in using the Noatikl VSTi with Sonar; see here for more details about how to work-around these issues.
The steps for using Noatikl VSTi under Sonar Home Studio (which is similar to Sonar Studio/Producer) are as follows (see also the video tutorial). These steps might also work (in slightly different form) with earlier versions of Sonar; let us know if you find out.
When you've first copied the Noatikl VSTi to your computer, be sure to scan for the VSTi. On my machine, this involves the following steps:
Cubase (Windows/Mac) works well with the Noatikl VSTi. The steps for using it with Cubase SE 3 are as follows (see also the video tutorial). These steps might also work (in slightly different form) with other Steinberg authoring tools; let us know if you find out.
When you've first copied the Noatikl VSTi to your computer, be sure to scan for the VSTi.
The steps for using Noatikl VSTi under Ableton Live are as follows; these steps apply to both the Windows and Mac versions of Ableton Live.
When you've first copied the Noatikl VSTi to your computer, be sure to scan for the VSTi from Ableton. Once done, you should see noatikl_VSTi_win (Windows) or noatikl_VSTi_mac (Mac) in Ableton's list of "Plug-In Devices".
There is a separate section just for Logic and Noatikl Standalone. This because to run Noatikl under the direct control of Logic's own transport controls, and also route MIDI event data from Noatikl such that Logic can pick-up that data, requires that a little bit of preparation work is done first.
Logic sums all incoming midi data to the current active track in the arrange window because this is normally what you might want. However, it isn't what you want with Noatikl and the Logic manual isn't clear as to how to change this.
Using Noatikl Desktop Standalone application with Logic Pro:
This now works correctly i.e. setting Noatikl to transmit on c1 directs the data to the first instrument in Logic, transmitting on c2 goes to the second etc.
You are now ready to make amazing music with Noatikl and Logic on your Mac.
Noatikl V1.5+ listens to incoming MIDI data to allow you to create dynamic hyperinstruments.
In order to use this feature in the standalone version of Noatikl, Logic users need to take certain steps to eliminate the risk of MIDI feedback.
Due to the way Logic implements it's own MIDI through system, it is essential for Noatikl to use different MIDI ports for MIDI in and MIDI out. Port sharing will cause MIDI feedback, lockups and the risk of system crashes.
Open Audio/MIDI setup in the Applications/Utilities folder. Select the MIDI tab.
Double click on the IAC icon and select Ports Click on the Add port button underneath the ports window. Accept the default setting by clicking Apply.
In Noatikl select IAC bus 1 as the MIDI output bus and IAC bus 2 as the MIDI input bus
Launch Logic.
Open the Environment window (Command 8) and select the Clicks and Ports layer.
Click on New -> Monitor to create a new Monitor object. Draw a cable from the Midi input object from IAC Bus 2 and connect it to this monitor. Do not connect the output of this monitor to any other object in the environment.
In the arrange page, select "Settings -> Synchronisation". Click on the MIDI tab. Set the MIDI clock destination tab to be IAC Bus 2 and you are good to go.
See also: Noatikl video tutorial - "creating your first piece on Mac" which will get you going with MidiPipe by SubtleSoft in 1 minute.
To create a second MidiPipe port, drag another MIDI in and MIDI out into your current pipe.
Select the second MIDI input and click on the blue menu display tab to show all the MIDI inputs. Click on Edit virtual Inputs
Click on New Virtual Input to add the second input, repeat this in the Virtual Outputs view to create a new virtual output. Click Done.
Highlight the first Midi output in the pipe. Ensure the box marked Pass Through is unchecked (this box is checked by default).
Save your Pipe.
In Noatikl select MidiPipe input 1 as the output and MidiPipe Output 2 as the input.
Launch Logic.
Open the Environment window (Command 8) and select the Clicks and Ports layer.
Click on New -> Monitor to create a new Monitor object. Draw a cable from the MIDI input object from MidiPipe Output 2 and connect it to this monitor. Do not connect the output of this monitor to any other object in the environment.
In the arrange page, select Settings -> Synchronisation. Click on the MIDI tab. Set the midi clock destination tab to be MidiPipe Input 2
Noatikl 2 Mobile Load screen
Noatikl Mobile for iOS (available at the Apple App Store) has all the power of Noatikl Desktop (including support for PSE Soundfont (SF2) Wavetables) except that it does not support Scripting or Listening Voices.
That said, it has a useful "Blend" mode for X-Y blending of elements with a "drift" facility as well as support for Inter-App Audio / Audiobus and CoreMIDI / Virtual MIDI. As with Noatikl Desktop, Noatikl Mobile takes a bit of time to master - but it is worth the effort.
This Noatikl Mobile section goes though the main areas of the mobile interface so that you can become familiar with what does what and we will go on from there. The parameters are all detailed in the preceding Noatikl desktop sections.
There are four main "Views" selectable via the bottom tab bar (see Views below). The first two views are where you design and blend pieces and are unsurprisingly called the Design and Blend views. The other two views are the Voices and Piece views, but more on those later. OK, let's get started, and to do that, we open and play one of the included demo pieces!
Noatikl Mobile comes with two demo pieces; these are finished pieces that are in Tilkbox Relax. From either the Design or Blend view (see Views below), select the top left button which takes you to the Pieces screen. To open one of the Tiklbox pieces either double tap it or tap it and then tap the top right Open button. To play it, tap the left Play button in the bottom toolbar.
The next thing to do is to create your own piece. From either the Design or Blend view (see Views below), select the top left button which takes you to the Pieces screen.
In the Pieces screen select the top right "New" ("+") button and you are presented with the Template screen containing the list of available Noatikl templates from which you may base your new Noatikl composition.
Simply select one and press the top right "New" button and you get taken to the Design view - you now have a new piece to edit as you wish!
The Design view is where you will do your piece construction and set up.

Design View
The top panel contains the "Pieces" button on the left and the "Settings" button on the right.
Below this is the small Piece status panel and this shows the piece name, elapsed time in Measures:Beats:Ticks format (MBT), elapsed piece position (%) relative to the piece duration and the piece tempo.
The output from every Effect is added together and passed through a Global Effect network. If you want to use a Global Effect, click the "Glob FX" button to invoke the Global Effect editor dialog. This dialog looks the same as for the Track Effect dialog.
By default, the dialog shows no effects units. You can alter the network to use a custom set of sound effects units in various configurations; or select from a list of built-in preset effects.
The central "Network" editor / panel is where you marry voices (note generators) to MIDI channels, PSE synth sounds and FX. It shows a view of all Noatikl NME Voices, together with cells showing the associated MIDI channel and any PSE Synth, Track Effect and Global Effect settings.
Tap/hold on a voice and you can drag it up/down to change the voice order. If you drag from a Voice button to a MIDI channel box that will tell the system that the Voice will play through the defined MIDI channel. If a new voice is added to a piece, the voice won't be assigned to a specific MIDI channel; if you haven't yet hooked-up a Voice to a MIDI channel, Noatikl will decide on a free MIDI channel to hook-up the Voice to when it starts playing.
The Voice "NME Patch" parameter (see Voices View) defines which MIDI Patch command to send for each MIDI channel - in general, you should only hook-up multiple Voices to the same MIDI channel if they all share the same Patch parameter.
MIDI Channel 10 is reserved for the Drum instrument. Every voice with a Drum Patch, should generally be attached to MIDI Channel 10.
If the "Partikl" toggle is checked in the Settings screen, then MIDI events are routed for each channel through a PSE Synth configuration defined by the associated Synth box, which by default will use PSE's built-in MIDI Wavetable synth (using the Patch defined by the Voice's Patch parameter). If you want to use a custom sound, click the Synth button to invoke the Synth editor dialog.
The output from every Synth box can be passed through a custom Effect network. If you want to use an Effect, click the Effect button to invoke the Effect editor dialog.
Tap on a voice to get a standard iOS pop-up menu (Edit | Mute / Hear | Solo / All | Delete | Copy / Paste). To Paste a voice (once copied) you must tap an existing voice and then select Paste.
The toolbar contains the Play/Stop control, as well as a button to add templates, buttons for mute and solo screens, and a help/more button.
At the bottom of the screen are 4 tabs that allow you to display the 4 main views, Design, Blend, Voices and Piece.
The Blend view is where you will do your piece blending (easily change volume and pan settings) and also have fun with the drifting capability (where voices can auto blend)!
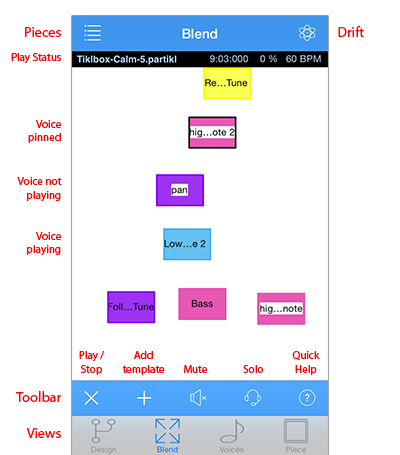
Blend View
The top panel contains the "Pieces" button on the left and the "Drift" button on the right. The 4 Drift options are: Manual (blend), Drift, Flock, Drift & Flock.
As Design screen.
The central area shows the piece voices and you drag them left/right to change their pan position, or up down to change their volume. Tap on a voice to get a pop-up menu (Edit | Mute / Hear | Solo / All | Delete | Copy / Paste | Pin). Selecting Pin will allow you to anchor that voice so that it will not drift.
As Design view
As Design view.
The Voices view is where you edit all the parameter values for each of the voices in the piece. Simply select the Parameter Group on the left hand side, and then edit the parameters on the right!
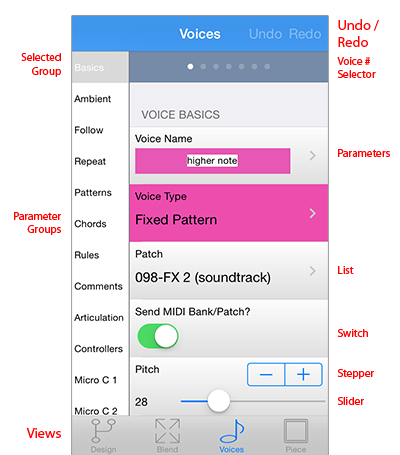
Voices View
Tap this to go back to the top of the list and display the Basics parameter group.
Tap left or right of this to quickly move between NME Voices.
Tap one of the groups to display, on the left, the parameters for that group. Refer to the NME Guide for information on Voice parameters.
The Piece view is where you edit all the NME Piece parameter values for the piece itself. Simply select the Parameter Group on the left hand side, and then edit the parameters on the right. Refer to the NME Guide for information on parameters.
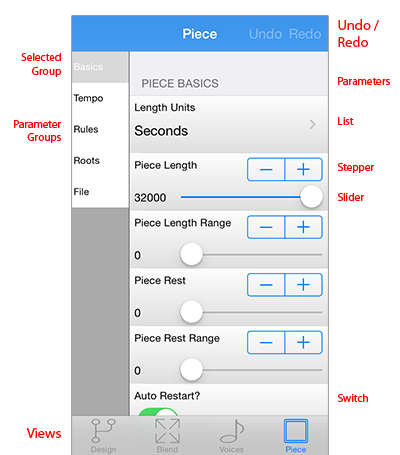
Piece View
Tap this to go back to the top of the list and display the Basics parameter group.
Tap one of the groups to display, on the left, the parameters for that group. Refer to the NME Guide for information on Piece parameters.
The Piece parameters can make a big difference how your piece sounds, especially the tempo and root. When exporting a piece for use in Mixtikl, remember that it is best to use a maximum piece length (32,000 seconds).
If you are going to be making your piece available for others to use, you may well wish to include your own copyright statement for the piece. Each voice can also have its own copyright statement.
The Pieces screen is where you open / save / create new pieces etc, and also access the list of templates should you want to add one to your current piece.

Pieces Screen
On the left of the top panel are the "Design" or "Blend" button on (depending on how you accessed this screen). On the right is the "Open" button which will open the selected piece.
The Make Copy panel is where you can save the currently selected piece to a new name (create a copy). Pressing Save will save the piece (to back up or transfer this off your iOS device see Copy In/Out).
Select a piece in the list and then use the toolbar buttons to carry out an action on it.
Tip: Double tap a piece to see the option to open it or merge into the existing piece.
The selected pieces will be indicated with a highlight.
The toolbar contains the Rename piece button, and buttons to create a New piece from a template, Export and Import pieces to/from the clipboard and to Delete pieces.
Tip: When you open a piece, you get presented with an option to merge it into an existing piece. This can be really useful and fun. Try merging the two included Tiklbox pieces in this way!
As Design view.
The Templates screen is where you select and open templates that you want to base a new piece on (when accessed via Pieces screen) or add to the current piece (when accessed via Design/Blend views).
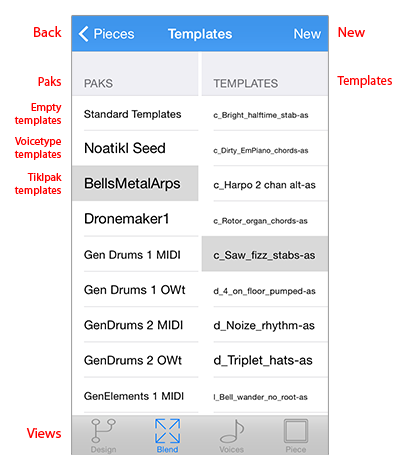
Templates Screen
On the left of the top panel are the "Pieces" button or "Design" or "Blend" buttons (depending on how you accessed this screen). On the right is the "New" ("+") or "Add" button (depending on how you accessed this screen). The New button takes you to the Templates screen and the Add button takes you back to the view you were last in (Design or Blend).
Tap a template to preview it. Tap it again to stop the preview.
There are two simple template that you can choose if you wish as plain starters.
These let you start a new piece with a particular voice type.
Noatikl Mobile includes all the template that are in Noatikl, grouped by Tiklpak. There are a lot of templates, so just scroll down the screen as you would any list in iOS.
As Design view.
This screen is where you configure how you want Noatkl to play its sounds and how to control other apps via Audiobus and Core MIDI.
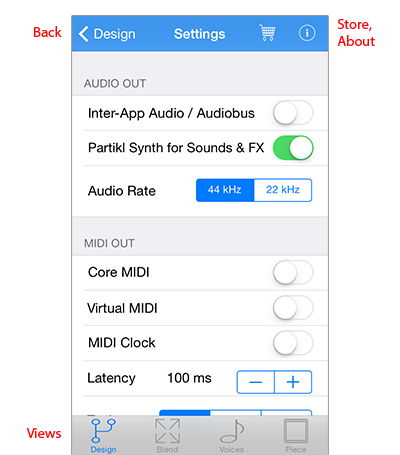
Settings Screen
On the left of the top panel is the "Design" button. On the right is the "About" button which, when tapped, shows you the Noatikl version number (also shown on the load screen as Noatikl Mobile loads).
Note: Inter-App Audio and Audiobus are on by default. To use either of these you need to route Noatikl via an Inter-App Audio or AudioBus enabled app.
PSE Synth for Sounds & FX: On by default. Enables PSE sounds, which all voices use as this is the sound generator for Noatikl. Turn this to off when you want to play through an external synth(s) and you do not want to hear the PSE sounds as well. NOTE: When this is set to OFF you will not hear anything from Noatikl unless you have a MIDI device connected (and you will hear sounds through that instead).
Audio Rate: 44 kHz by default. 44 kHz gives the highest quality sound output from the modular synth (should you be using that). Depending on how complex your piece is in terms of sounds and FX, however, older devices might struggle at this output rate. In which case, you can try reducing how hard Noatikl works the processor by reducing the output rate to 22 kHz.Core MIDI: Off by default. When enabled, tells Noatikl to send-out MIDI events via Core MIDI. Apps that are Core MIDI enabled can take advantage of this.
Virtual MIDI: Off by default. When enabled, causes Noatikl to present a number of Virtual MIDI ports - one Omni (all channels) and 16 per-channel virtual MIDI ports - and Noatikl sends MIDI events as Virtual MIDI ports over Core MIDI.
MIDI Clock: Off by default. When enabled, tells Noatikl to send-out MIDI Clock events over Core MIDI / Omni channel.
Latency: 100ms by default. Sets Latency (milliseconds) to apply to MIDI events sent-out to Core MIDI / Virtual MIDI by Noatikl. Use to help remove jitter if using e.g. Network MIDI.
Tuning: Off by default. Useful option for tuning external analog synths - causes all notes sent-out by Noatikl to be "forced" to the specified pitch.
This view is where you select and (real-time) edit the Rules used in your voice or piece - be they Scale, Harmony, Next Note or Rhythm rules.
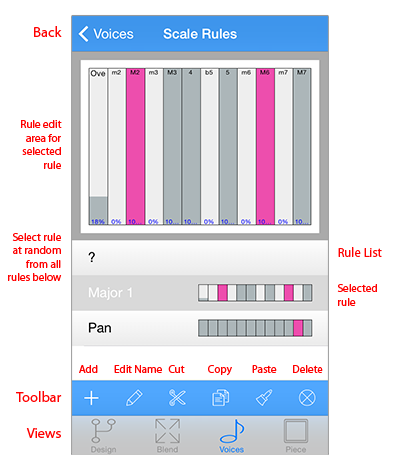
Rule Editor View
This control lets you change the rule elements. Tap on the element to change its value. The composition engine accomodates all rule changes in real-time - which can be a lot of fun!
So that you can tell when a voice using the currently selected rule composes using it, it flashes the colour of the voice type used by that voice. This is primarily to remind you that other voices rely on that rule, so if you are going to change it then the way other voices compose may change, too. It can be useful to have the same rule used by all voices, but if you want to, then each voice can have its own rule!
Below the Rule Edit area is a scrollable list contains all of the defined rules. Tap a rule to select it so that you can edit it in the Rule Edit area above.
The toolbar contains the Add Rule button, as well as a the Edit Rule Name, Cut, Copy and Paste buttons and the Delete button. When you select the Add Rule button you are presented with a set of included default rules. For Scale rules these include Major, Minor, Dorian, Hypodorian, Hypolydian, Hypomixolydian, Hypophyrgian, Lydian, Mixolydian, Pentatonic, Phrygian.
This view is where you edit all the Pattern parameters. Patterns are a little tricky to use in the mobile version (because of limited string editing), so be aware.
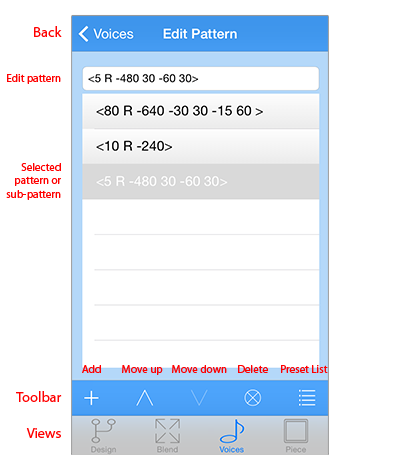
Patterns View
Tap in the field to edit the NME Pattern or Sub-pattern. The NME Pattern Syntax can take a bit of getting used to and you will need to study it carefully if you want to use patterns.
The toolbar contains the Add Pattern button, as well as a the Up and Down buttons to move patterns up and down, the Delete pattern button and the Presets button. Select the Presets button display a list of preset included patterns to choose from.
IMPORTANT: The pattern you select in the presets list OVERWRITES your current selected pattern.
Patterns are a way that can be used to create hidden structure in a piece. Set up a voice to be of Voice Type Pattern, set its volume to be zero (e.g. in the Blend view), but do not mute it (or it will not count in terms of composition). Then, follow that Fixed Pattern voice with another voice. Set up the following voice with Chords Strategy set to Chordal Harmony and you will never hear the pattern but it will be used as an invisible skeleton around which to compose! If you want to hear the pattern, set Follows Strategy to Semitone Shift.
iPhone: https://youtu.be/8KSKL_EB2H8
iPad: https://youtu.be/hbYKbP96vWU
See also the list of available Noatikl videos.
Intermorphic is just Tim Cole & Pete Cole and we have many people to thank for their support and help at different times over the years. Their efforts have helped us get to where we are today with all the IM apps/tools, including Noatikl and the NME (which is in all our apps). The list below is an ever expanding one, in no particular order, and does not include everyone (sorry to those we have missed!):